目录 - my-eaget.eu Web viewContent. 1. 1 Introduction. 1. 1.2 Announcements. 1. 1.3 Safety...
52
Content Content.........................................................1 1 Introduction..................................................1 1.2 Announcements............................................1 1.3 Safety Instruction.......................................2 1.4 Abbreviation/Terminology.................................3 2 MID Introduction.............................................3 2.1 MID Accessories Introduction.............................3 2.2 MID Usage and Preparation................................4 2.3 MID Status and Reminder..................................4 3 Quick Start Guide............................................5 3.1 Keys Function............................................5 3.2 Startup and Shutdown.....................................6 3.3 Open and Close the Screen................................6 3.4 Usage of Touch Screen....................................8 3.5 Main Interface...........................................8 3.6 Visit Application Procedures............................11 3.7 USB Connection..........................................12 3.8 Input words.............................................13 3.9 Application Technique...................................14 4.1 Voice and display.......................................15 4.2 Basic setting...........................................16 4.3 SD card and MID memory..................................17 4.4 Date and Time...........................................18 4.5 Setting Language........................................18 4.6 About Tablet............................................19 5 Multi-Media..................................................19 5.1 Music...................................................19 5.2 Music...................................................20 5.3 Video...................................................21 5.4 Photo gallery...........................................22 5.5 Camera..................................................23 6 Connection Establishment.....................................25 6.1 WIFI connection.........................................25 6.2 Email...................................................26 7 Internet.....................................................28 1
Transcript of 目录 - my-eaget.eu Web viewContent. 1. 1 Introduction. 1. 1.2 Announcements. 1. 1.3 Safety...

Content
Content..............................................................................................................................................11 Introduction...................................................................................................................................1
1.2 Announcements...................................................................................................................11.3 Safety Instruction................................................................................................................21.4 Abbreviation/Terminology..................................................................................................3
2 MID Introduction......................................................................................................................32.1 MID Accessories Introduction............................................................................................32.2 MID Usage and Preparation................................................................................................42.3 MID Status and Reminder..................................................................................................4
3 Quick Start Guide.....................................................................................................................53.1 Keys Function.....................................................................................................................53.2 Startup and Shutdown.........................................................................................................63.3 Open and Close the Screen.................................................................................................63.4 Usage of Touch Screen.......................................................................................................83.5 Main Interface.....................................................................................................................83.6 Visit Application Procedures.............................................................................................113.7 USB Connection...............................................................................................................123.8 Input words.......................................................................................................................133.9 Application Technique......................................................................................................144.1 Voice and display..............................................................................................................154.2 Basic setting......................................................................................................................164.3 SD card and MID memory................................................................................................174.4 Date and Time...................................................................................................................184.5 Setting Language..............................................................................................................184.6 About Tablet......................................................................................................................19
5 Multi-Media.................................................................................................................................195.1 Music................................................................................................................................195.2 Music................................................................................................................................205.3 Video.................................................................................................................................215.4 Photo gallery.....................................................................................................................225.5 Camera..............................................................................................................................23
6 Connection Establishment...........................................................................................................256.1 WIFI connection...............................................................................................................256.2 Email.................................................................................................................................26
7 Internet.........................................................................................................................................28
1

7.1 Browser.............................................................................................................................288 Other applications........................................................................................................................308.1 Clock.........................................................................................................................................30
8.2 Calculator..........................................................................................................................318.3 File Management..............................................................................................................31
9 Installation of Application Procedures.........................................................................................349.1 Installation........................................................................................................................349.2 Uninstall............................................................................................................................349.3 Update Path.......................................................................................................................35
10 System Upgrade.........................................................................................................................3510.1 Preparation for System upgrade......................................................................................3510.2 Restore Factory Setting...................................................................................................3510.3 System Upgrade..............................................................................................................36
11. Troubles Shooting.....................................................................................................................38appendix 1...............................................................................................................................39
12. How to use Digital TV..............................................................................................................4013. How to use GPS........................................................................................................................42
2

1 Introduction
1.1 Acknowledgement
Thanks for your purchase of our product. The product is MID (Mobile Internet Device), it is a high end product, with with a touch screen which resolution of 800x480 pixel. It is designed with TTC8923 high speed processor and 512RAM, and 4GB flah. The operating system is Android 4.0.
The product is built in WIFI module, front and rear camera, it is easy to complish internet function, it can be viewed high definition video and photos, it can also support camera shooting and video shooting function. Besides, it is available for many office and entertnaimnet applications. Brand new operation interface will provide you with diferent enjoyment.
The manual systemically introduces the functions, use techniques and announcements, please read this manual carefully before your operation.
1.2 Announcements
Preventive maintainance
Please always keep the MID dry. To avoid the device short trouble, corrosion fault and electric short, please prevent the device, battery and charger from water and moisture, and don’t operate the device or charger by wet hand.
To avoid failure of device, battery and charger, please prevent the device, battery, charger from violent shock or shake.
To avoid failure of device, battery and charger, please prevent the device, battery, charger of all over heating or too cold circumstance
Never shock, throw, prod the MID, or drop, extrude, bend the MID.
Never disassemble the device and accessories arbitrarily, otherwise the device and accessories are not in our company warranty scope.
1

1.3 Safety Instruction
Before the operation of the MID, please read this chapter and teach your kids about these information. For further details, please refer to the safety instructions and announcement.
Never use the MID when driving car, in order to ensure safe driving.
In the medical area, please abide by related rules and regulations. Please shut down the MID when it is near to the medical area.
To avoid the wireless signal to interrupt the plane- controlled signal, please shut down the MID or using airplane mode when you are boarding a flight,
To avoid electronic equipment failure, please shut down the MID in the vicinage of high-accuracy electronic equipments.
Please don’t disassemble the MID and accessories. Only authorized agent has access to service the MID.
Please keep the MID far away from magnetic equipments, the radiation of MID may erase the data stored in the magnetic equipments.
Never use the MID in the vicinage of high temperature, inflammable gas ( gas station).
Protect the MID and accessories from kids reach scope, and avoid the kids to use the MID without parents’ supervision.
Please comply with related rules and regulations, and respect others’ privacy and legal rights while using the MID.
Please strictly adhere to related instructions in the manual when using USB cable to ensure the safety of the MID or PC.
Never use the MID in bathroom or other humid environment, and please protect the MID from liquid wash or wet.
2

1.4 Abbreviation/Terminology
Abbreviation/Terminology Full Name Description
MID Mobile Internet Device
mobile internet terminal
WIFI Wireless Fidelity Base on IEEE 802.11b standard wireless LAN
TF TransFlash Alternative name is Micro
SD , super miniature memory card
HDMI High Definition Multimedia Interface
HDMI: HighDefinition
Multimedia Interface
2 MID Introduction
2.1 MID Accessories Introduction
Package:
Below items are included in your MID package, please confirm:
MID complete device
power adptor
USB cable
Earphone
Leather case
User’s manual
Warranty Card
3

Qualification certificate of product
2.2 MID Usage and Preparation
Battery Charging
If this device is first used, please use AV adaptor to fully charge it.
1. Apply the power adptor to charge for MID.
2.3 MID Status and Reminder
Reminder icons:
When some remind message appears in your reminder window, please click column and slip the screen to open the reminder list. Choose the menu you need, and confirm the information. Then you can close the reminder window through clicking the column to slide up. Please refer to below status icons.
New email airplane mode
USB is connected USB adjustment is connected
Home keydownloading
Menu key Home key
Battery volume mark WIFI service has been
connected, available to internet
No SD card Alarm on
General Notice Mute
4

Reminder board
Reminder icons will work while receiving emails, alarm is set, and connect WIFI, you can open the reminder board to view the detailed information.
Open the reminder board
When the reminder column shows new reminder icon, please hold the column and slip down your finger, then the reminder board is opened.
3 Quick Start Guide
3.1 Keys Function
keys function description:
5
Volume-
Volume+ Power key
search key
Return key
Home key
Menu key
Return key
Home key Menu key

Power key(power) Short press to dormant/awake function, long press to turn in/off.
Volume +(up) increase volume
Volume-(down) decrease volume
Menu key(menu) Click it to open the menu in current interface.
HOME key(home) Click it in any interface to return main menu interface.
Back key(back) Click it in any interface to return previous menu.
Search(search) Click it to enter into Google search.
3.2 Startup and Shutdown
Startup
Long press Power key for three keys, you can enter into startup picture. The system enters into screen locked status, please unlock it to enter into main interface to operate.
Shutdown
1.Long press Power, it will popup shutdown window.
2.The setting includes mute mode and shutdown, as Picture 3-11.
3.Clicking Shutdown is the last step.
Picture 3-1
6

3.3 Open and Close the Screen
Screen will be closed on its own when no operation happens.
1. Screen will be closed on its own if no operation happens for some time to save battery power.
2. When screen is open, press Power key, the screen will be closed immediately.
Open the screen when it is closed.
If the screen is closed, short press Power to open the screen. The screen will be locked as Picture 3-2 after opening it, hold “lock” icon via finger or touch pens and slid up it to camera, as Picture 3-3.
Picture 3-2
7

Picture 3-3
3.4 Usage of Touch Screen
MID operating methods
There are many methods to view the main screen, menu and applications of your MID.
Click
When you want to use the screen keyboard input or choose application in the main interface, you only need to touch it by finger.
Press on
If you want to open some item( textbox or the link in the webpage), or shortcut and main procedure move, you can press on this item.
Quickly slide or slide
Quickly slide or slide indicates make quick vertical or horizoncial movement via finger or touch pen.
Pull
Before you pull, you need to hold it with strenghth until you pull it into the position you want.
Rotate
For most pictures, you only need to rotate the MID sidewise to change the screen direction from horizoncial to vertical. For instance, when you are inputing wods, and listening MP3.
8

3.5 Main Interface
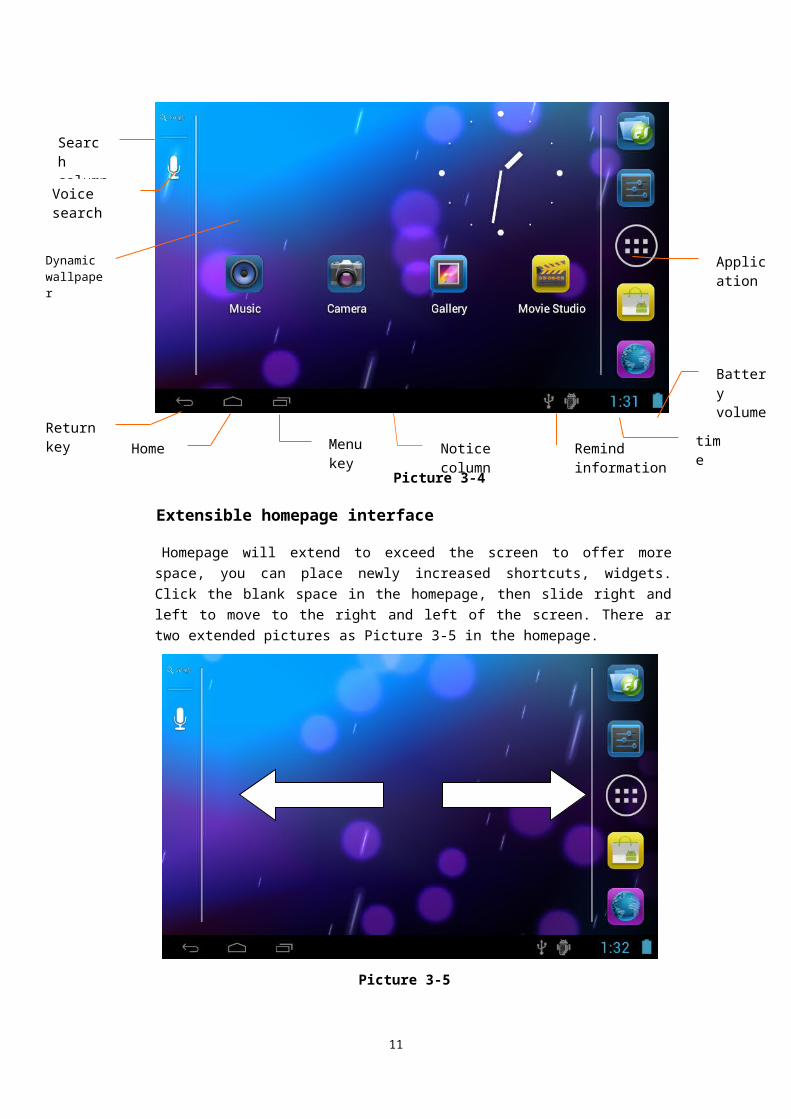
Main menu screen will show all the applications as below Picture 3-4. You can use applications, shortcut and define your main interface wallpapers.
Picture 3-4
Extensible homepage interface
Homepage will extend to exceed the screen to offer more space, you can place newly increased shortcuts, widgets. Click the blank space in the homepage, then slide right and left to move to the right and left of the screen. There ar two extended pictures as Picture 3-5 in the homepage.
9
Remind information
Notice columnHome
Search column
Dynamic wallpaper
Return key time
Application
Battery volume
Menu key
Voice search

Picture 3-5
Shortcut icons management of desktop applications
System below Android 2.3has the function of creating folder in the desktop, and put the icons in the folder. Android 4.0 systemmake the folder creation more simple. The steps are as below:
1. Draw all the icons together, as Picture 3-6 shown.
2. Then click the composited icons to open all the applications as Picture 3-7.
3. Click unnamed folder below black frame, it will popup hidden keyboard, and you can rename this folder(it is silimar with IOS system.)
10
Picture 3-6
Picture 3-7Delete the icons in the desktop
1. Click and hold the icon needs to delete, the top left will show the icon.
2. Draw the icon to the upper of the DELETE icon till the icon turns to red, then move your ginger to delete.
Change the destop wallpaper
1.Click and hold the blank space in main screen, it will popup the window to change the wallpaper.
2.Click the photo gallary or wallpapers gallary to choose photo.
Voice search
1. Touch the Microphone icon 。
2. You can choose according to your need in the google selection.
3. You can sest the language according to your need in the voice search frame, click OK to confirm.
4. Keep your mouth direct to the microphone, and speak out the content you need to search, the broswer will open the search result list.
Note: Please make sure the internet is welll connected before voice search.
11

3.6 Visit Application Procedures
How to visit the application procedure of MID:
1. Click button in Picture 3-6, enter into application procedures, as Picture 3-8:
2. Choose the application procedure you want to visit.
Picture 3-8
3.7 USB Connection
MID storage configurationBefore transmitting documents, you have to conduct storage configuration for your MID:
Connect MID and PC via USB connection, the reminder column will show the remind information.
1. Open the reminder board; please view the Chapter 2.3 MID status and reminder to learn how to open the board.
2. In the remind board, click USB is connected, then touch to open USB memory device, as Picture 3-9.
3. Now USB is well connected.
12

Picture 3-9 Copy the file into memory card
1. Connect MID and PC via USB connector.2. Operate as the MID memory setting to connect the MID and PC.3. Open “My computer” to view Mobile disk(x).4. Copy the file you need to copy into “Mobile disk(x)”.5. After copying, click “close USB memory” in your computer to uninstall.
Note: When you MID is connected in USB cable, if you open the USB memory device, you can visit the memory card through MID. If you hope to visit the memory card, you need to disconnect the USB cable.
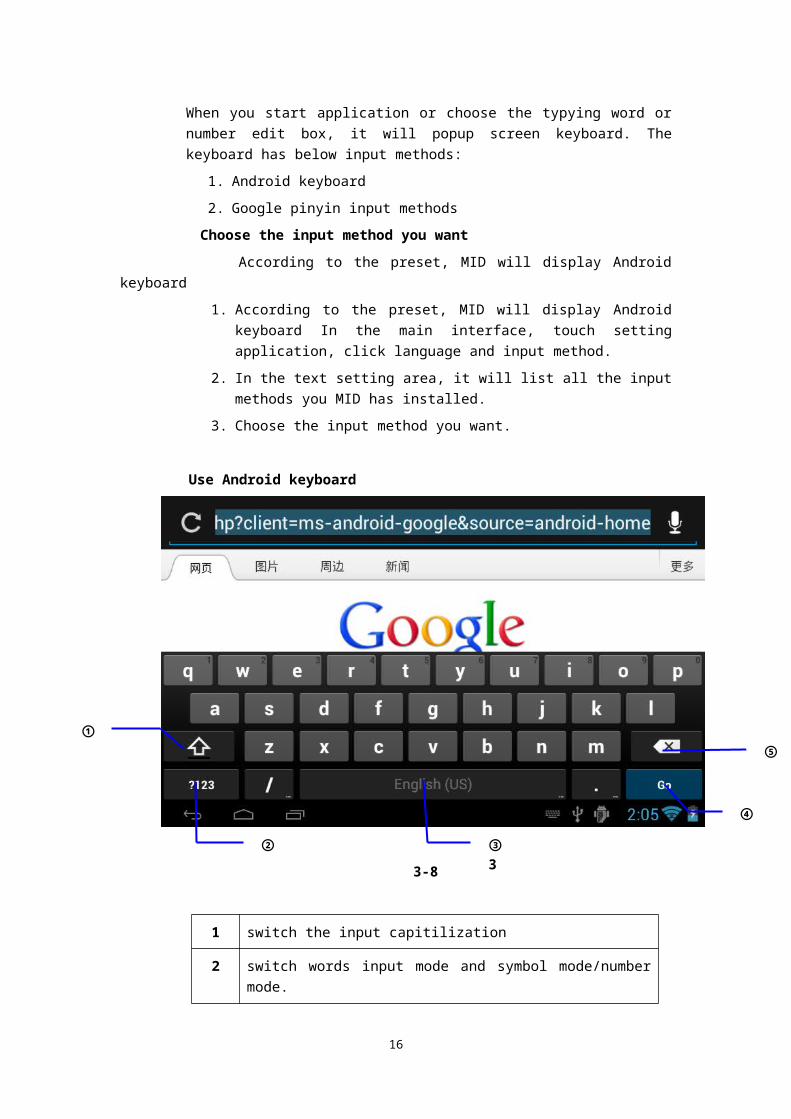
3.8 Input words
Use screen keyboard
When you start application or choose the typying word or number edit box, it will popup screen keyboard. The keyboard has below input methods:
1. Android keyboard
2. Google pinyin input methods
Choose the input method you want
According to the preset, MID will display Android keyboard
1. According to the preset, MID will display Android keyboard In the main interface, touch setting application, click language and input method.
2. In the text setting area, it will list all the input methods you MID has installed.
13

3. Choose the input method you want.
Use Android keyboard
3-8
1 switch the input capitilization
2 switch words input mode and symbol mode/number mode.
3 click to insert space.
4 click to enter.
5 delete the word next to cursor, click and hold to delete all the charactics.
3.9 Application Technique
Enter into the widgets interface window
Click the window wigdet on the top of the screen in the application interface or left slide the screen, it will turn to the window widgets interface. Long click any component to turn to shortcut, and you can enter into application through the shortcut.
14
①
② ③3
⑤
④

Creat the application shortcut icons in the desktop
In the application system and widgets interface, long click any icon to switch into desktop, draw and hold the icon to put in any place in the desktop.
Remind: System will provide you with more choice and activate this widget, if no space in the target position, the widget will not be added into the main screen.
Switch the screen
Android 4.0 applies to the multi-screen display, touch the screen via your finger and slide right or left the screen to switch the screen.
4 Basic setting
4.1 Voice and display
Multi-media volume setting
1. Click setting application in the main interface.
2. Click Voice.
3. Click volume to adjust the volume for music and video.
4. When popup volume setting board, left or right progress bar to control.
5. click confirm.
Display setting
Adjust the bightness of screen
1. Click Setting application procedure in main interface.
2. Click display.
3. Click brightness when the menu popup.
4. It will popup setting board, left and right slide the brightness bar to adjust the brightness.
5. Click OK.
Adjust screen standby time
1. Click Setting application procedure in the main interface.
2. Click display.
15
i. Slide down the screen, and click dormant.
ii. It will popup screen standby time setting, choose the standby time you want.
4.2 Basic setting
Setting screen lock.
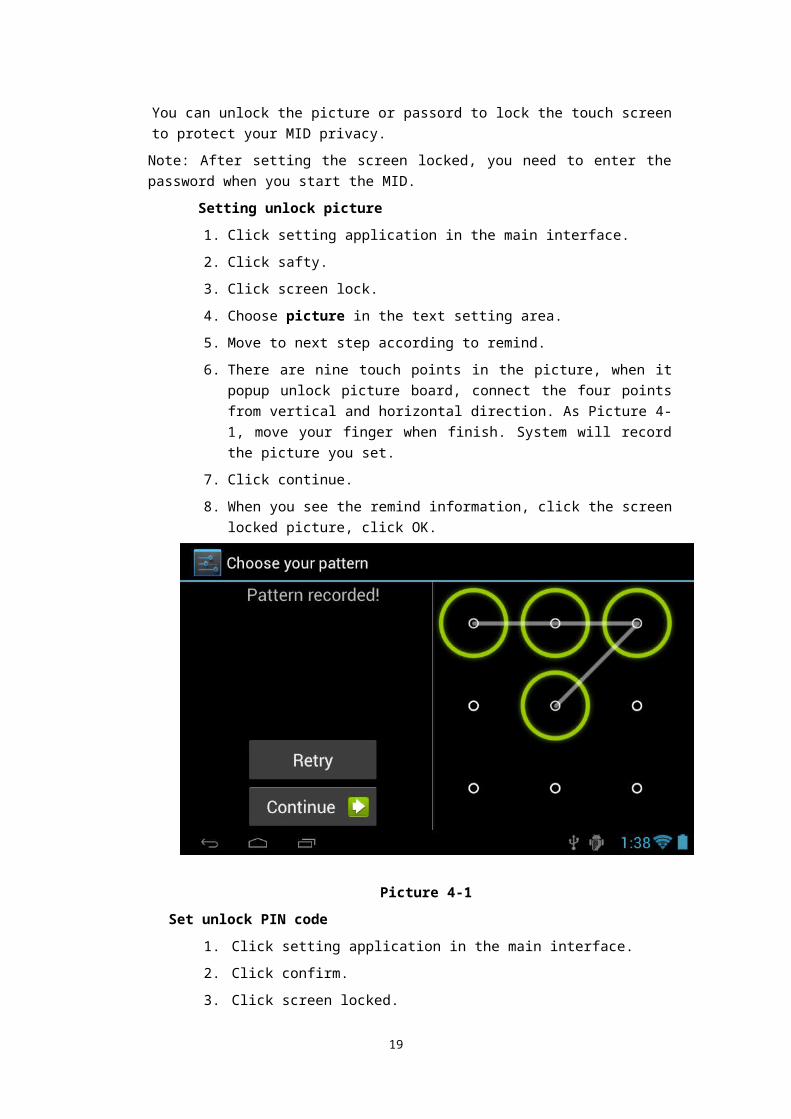
You can unlock the picture or passord to lock the touch screen to protect your MID privacy.
Note: After setting the screen locked, you need to enter the password when you start the MID.
Setting unlock picture
1. Click setting application in the main interface.
2. Click safty.
3. Click screen lock.
4. Choose picture in the text setting area.
5. Move to next step according to remind.
6. There are nine touch points in the picture, when it popup unlock picture board, connect the four points from vertical and horizontal direction. As Picture 4-1, move your finger when finish. System will record the picture you set.
7. Click continue.
8. When you see the remind information, click the screen locked picture, click OK.
16

Picture 4-1
Set unlock PIN code
1. Click setting application in the main interface.
2. Click confirm.
3. Click screen locked.
4. Choose PIN when it popup text setting area.
5. Enter new PIN code and click continue.
6. Enter new PIN code again and choose OK.
setting unlock password
1. Click setting application in main interface.
2. Click safe.
3. Click screen locked.
4. Click password in the text setting area.
5. Set new password(letters and number) and click continue.
6. Enter password again and click confrim.
4.3 SD card and MID memory
View SD card and MID memory available space
1. Click setting application in the main interface.
17

2. Click memory.
3. View the available spce in SD card.
4. View MID internal memory space.
Remove SD card safely
Remove the SD card safely can prevent the SD card and extend the SD lifetime.
1. Click setting application in main interface.
2. Click memory.
3. Click remove SD card.
4. Pull out SD card.
4.4 Date and Time
Manual adjust date, time and zone
1. Click Setting application procedure.
2 Slide down screen, and click date and time.
3 Click select time zone, and coose the zone in the list. Slide down to view more zone information.
4 Click setting date and then click up and down button or slide up and down to set area to adjut date, month and year, click setting when finish.
5. Click setting time and click up and down or slide up and down to setting area to adjust hour and minute, click AM or PM to change the morning and aftfernoon(there is no such selection when you choose 24 hour format), click setting.
6. Click to choose 24 hour format, you can switch between 12 hour format and 24 hour format, the selected time format will be used on the alarm.
7. Click choose date formats, and click the date formats in MID.
4.5 Setting Language
1. Click setting application in main interface.
2. Click langauge and input method.
3. Click language, and select the language you want, slide down to search more language.
18
4.6 About Tablet
View the MID Status
1. Click Seting application procesure.
2. Click About Tablet, you can view the electric volume, status messages and so on.
System update
1. Click Setting application procedure in main interface.
2. Click About tablet.
3. Click System update, update as steps.
4. click Install system update if there is new veersion. (Please confirm there is new version TF card in device before installation.
View system version
1. Click Setting application procedure.
2. Click About Tablet.
3. You can view model NO., Android version, firmwave version and internal version.
5 Multi-Media
5.1 Music
Your MID support below formats
Music file formats
MP3 AAC OGG WAV APE FLAC AMR WMA
19

RA (License)
Supported video formats
AVI MPG VOB MKV FLV TS/TP H264 MPRC-4 RMVB(License) DIVX MPEG-2 3GP MP4 MOV
Supported photo formats JPEG GIF PNG BMP
5.2 Music
You music can be divided into four types: artists, album, and music and play list. Choose a type to view the list. If enter into one type, continue to choose, until the music you want to play appears. For example, if you choose artist type, you can see the artist name from A to Z, if you choose one artist, list will display the artists’ album and album list.
20

Picture 5-1
Visit and play music1. Click music in the main interface.2. Enter to select music and click artist, album and play list.3. Select any music to play.
Add the music into new play list
1. Click music in the main interface.2. Enter to select music.3. Click and hold the music you want play.4. Click music setting menu, click add into play list.5. Click new builder list.6. Input name into play list.7. Click save.
Delete the music in play list1. Click music.2. Click music.3. Click and hold the music you want delete in the play list.4. When popup music setting menu, click delete to finish.
5.3 Video
Visit video
21
Cover of album cover
Artist
Previous song
Music
Played time
View current play list
Random play
repeat time
Music total time
Play progress bar
Album
pause
Next song

Enter into video player: in the desktop choose application procedure, choose the video you want to play.
1. Click gallery application.2. MID refresh all video files.3. Click the file you want play.4. Enter into play picture to play. Note: You can choose related player, (if there are many players installed).
5.4 Photo gallery
Photo gallery application can be search into SD card memory card and video file, and photo gallery will devide the photos and video photo, you can use the photo gallery application to view and edit phot, and set the desktop and view photo.
View phots
1. Click photo gallery application in main interdface.
2. Enter into photo gallery, click the file you want to view and.
3. Click the photo you want to view, system will view the photo in full screen.
4. When you view photos, you can zoom in and out, touch the screen with two finders, and pull the fingers and sperate the fingers to decrease and inscrease the photo or double touch screen.
Technique: when you view photos you can slide left and right to switch the photo.
Eidt and setting photo
When you view the photo in full screen, click menu key to display menu, you can select the selection to edit and set photo.
film slide
1. Open any photo, touch menu key to display menu selection.
2. Click play the film slide, it will auto play(or in the photo gallary selection button).
Shave
1. Click menu key to display menu selection.
2. Then click shave, click draw related area to adjust trimmer.
3. Click trimmer to draw bigger and smaller to adjust size.
4. After adjust the size, click shave to finish.
22

5. Click cancel return to photo scan if you want give uo shaving.
Edit
1. Click menu key, it will display menu.
2. Click edit.
3. Set brightness, style and result setting in the selection popup.
4. Click save.
5. Click return key to give up editing in the popup box.
5.5 Camera
Camera application and video shooting function, includes two caremas, one is front camera(300.000piexl), another is rear camera( 2 million pixel), rear camera provides “ full screen” mode, can make you shoot the photo single picture through move the camera lens.
Open the camera
You can open the camera through below two ways:
1. Slide the screen (if you already set the setting to “slide”, slide down the
icon to camera icon.
2. Touch camera icon in the main screen or all application. Camera operation button as Picture 5-2
Switch camera: select button to switch camera.
23

Picture 5-2
Take photos
1. open camera, make sure your device is in camera mode, screen will display camera icon, as below picture shown:
2. Aim at the target you want take phots.
3. Touch blue button to take photos.
Note: To avoid the unclear photo, please catch the MID tightly and stably, you‘d better touch the blue button as soft as possible.
Record video
1. Enusure your device is in video mode:
2. Move the camera lens to the target you want to shoot.
3. Touch red button , the system starts to record video. During the record, the red button will display a white diamond.
4. Touch the red button when finish record.
Remind:
24
switch front and rear camera
full screen mode
video shooting mode
photo shooting mode
submenu
click to take photo
View photo and videos

The photos and videos will save automatically.
You can view the photos and videos you have recorded.
If you want view more photos and videos you can slide left and right.
When you view the photos, move together or separetly to zoom in or out the photos or double touch the screen.
.when you view videos, if you want to play the video, click play button
.
Pan-shot
Open the camera, make sure your device is in full screen mode, the screen will display full screen icon, as below picture:
1. Aim at the scene you want to shoot from one end to another end.
For example, if you want to shoot one bridge, please shoot your camera from the head of the bridge.
2. Touch green button , then smove the camera from the whole scene.
Take bridge for example, you need to move the camera from one angle to another, if you move too fast, the screen will display fast charaters.
3. During the shooting, green button will display a white diamond.
4. After shooting finishes, reclick the green button, the system will display full screen photo, and the camera will display the progress bar when saving photo.
Remid: to view photos, please touch the thumbnail beside green button.
6 Connection Establishment
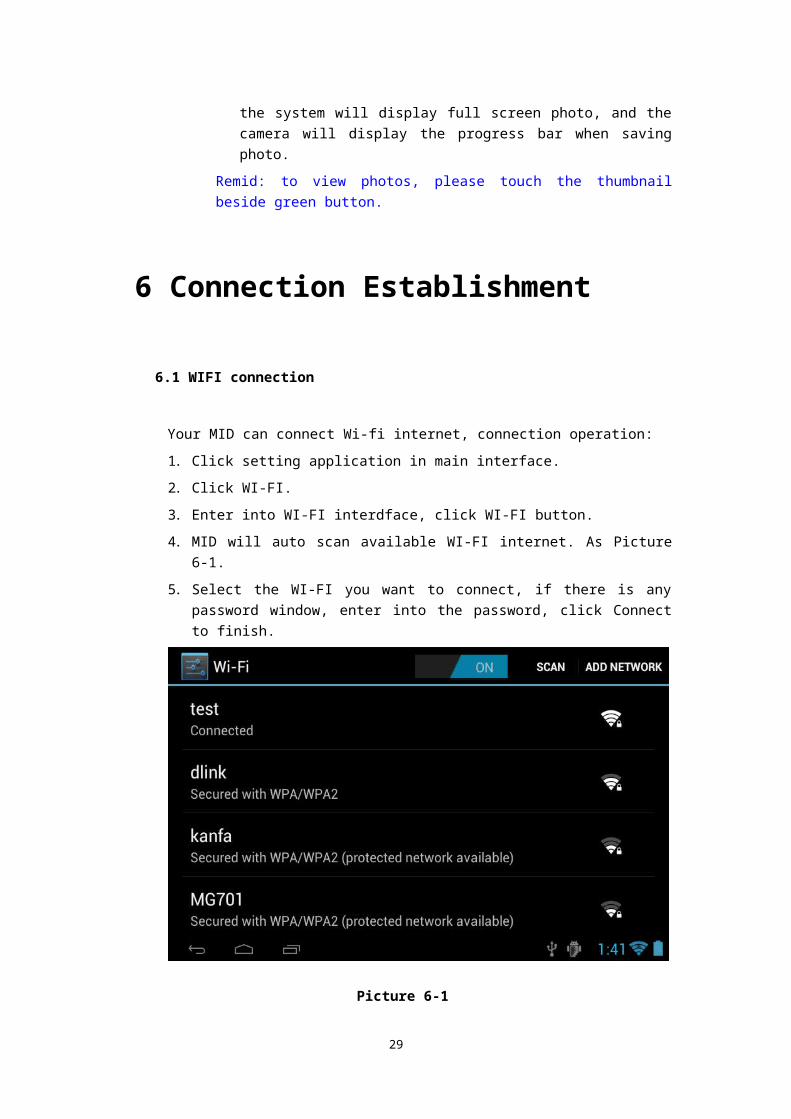
6.1 WIFI connection
Your MID can connect Wi-fi internet, connection operation:
1. Click setting application in main interface.
25

2. Click WI-FI.
3. Enter into WI-FI interdface, click WI-FI button.
4. MID will auto scan available WI-FI internet. As Picture 6-1.
5. Select the WI-FI you want to connect, if there is any password window, enter into the password, click Connect to finish.
Picture 6-1
6.2 Email
Email setting
Email application attaches email setting guide, you can add ordinary web email service to the external POP3 or IMAP email account of provider (such as Yahoo, Gmail and 163)
26

Picture 6-2
Note: before starting email setting guide, please ensure your internet is well connected.
Email seting guide
1. Enter into main interface, as Picture 6-2
2. Click email icon, it will popup email setting guide to help you to set, as Picture 6-3.
3. Enter into your email account address and paaword.
4. Click next button, choose your email type is POP3 or IMAP.
5. Click next button to check the email receiving and sending is available or not.
6. Enter into account name and the email sender’s name, click finish.
7. If the mailbox is available, it will enter into your inbox.
27

Picture 6-3
Delete email account
You can delete the set POP3 or IMAP email account from your MID.
1. Click email.2. Enter into your inbox.3. Touch menu key.4. Click setting.5. Touch your account via your finger.5. It will popup menu list, slide down the screen and click delete account.6. Click Ok to delete.
Send E-mail
1. Click Email to display your mail box.2. Click the inbox, it will refresh the new emails automatically; click it to read new
email.
3. Touch button in the top of screen.
4. Enter into edit new email interface.5. Input the receiver’s email address in the receiver column.6. Input subject and email content.7. Click add attachment, touch menu key, it will popup menu.8. Click add attachment.9. Select the attachment you want to send (pictures, videos)
10. Click send button to send the email.
7 Internet
7.1 Browser
open and use internet browser
Touch browser icon in main screen or all application screen.
Broswer will open the previous webpage you visit, ig you haven’t use browser, it will open your main webpage.
When you touch any internet connection (for example, emial or chatting internet), it will open the browser.
28
On the top of the screen, it will display the current URL, expect address column(multi-function column) slip to the positon beyond the top. In this case, slide down can display the adddress column again.
Set the main webpage.
1. Touch the browser icon in main screen.2. Touch menu key to popup browser setting menu.3. Slide down the menu, click setting.4. Click normal.5. Click setting main webpage.6. Select the method of setting main webpage in the setting column.7. MID Restart after selecting.
Visit webpage
1. Touch browser icon 2. Input the website you want to search in the soft keyboard.3. Click finish to search website.
Picture 7-1 View the webpage
Open the webpage as Picture 7-1, click address column to input address, click starrt, enter into related webpage to view corresponding website information, you can slide your finger in the screen to browse and view the other parts of the webpage.
29
地址栏

Increase and decrease the webpage
After opening the webpage, you can draw the webpage, below the browser, it will appear increase and desearce button, you can click to increase and decrease the webpage.
Search the words in webpage
a) When you view the webpage, touch the menu key, it will popup menu selection.
b) Click search in the webpage.
c) Input the item you want to search.
d) When you input words, the relavant words will turns to be blue colre instead of white.
e) Click up and down arrow button in the right of search column to move to previous and next relavant word.
Bookmark management
setting webpage bookmark
1. Go to any webpage in browser interface.
2. click menu key and click save to bookmark.
3. Edit bookmark and click OK.
Open bookmark
1. Click menu and bookmark in browser interface.
2. Click the bookmark you want to open the webpage.
Edit bookmark
1. Click menu key and click bookmark.
2. Click and hold the exsiting bookmark to open menu.
3. Click edit bookmark and edit, then click OK.
Save current webpage to read when no internet.
You can save all webpage into MID in case afterwoards reading (even if no internet is connected.)
1. When you view the webpage, please touch menu repondingly to save it for reading without internet.
30

2. Below the save webpage bookmark, it will display the thumbnail, to return to the real webpage, please touch “return” button.
3. To view saved webpage, please touch “lable page” icon , then touch menu> saved webpage, and the thumbnail of this webpage.
8 Other applications
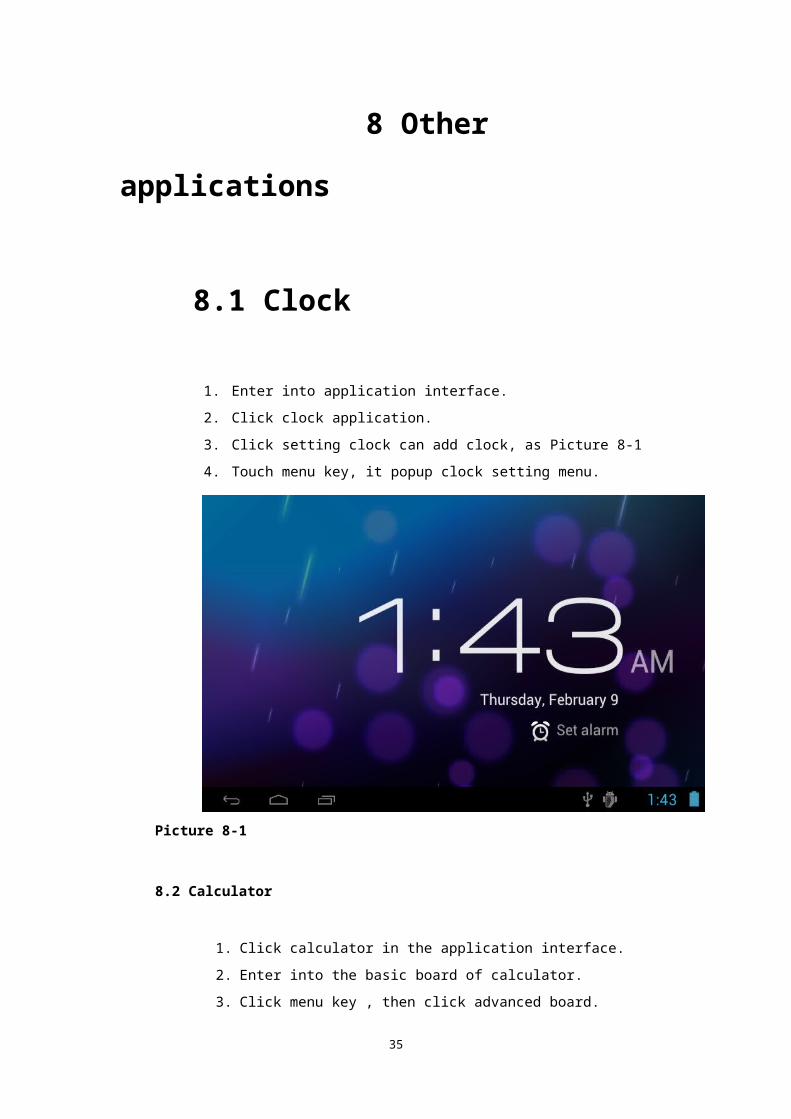
8.1 Clock
1. Enter into application interface.
2. Click clock application.
3. Click setting clock can add clock, as Picture 8-1
4. Touch menu key, it popup clock setting menu.
Picture 8-1
31
8.2 Calculator
1. Click calculator in the application interface.
2. Enter into the basic board of calculator.
3. Click menu key , then click advanced board.
4. Touch the number or operator in the calculator.
5. Operate advanced noard as above operations can switch into basic board.
Remind: you can left or right silde to switch the basic board and advanced board.
8.3 File Management
Browse file
You can use file browser edit and delete file and folder. And you can also build share and FTP servicer to make resources be shared.
SD card read path
1. In the main interface, touch file browser button , enter into file browser interface, as Picture 8-2.
2. Touch button in the top of file browser
3. Popup folder, as Picture 8-3, click /mnt/ext_sd.
4. Open the file, you can view the file in SD card, as Picture 8-4
32

Picture 8-2
Picture 8-3
33
Picture 8-4
Cut and copy the file
1. Click the file you want operater in the file browser.
2. It popup operation menu, includes cut, copy, delete, rename, select all, set main menu and property.
3. Click cut or copy file or folder.
4. Click to enter into the folder you want to paste, touch menu key to popup menu.
5. Click operate, then click paste to finish.
Delete file
1. In the file browser, click and hold the file you want to delete.
2. Click delete.
3. Click OK to deledte file.
Create folder
1. In the file browser, touch menu key to popup menu.
2. Click create.
3. Click folder.
4. When popup window, input the new folder name in edit column.
5. Click OK to create folder.
Fast search
1. Click menu to popup menu in file browser.
2. Click create.
3. Click search.
34
4. Popup search file board.
5. Input the key words in name edition column.
6. Click OK.
7. The system will auto display the search result after search.
9 Installation of Application Procedures
9.1 Installation
Install the third part application procedure
You can gain the third party application procedure which match the Android system from internet, and install it by yourself in MID. Copy the application procedure into SD card, and insert in the MID.
1. Click ES file browser; choose the application you need to install.
2. Hold the application you want to install.
3. Popup installation, clicks install APK.
4. You can operate after installation guide.
Note: The third party procedures searched from internet to use on the system are all suffixed with .apk.
9.2 Uninstall
Uninstall application procedure
Click setting in main interface.
1. Click application procedure, it will list all the application list.
2. Select the application you want to uninstall, click uninstall.
3. Click OK to finish uninstallation.
Tip: The procedure manager installed by system has many convinent methods
to uninstall, after opening procedure manager, click uninstall, it will list all the application procedures installed by system.
35

9.3 Update Path
Update the application procedures of Android system
Download the latest application procedure from apponted website.
Download form the Android system related software forum in the internet.
10 System Upgrade
10.1 Preparation for System upgrade
Download the upgrade procedure
You can download the software upgrade pack from website, then use the upgrade pack to upgrade the system version of MID.
Preapration for system upgrade:
1. Download the system upgrade pack to your computer from related websit.
2. Prepare the toolf for system upgrade; one TF card, file sytem FAT or FAT 23 format both ok.
10.2 Restore Factory Setting
When your MID occures some serious mistake or unlocked passwords are forgotten, you can apply restore factory setting to return to factory status. Restore the factory seeting will delete all the data such as exisiting application procedures and user’s setting, do remember to backup your data.
1. When the device is in shutdown state, hold the Volume up key by one hand, and press Power key into upgrade picture by another hand.
2. Enter into upgrade picture, the picture is a triangle with a exclamation mark.(As Picture 10-1)
3. Click Volume- key when you see the triangle.
36

4. The system enter into another picture, recovery status, there are six items for option.(As Picture 10-2)
5. The first option: Restart the system. The second option: System upgrade. The third option: Ripe data/ Factory reset. The forth option: Ripe caching data. The fifth option: LOGO upgrade。Backup user’s data. The sixth option: copy user’s data. The seventh option: input the serial NO.
6. Now you press Volume down key, the option bar will slide down, press Volume+ key to execute.
7. Choose wipe data/factory reset to execute. As Picture 10-2
8. Enter into confirmation interface, click Yes to restore factory setting, click No to exit the confirmation interface.
10.3 System Upgrade
Note: Before upgrading, please confirm the electric volume of your MID is more than 30% to ensure the upgrade can be finished. Besides, you need to backup your important data, such as application procedures, emails, etc.
Upgrade steps:
1. (First insert the TF card with update zip upgrade package into MG701, the file named update zip)
2. In shutdown mode, click Volume up key, then press Power key to enter into recovery mode.
3. enter into system upgrade picture, the picture is a triangle with exclamation mark, as Picture 10-1
4. Short press Volume- when see triangle.
5. System enters into another upgrade picture, recovery mode; there are seven selections for option. As Picture 10-2
6. The first option: Restart the system. The second option: System upgrade. The third option: Ripe data/ Factory reset. The forth option: Ripe caching data. The fifth option: LOGO upgrade。Backup user’s data. The sixth option: copy user’s data. The seventh option: input the serial NO.
7. Now click volume-to slide up and down, click volume + to operate.
8. Note: before upgrade, you must operate the third wipe data to make sure upgrade successfully.
9. Enter into the second option to enter into the next interface, still select the second option, the system will enter into upgrade mode, it will display the
37

progress remind.
10. After system upgrade finishes, it will remind the words : “Install from SD card complete”。
11. After system upgrade finishes, the option will scan into the first option, now click volume +to exit upgrade interface and to start up.
12. Users can change the system logo by their need, the file format is 16 numbers, windows formats, 800*480, the file name is LOGO, format is .BMP file, path is memory card, choose update the first logo directly to finish, long press Volume- to option, confirm the restart to finish, or select the fifth option upgrade logo in Point 9.
Picture 10-1
38
Picture 10-2
10.4 Safety modeRemind: After entering into safety mode, you can uninstall the software which has occurred
error, after uninstall the software, you need to restart the MID and exit the safety mode.Operation steps:
1. Click power key to startup and display the first LOGO picture.2. Long click Volume- key in Logo interface, and click menu key at the same time,
after entering, on the left bottom will display the safety mode reminder. As Picture 10-3.
Picture 10-3
11. Troubles Shooting
1. The first time to turn on the MID takes too long time.
After updating the system of the MID, it will take 2-3 minutes to install the application softwares. Then, the speed of turning on the MID will be faster than before.
2, Sometimes, the temperature of the MID is a little high.
It is the common situation that the temperature of the MID is a little high when use several applications at the same time or the backlight is maximum or it is
39

charging.
2. MID cannot connect the WiFi.
Make sure the wireless router works well.
The distance between the MID and the wireless router should be within 50-100m and there is no wall or other barriers btween them.
Please make sure the user and the password are correct.
4. Cannot surf the Internet
Please make sure the distance between the MID and the wireless is within 50-100m.
Please re-connect the WIFI.
5. The system cannot run in some situation.
When installing some third party applications, the system may not run. It is suggested to long click the Power button for 6 seconds to turn off the MID.
6. Cannot set the E-mail or register the application system
Please make sure the conncetion of the internet works well.
Please make sure the way to set the E-mail is correct.
7. Cannot read the data of the TF card
Please make sure the TF card inserted into the device correctly.
8. Sometimes, the MID runs slowly.
This is the common situation. But you can close some applications in the tast management interface, or unload some third party application to release more system resourse.
appendix 1
Specifications Products Parameters:
Type Details Description:
Basic parameters
MID model M78DCPU model Teleships 8923,support 3D boostingCPU frequency
1.2Ghz
DDR-RAM 512MBNAND FLASH
4 GB
OS Google Android 4.0
40

Internet Connection
WiFi wireless internet
Camera Built-in two cameras, the back camera is 2 million pixel, the front camera is 0.3 million pixel.
USB connector
Mini
HDMI connector
1920 x 1080PHd digital signal output
battery Polymer lithium battery,3000mAh/3.7V Power adaptor Input AC 100V-240V,out put DC 5V, 2ASD card Support maximum 32G Creen 7.0 inch TFT LCD with capacitive touch panel, resolution 800x480
Applications
Video play Support AVI、MKV and FLV etc. ,support 720P play Audio play Built-in video player which support MP3、MIDI, WAV etc.Games Support third party softwareInput method Pinyin, EnglishPhoto Viewer Support JPG、BMP、PNG、GIF etc.OFFICE software
Support office (word、excel read and edit ),support PDF view
12 How to use Digital TV
Main Interface of Digital TV:
1. Click “DVB-T” on APP.;
2. Click “ search” to search channels;
3. Choose the program you want to watch from the list.
4. Click “ Play” to full screen play;
5. Captured picture could be stored in /SDCARD/Images;
6. Recorded video file could be stored in /SDCARD/Videos.
PS: pls don’t pull out the SD card during recording TV
41

picture:12-1
when play in full screen, press “menu” , the bottom of screen will show below options:
Pic:12-2
Press “EPG” to enter into “EPG” interface, see pic 12-3
42
Volum adjust
Channel list
VideoRecord
Brightness AdjustPicure
capature
Channel search
playinterface
Return to DVB-T main interface
Programpreview
settingProgramswitch
Screen zoom

Pic: 12-3
13 How to use GPS
GPS Interface:1. Click “GPS Test” on APP interface;
2. Enter into GPS Test interface,when signal strips turns to blue, it is positioning;
43
Programpreview
Playinterface
Program summary

3.When signal strips turns green, positioning sucessful.
4. Click navigate app. with map software which installed in flash or SD card to navigate.
44
Positioningtime
Signalstrips
signal