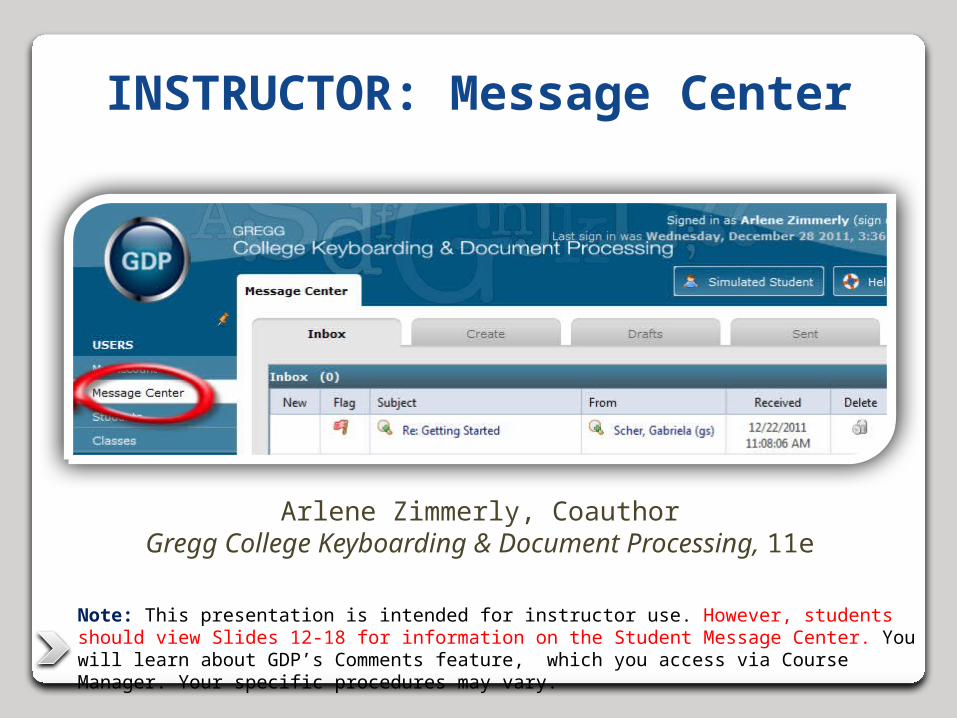
INSTRUCTOR: Message Center Arlene Zimmerly, Coauthor Gregg College Keyboarding & Document...
22
INSTRUCTOR: Message Center Arlene Zimmerly, Coauthor Gregg College Keyboarding & Document Processing, 11e Note: This presentation is intended for instructor use. However, students should view Slides 12-18 for information on the Student Message Center. You will learn about GDP’s Comments feature, which you access via Course Manager. Your specific procedures may vary.
-
Upload
stuart-norton -
Category
Documents
-
view
219 -
download
2
Transcript of INSTRUCTOR: Message Center Arlene Zimmerly, Coauthor Gregg College Keyboarding & Document...
�����������
INSTRUCTOR: Message Center
Arlene Zimmerly, CoauthorGregg College Keyboarding & Document Processing, 11e
Note: This presentation is intended for instructor use. However, students should view Slides 12-18 for information on the Student Message Center. You will learn about GDP’s Comments feature, which you access via Course Manager. Your specific procedures may vary.

�����������
Preferences• Preferences settings for Messaging, Resources,
Gradebook, Formatting Assistant, Score Keystroking, and Proofreading Viewer affect GDP screen content and functionality.
• Your GDP screens may vary from those shown in this presentation.
Note: See the handout “Message Center” for details on all topics in this presentation.

�����������
Enable Message Center
Before you can use Message Center, you must enable it in Course Manager:
From Classes, click the desired Class; from the Actions menu, click Edit.
From the Preferences tab, under Default Preferences, Messaging Enabled, click Yes, Save.
Repeat if necessary for any desired Sections.
Note that under USERS, Message Center now appears.

�����������
Inbox—New Mail
When you have new messages, you will see:
(1) a number by Message Center in the USERS pane and by Inbox,
(2) a New icon on the Inbox tab, and (3) a new message link in bold.

�����������
Create
Use the Create tab to send messages to a Class, Section, or User (student).

�����������
Drafts
Use the Drafts tab to review saved draft messages.

�����������
Sent
Use the Sent tab to review archives of saved messages.

�����
Create & Send Class Message From the Message Center, Create tab, under Recipient
List, click the green plus sign at the end of the To Class box.
From the Send to Class dialog box, click the desired Class.
Click Add Recipients to return to the Create tab. Note that the Class name now appears in the To Class
box. Type a subject and message and format as desired. Check or uncheck Allow student to reply to message as
desired. Click Send Message.

�����
Send Class Message—Actions Menu From USERS, Classes,
Classes tab, click the Actions menu for the desired Class.
Click Send Message to open the Message Center, Create tab.
Note that the Class name has been inserted in the To Class box automatically—no searching required.

�����
Create & Send Section Message Follow the same steps for sending a message to a Class,
except you will use the To Section box and select a Section rather than a Class.
�����
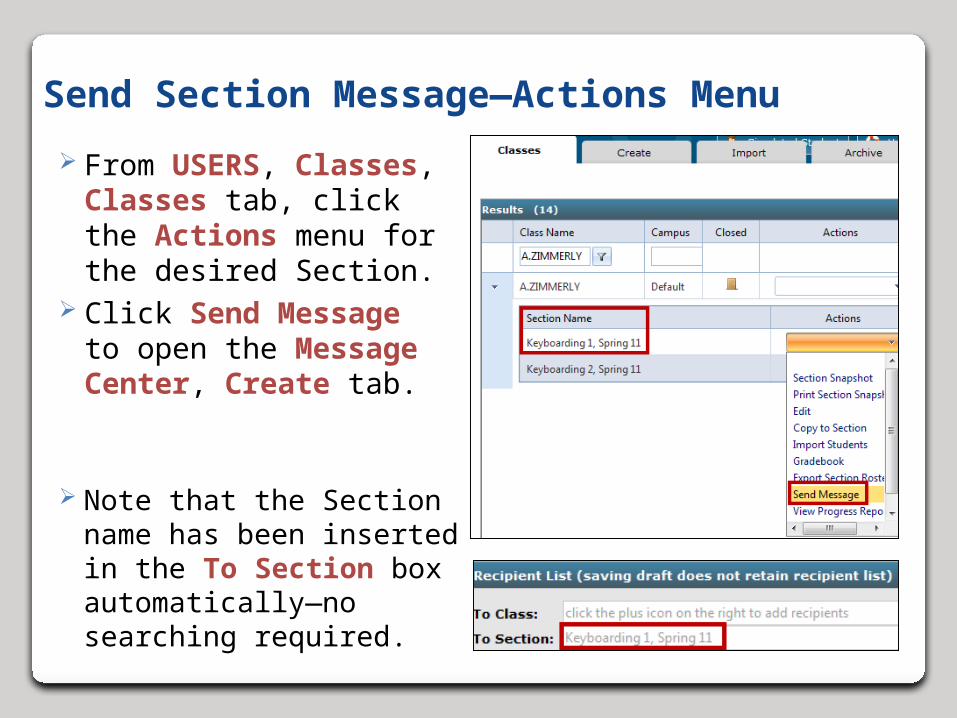
Send Section Message—Actions Menu
From USERS, Classes, Classes tab, click the Actions menu for the desired Section.
Click Send Message to open the Message Center, Create tab.
Note that the Section name has been inserted in the To Section box automatically—no searching required.

�����
Create & Send User Message From the Message Center, Create tab, under Recipient
List, click the green plus sign at the end of the To User box.
From the Send to User dialog box, under Search, type any relevant information in any of these boxes: Student ID, First Name, User Name, and/or Last Name.
Click Search until your search returns the desired student name in the Results pane.
From the Results pane, click the desired recipient(s). Click Add Selected Recipients to move that recipient
name into the Selected Recipients pane at the top. Continue in like manner until all recipients are added. Click Add Recipients.

�����
Send User Message—Actions Menu From USERS,
Students, Students tab, click the Actions menu for the desired student.
Click Send Message to open the Message Center, Create tab.
Note that the student’s name has been inserted in the To User box automatically—no searching required.

�����
Create & Edit Draft Message Follow the steps for sending a message to a Class,
Section, or User—when you’re finished, click Save Draft.
Then from the Drafts tab, click the Edit Message button to reopen and send the message or Delete to delete the draft.

�����
Student Message Center From My GDP, click Message Center. When a new message arrives, students will see a red
number by My GDP and by Message Center and an icon under the New column.
����������
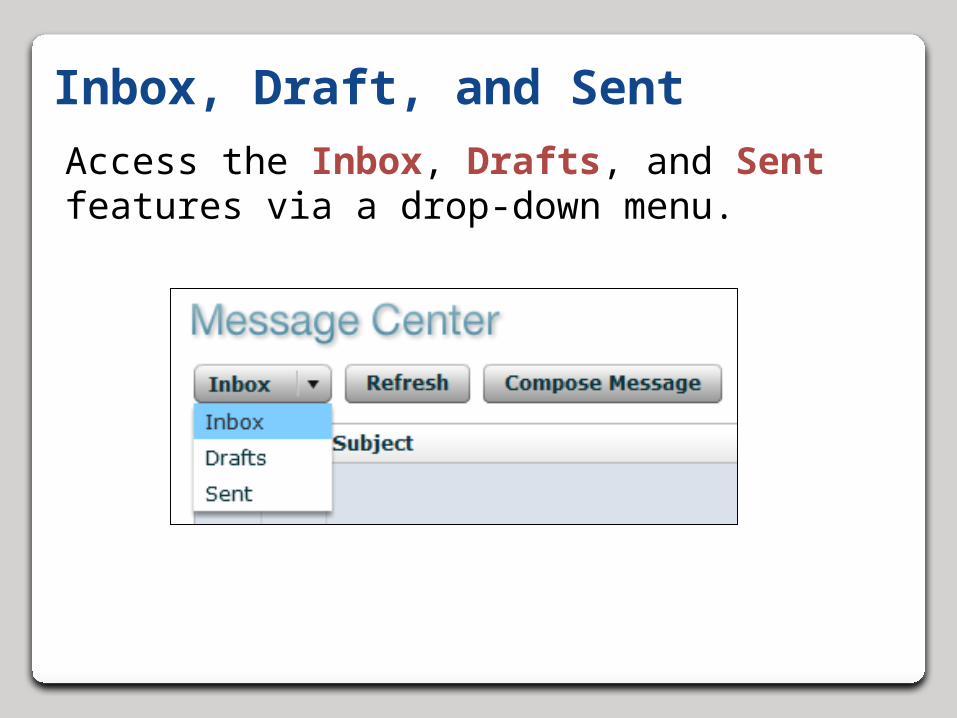
Inbox, Draft, and Sent
Access the Inbox, Drafts, and Sent features via a drop-down menu.
����������
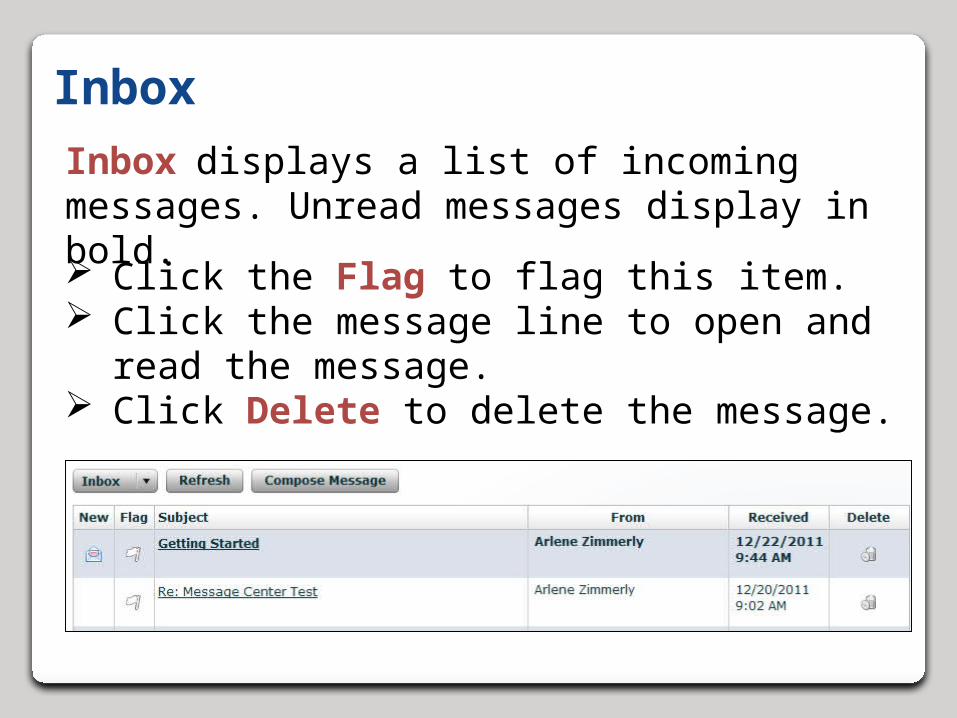
Inbox
Click the Flag to flag this item. Click the message line to open and read the
message. Click Delete to delete the message.
Inbox displays a list of incoming messages. Unread messages display in bold.

����������
Draft
Click the Flag to flag this item. Click the message line to open and read the
message. Click Delete to delete the message.
Draft displays a list of message drafts.

����������
Sent
Sent displays a list of sent messages.

����������
Refresh
Click Refresh to refresh the screen and display any new messages since the student last logged on to GDP.

����������
Compose Message
Click Compose Message to display the Compose Message window.
Click the green plus sign by the To box to open the Select Recipients window.
From the Select Recipients window, check the box next to any desired recipient. (The list of recipients will vary.)
Click Add/Remove Recipients. Type a subject and message and click Send
Message.

������������
Feedback?If you have any questions on the
Message Center feature or GDP, please send an e-mail:
Note: This presentation was created as a generic guideline for instructors. Your specific procedures may vary.
Enjoy using GDP’s Message
Center!