© Erwin Hymer Group North America, Inc., R00 - caradorv.com · All images used in this manual...
70
© Erwin Hymer Group North America, Inc., R00
Transcript of © Erwin Hymer Group North America, Inc., R00 - caradorv.com · All images used in this manual...

© Erwin Hymer Group North America, Inc., R00

2
© Erwin Hymer Group North America, Inc., R00
Contents
Introduction to Your Carado …….………………………………………………………………………………………………………………………………….. 7
Disclaimer ................................................................................................................................................................................................................ 7 Copyright ................................................................................................................................................................................................................. 7 References .............................................................................................................................................................................................................. 8 Do’s and Dont's ....................................................................................................................................................................................................... 8 Symbol Legend ....................................................................................................................................................................................................... 8 Regulatory Warnings ............................................................................................................................................................................................... 8 Information, Cautions and Warnings ....................................................................................................................................................................... 9 Before You Head Out ............................................................................................................................................................................................. 11 Coming Home ................................................................................................................................................................................................... 12-14 Interior Living Space .............................................................................................................................................................................................. 15 Cabinets ........................................................................................................................................................................................................... 15-16 Galley Cabinets ................................................................................................................................................................................................ 17-18 Lights .................................................................................................................................................................................................................... 19 Tables and Leg Mounts ......................................................................................................................................................................................... 20 Mid Lounge Table Setup ....................................................................................................................................................................................... 21 Table Storage ........................................................................................................................................................................................................ 21 Captain’s Seats ................................................................................................................................................................................................ 22-23 Window Treatments and Rear Windows ........................................................................................................................................................... 24-25 Ventilation.............................................................................................................................................................................................................. 26 Sleeping Facilities .................................................................................................................................................................................................. 27 Twin and King Bed Assembly ........................................................................................................................................................................... 27-28
Bathroom Facilities ................................................................................................................................................................................................ 29 Using the Toilet ..................................................................................................................................................................................................... 29

3
© Erwin Hymer Group North America, Inc., R00
Shower Setup ........................................................................................................................................................................................................ 30 Taking a Shower .................................................................................................................................................................................................... 30 Shower Setup Outside and Inside View ............................................................................................................................................................ 31-32 Shower Light, Sink and Pull Handle....................................................................................................................................................................... 33
Appliances ................................................................................................................................................................................................................ 34
Refrigerator ........................................................................................................................................................................................................... 34 Microwave Oven.................................................................................................................................................................................................... 34 Propane Cooktop .................................................................................................................................................................................................. 35 Water Heater ......................................................................................................................................................................................................... 35 Outside Your Carado ............................................................................................................................................................................................. 36 Awning ............................................................................................................................................................................................................. 36-37 Driver’s Side Compartments – Outside Connections and Dumping.………………………………………………………………………………………..38 Monitor Panel ......................................................................................................................................................................................................... 39 Inverter Charger .................................................................................................................................................................................................... 40 Shore Power .......................................................................................................................................................................................................... 40 Other Switches ...................................................................................................................................................................................................... 40 Awning Light.......................................................................................................................................................................................................... 41 Water Pump Switch ............................................................................................................................................................................................... 41 Tank and Charge Indicators .................................................................................................................................................................................. 41 Distribution Panel .................................................................................................................................................................................................. 42 AC Breaker ............................................................................................................................................................................................................ 42 12 Volt Fuse Panel ................................................................................................................................................................................................. 42 Propane System .................................................................................................................................................................................................... 43 Quick Connect BBQ .............................................................................................................................................................................................. 43

4
© Erwin Hymer Group North America, Inc., R00
Utilities ................................................................................................................................................................................................................... 44 Fresh Water ........................................................................................................................................................................................................... 44 City Water ............................................................................................................................................................................................................. 44 Water Pump .......................................................................................................................................................................................................... 45 Black/Grey Tank .................................................................................................................................................................................................... 45 Indicators .............................................................................................................................................................................................................. 45 Heating and Cooling ......................................................................................................................................................................................... 46-47 Thermostat ............................................................................................................................................................................................................ 46 Air Conditioning ..................................................................................................................................................................................................... 46 Propane Furnace ................................................................................................................................................................................................... 47
Electrical System ...................................................................................................................................................................................................... 48 Coach Batteries ..................................................................................................................................................................................................... 48 Battery Disconnect Switch...……….…………………………………………………………………………………………………………………………….48
Inverter Charger .................................................................................................................................................................................................... 48 Alternator Charger and Battery Isolator ................................................................................................................................................................. 48
Optional Equipment ............................................................................................................................................................................................. 49-50 Optional Solar Panels................................................................................................................................................................................................ 49 Optional HDTV and Blu-Ray Player ........................................................................................................................................................................... 50
On Board 120-Volt AC Power ................................................................................................................................................................................ 51 2000W Inverter ...................................................................................................................................................................................................... 51
Shore Power ............................................................................................................................................................................................................. 52 Outlets ................................................................................................................................................................................................................... 53
Alarms and Warnings ................................................................................................................................................................................................ 54 Propane and CO Alarm ......................................................................................................................................................................................... 54 Smoke Alarm ......................................................................................................................................................................................................... 54

5
© Erwin Hymer Group North America, Inc., R00
Fire Extinguisher ....................................................................................................................................................................................................... 55 Inside Rope Lighting Controls ................................................................................................................................................................................... 56
Inflation Kit ............................................................................................................................................................................................................. 57 Optional Tow Hitch and Tow Rating ......................................................................................................................................................................... 58 Maintenance ............................................................................................................................................................................................................. 59
Tires ...................................................................................................................................................................................................................... 59 Cargo Carrying Capacity ........................................................................................................................................................................................ 59
Owner Maintenance Checks ................................................................................................................................................................................ 60-62 When You Stop For Fuel or Weekly ....................................................................................................................................................................... 60 Every Other Week .................................................................................................................................................................................................. 60 At Least Monthly ................................................................................................................................................................................................... 60 At Least Every Three Months ................................................................................................................................................................................ 60 At Least Twice a Year ............................................................................................................................................................................................ 61 At Least Once A Year ............................................................................................................................................................................................ 61 Other Maintenance Checks ................................................................................................................................................................................... 62
Specifications ........................................................................................................................................................................................................... 63 Warranty .............................................................................................................................................................................................................. 64-66
Two Year RV Warranty ..................................................................................................................................................................................... 64-66 Chassis Manufacturer Warranty ....................................................................................................................................................................... 64-66 Appliance Warranty .......................................................................................................................................................................................... 64-66 AGM Battery Warranty ..................................................................................................................................................................................... 64-66 Lithium Battery Warranty .................................................................................................................................................................................. 64-66 Registration ............................................................................................................................................................................................................ 67 Aftermarket Disclaimer ........................................................................................................................................................................................... 68 Regulatory Notices ................................................................................................................................................................................................. 69

6
© Erwin Hymer Group North America, Inc., R00
HOWTOs……………………………………………………………………………………………………………………………See Manufacturers Website

7
© Erwin Hymer Group North America, Inc., R00
Introduction to Your Carado Congratulations on the purchase of your Carado and welcome to the Erwin Hymer Group North America family. The information included in this manual is meant to help and guide you using your vehicle so that you know how to properly use the many functions your Carado has to offer.
Please keep this manual in your vehicle as a reference for when you are travelling. If you have any questions or comments on information found in this document, please contact us at [email protected].
Disclaimer This owner’s manual was created to help owners with general use, maintenance and care of their RV. Erwin Hymer Group North America conducts ongoing product development and uses photos from multiple brands and vehicles to create these instructions. The included images may not reflect exact makes and/or models however, the information remains relevant and useful. These instructions are provided as general guidelines only, as certain add-ons or customization to an RV may change the manner these operations are performed.
Copyright Erwin Hymer Group North America, Inc. reserves the right to make changes at any time, without notice in colors, materials, equipment, specifications and models. The information contained in this manual is intended as a guide only, as continuous improvements are ongoing. Please contact [email protected] for the most up to date manuals available. Some motorhomes may be shown with equipment that is optional. Accessories shown in any photograph may not be included.
This manual is released under a Creative Commons Attribution-Non-Commercial-No Derivatives 4.0 International License [1].
In summary, you may:
• Copy any portion of this manual in any form for personal use;
• Distribute this manual complete with all its original unmodified content;
• Modify this manual for your own personal, non-commercial use.
In summary, you may not:
• Use this manual for any commercial use whatsoever;
• Modify this manual except as provided for in the full license and then distribute the resulting work;
• Charge for this manual other than reasonable media and shipping costs.

8
© Erwin Hymer Group North America, Inc., R00
All images used in this manual remain the property of Erwin Hymer Group North America. They are for illustrative purposes only and may or may not be representative of the upfit in your Carado. Contact Erwin Hymer Group North America for alternate licensing arrangements if you want to use or distribute this manual commercially.
References [1] http://creativecommons.org/licenses/by-nc-nd/4.0/
Do’s and Dont’s
Symbol Legend
Information: Useful information and knowledge.
Warning: Not following this instruction may lead to negative results.
Caution: You should follow this instruction.
Danger: DO NOT perform this action. Doing so may result in severe damage, injury or death.
Regulatory Warnings
LEVEL ITEM INSTRUCTION
Danger Do not place propane cylinders inside the vehicle. • Propane cylinders are equipped with safety devices that relieve excessive pressure by discharging propane tothe atmosphere.• Propane gas is highly flammable. This action can lead to fire or explosion and result in serious injury or death.
Caution Do not use gas cooking appliances for comfort heating. • Can lead to carbon monoxide poisoning, which can lead to serious injury or death.
Caution Gas cooking appliances need fresh air for safe operation. • Open vents or windows slightly or turn on exhaust fan prior to using cooking appliance.• Gas flames consume oxygen, which should be replaced to ensure proper operation.• Improper use can result in serious injury or death.
9
© Erwin Hymer Group North America, Inc., R00
Caution Do not fill propane containers to more than 80% of their capacity. • A properly filled container contains approximately 80 percent of its volume as liquid propane.• Overfilling propane container(s) can result in uncontrolled propane flow, which could lead to a fire or explosionand result in serious injury or death.
Caution When using an outdoor cooking area, the vehicle must be level and stabilized. Do not violate manufacturers’ instructions on required clearances for cooking appliances during use. Do not store cooking appliances until cool to the touch. Failure to do so can lead to a fire and result in serious injury or death.
Caution
If you smell propane: 1. Extinguish any open flames and all smoking materials.2. Shut off propane supply at the container valve(s) or propane supply connection.3. Do not touch electrical switches.4. Open doors and other ventilating openings.5. Leave the area until the odor clears.6. Have the propane system checked and leakage source corrected before using again.7. Ignition of flammable vapors could lead to a fire or explosion and result in serious injury or death.
Caution Vehicles and equipment powered by internal combustion engines and placed in recreational vehicles can cause carbon monoxide poisoning or asphyxiation, which could result in serious injury or death. • Do not store, transport, or dispense fuel inside this vehicle.
Information, Cautions and Warnings
LEVEL ITEM COMMENT Seat Belts Use only forward-facing seats equipped with factory installed seat belts while the vehicle is in motion. All
passengers must be seated in these seats only, with the seat belts fastened while the vehicle is in motion. TV Turn the TV off and stow it while the vehicle is in motion.
TV The flat screen TV should not be stored inside the Carado in cold temperatures. Remove it to reduce the chance of damage from the cold. Check the Owner's Manual for the TV for storage and operating temperatures.
TV To remove the TV, release the bracket on the back of the TV mounting bracket and remove the RCA cables, power supply cable and antenna cable.
Propane The propane tank valve must be closed and all pilot lights, appliances and their igniters must be turned off during refueling of the motor fuel tank and/or the propane fuel tank. Only qualified personnel should refuel your propane tank. Please see page 42 for further information.
Propane Purchase propane from a reputable propane facility. Contaminated propane is a common cause of system failure and is not covered under any warranty.

10
© Erwin Hymer Group North America, Inc., R00
Propane The BBQ quick disconnect is regulated to 10 P.S.I. Please ensure that all devices connected to this are either rated for high "pressure" or have their own regulator. Many grills sold in the United States are "low pressure" (1/2 P.S.I.) and will require an additional regulator to step the pressure down to a useable level. If hooked directly to the BBQ quick disconnect they will be a severe fire hazard.
Propane Leak Detector Do not block the air circulation in the area where the Propane Leak Detector is located.
Propane Leak Detector Battery disconnect switch must be in the "ON" position for the propane detector to function.
Flammable Liquids and
Gasses Do not store gasoline or other flammable liquids inside your vehicle.
Heating Never use cooking appliances or unvented propane heaters for space heating purposes. They need fresh air for safe operation.
Heating The heating furnace provides its own outside combustion air and exhausts to the outside.
Heating Portable fuel burning equipment, including wood, charcoal, and liquid fuel grills and stoves, should not be used inside your vehicle. Use of this type of equipment inside your vehicle may cause a fire or asphyxiation.
Carbon Monoxide
Leak Detector Do not block the air circulation in the area where the Carbon Monoxide Leak Detector is located.
Carbon Monoxide Leak
Detector Battery disconnect switch must be in the "ON" position for the Carbon Monoxide Leak Detector to function.
110 V Electrical Servicing Prior to servicing any 110V, unplug the output lead from the power inverter.
Exterior Access Doors
Ensure the shore power cord and city water supply lines are disconnected and in their stored positions before the vehicle is put in motion.
Awning Close the sliding side door prior to opening or closing the awning.
Dining Table When storing the 2 dining tables, secure in place using the clips attached.
Counter Space Make sure the stove is off and has cooled prior to using the counter space.
Battery Battery acid can burn your skin and damage clothing. Protective eye wear and gloves should be worn while handling batteries. Effective June 2010 all Erwin Hymer Group of NA installed batteries are sealed AGM or optional Lithium batteries that do not require the addition of water.

11
© Erwin Hymer Group North America, Inc., R00
Battery Disconnect the inverter/charger prior to disconnecting the auxiliary battery.
Generator The Carado is supplied with an optional AC generator located underneath the engine. Never submerge the generator. Use a spotter when launching a boat or crossing streams.
Waste Water Storage and
Dumping Close the black water gate valve before using the waste water system.
Freezing Under moderate subfreezing conditions, antifreeze is required in the exterior fresh water tank and the black waste water tank. Use RV antifreeze in accordance with the manufacturer's instructions.
Electrical Servicing
This unit has a 12VDC, 110VAC and optional 36-volt solar system. These systems need to be disconnected before working on them.
Before You Head Out Your new Carado is ready to go with just a little bit of preparation. To prepare for your first trip, you should:
• Read this manual.• Contact your dealer with any questions.• Plan your trip.
Then use this quick checklist:
• The day before your trip:o Charge your RV batteries by plugging in overnight. (*If equipped with optional Lithium batteries, inverter must be in on position.*)o Cool your refrigerator by turning it on.o Chill any beverages or other refrigerated items in your home refrigerator.o Flush and fill your fresh water tank with clean tap water.
• The day of the trip:o Load the refrigerator with beverages and other perishable items (from your home refrigerator).

12
© Erwin Hymer Group North America, Inc., R00
Coming Home
When you come home, there are a few maintenance tasks you should do to get your Carado ready to go for next time. Refer to other sections in this manual for the procedures listed here.
On your way home, dump the black waste water tank at a convenient facility. See the HOW TO’s: Waste Water Dumping section for a concise description of the procedure to do this. Some RV parks and gas stations will let you dump for a fee, some city wastewater plants will let you dump for free but there is no real pattern, so local knowledge is vital in locating dump stations.
• The website http://www.sanidumps.com is a good resource. The website with maps for each state and province ishttp://www.sanidumps.com/maps/help.php.
• At home, flush the water tank and fill it with fresh chlorinated water if you will be using it in the next few days. Otherwise, drain the tank. Don'tlet water you are planning to use sit in your tank for more than a week or so, and don't let any water sit in your tank for more than two weeks,whether you plan on using it or not. Over time, the chlorine evaporates allowing bacteria to grow.
• To flush the tank, fill it using the fill port located on the driver's side body panel approximately half way between your front and rear axles;(See images below) (Picture 12.2).
Picture 12.1 Picture 12.2
30AMP Power Plug Connector. Located in Drivers Side Running Between
Front and Rear Axles.
City Water Intake Located Between Front and Rear Axles on Drivers Side.

13
© Erwin Hymer Group North America, Inc., R00
Coming Home (Continued)
• Plug in the shoreline connection overnight to fully charge batteries.• Turn off and clean out the refrigerator and prop the door open to let it air out.• If you plan on storing your Carado for an extended period, turn off the Battery Disconnect Switch and the Inverter Switch on your monitor
panel to keep from draining your AGM or Optional Lithium battery(ies).• If you turn everything off and you have optional solar panels, the panels will keep your coach batteries charged to a safe level while your
Carado is parked.o Solar panels will only keep your Carado charged if parked outside.
• If you don't have solar panels, it is required that you check your coach battery state of charge every week and charge them as necessary.• If you don't turn everything off, even with solar panels, you will probably come back to dead batteries.
o Based on the electronic systems on your coach needing small amounts of electricity even when off, you will probably come back todead batteries over a period of time.
o If your coach is equipped with optional Lithium batteries, the battery switch(es) need to be on so the solar panel(s) can provide acharge to them. Turn the switch(es) off at the end of the day to maintain the battery charge.
• If you are not planning on storing your coach for an extended period, it is recommended that you plug in your coach to charge the batteriesto keep them from draining.
o Plug your coach into a dedicated power outlet. (Dedicated outlets provide a cleaner line of electricity supplied to the coach) (Picture14.1 On Next Page)
o Turn on your battery disconnect switch. (Picture 14.2 On Next Page)o If your Carado is equipped with standard AGM battery turn on your inverter switch.o If your Carado is equipped with the optional EcoTrek Lithium battery, turn on your Lithium Battery switch and make sure blue light
is illuminated. (Picture 14.3 On Next Page)o Turn your inverter to the on position. (Picture 14.4 On Next Page)

14
© Erwin Hymer Group North America, Inc., R00
Coming Home (Continued)
Optional EcoTrek Lithium Battery Switches Located on Drivers Side
Wall.
Coaches Monitor Panel with Battery Disconnect Switch
Shown.
30AMP Shore Power Cord Coach Connect Port.
Carado Inverter Switch in the On Position.
Picture 14.1 Picture 14.2 Picture 14.3
Picture 14.4

15
© Erwin Hymer Group North America, Inc., R00
Interior Living Space
Your Carado is equipped with cabinet latches which prevent the door from opening while the vehicle is in motion. The push buttons on the cabinet latches toggle from latched (button in) to openable (button out) by pressing the button.
To open a cabinet, press the button to pop the latch, pull gently on the latch, and the cabinet door will open.
To close a cabinet, make sure the latch is still open (button out), then close the door. Once the cabinet door is closed, press the latch button in to lock the cabinet.
Do not attempt to close the cabinet doors while the latch button is pressed in. This could break the latch. Always make sure the button is out before attempting to close a cabinet door. (Picture 15.2)
It is not recommended to keep large, round, and/or heavy objects in a cabinet unsecured as they may roll around and apply excessive pressure to the inside of the cabinet doors as you drive. The objects may shift position with vehicle motion and cause injury when the cabinets are opened. For this reason, Ewin Hymer Group North America recommends that you are aware of the objects that you store in overhead cabinets.
If you load a large amount of weight into a cabinet, experience large swings in temperature or humidity, ride on bumpy roads at high speeds frequently, or sometimes as part of normal wear and tear, the cabinet hinges may go out of adjustment. You will know the cabinet is out of adjustment when it will not open with the button out, or not latch with the button in.
Push Button for Cabinet Latches In Closed Position.
Push Button for Cabinet Latches In Opened Position.
Picture 15.1 Picture 15.2
Cabinets

16
© Erwin Hymer Group North America, Inc., R00
Cabinets Continued
To open a cabinet stuck shut with the button out, apply pressure UPWARD with your thumbs on both bottom corners of the cabinet door while simultaneously applying gentle pressure to open it, as shown above left. (Picture 16.1)
DO NOT FORCE THE DOOR OPEN BY PULLING OR PRYING ON IT - you will break the latch.
The screw in the top part of the hinge nearest the pivot point adjusts the vertical location of the door. Screw out to raise the door and screw in to lower the door and fix doors that won't stay shut when latched, as shown above left.
Cabinet Adjustment The screw on the long bracket hinge is used to apply or reduce the friction needed on your cabinet door to open and close smoothly.
Using an allen wrench, turning the screw to the right will tighten the hinge and put more friction on your cabinet door where turning left will loosen the pressure that is applied and allow for the cabinet to be opened with less force. (Picture 16.2.)
Apply Moderate Upward Pressure and Gentle Outward Pressure with One or Two Fingers on the Bottom Corners of the Door
to Open a Stuck Cabinet.
Adjustments to the Cabinet Hinges Will Allow for Tightening and to Loosen the
Friction Required to Open and Close the Cabinet Door.
Picture 16.1 Picture 16.2

17
© Erwin Hymer Group North America, Inc., R00
Galley Cabinets
Picture 17.1 Picture 17.2 Picture 17.3
Picture 17.4
Kitchen Galley Area Cabinetry. Kitchen Galley Area Cabinetry with Slide Out Drawer for Silverware or Other Use
Open.
Kitchen Galley Area Cabinetry with Slide Out Drawer for Dinnerware, Food Storage or
Other Use Open.
Picture 17.5
Galley Door Opened Showing Grey Water Tank for Galley Sink and Water Lines.
Kitchen Sink Grey Tank Water Drain Valve. Picture 17.6
Storage Shelf and Lower Storage Compartment Passenger Side.

18
© Erwin Hymer Group North America, Inc., R00
Galley Cabinets (Continued)
Immediately above the refrigerator in the kitchen galley is a slide out drawer for silverware and other uses. (Picture 17.2 on Previous Page.)
Directly under the sink is a pull-out storage drawer which can be used for storage for food, dinnerware or other uses. (Picture 17.3 on Previous Page.)
Immediately beneath the pull out upper storage drawer there is a second door below, within this area is the grey water tank for the kitchen galley and water lines going to and from this water tank. (Picture 17.4 on Previous Page.) (*Note – Due to the components that are in this compartment, it is not recommended for storage items. Items may cause damage to the water tank or the water lines that are contained within.)
To drain the kitchen galley grey water tank, use the grey tank drain located on the driver’s side of the vehicle near the city water intake valve between the front and rear axles. (Picture 17.5 on Previous Page.) (*Note – The grey/black water tank hose is removable and has a bayonet fitting to connect and drain the kitchen galley grey water tank.) (See hose housing in picture 38.2 and 38.3 .)
Across from the galley cabinetry on the passenger side of the vehicle is a secondary storage compartment. This compartment has a small upper shelf at the front and the lower level has full open storage the length of the passenger side seating area. Picture 17.6 on Previous Page) (*Note - This compartment also houses the vehicles jack and spare tire replacement kit, info will be further covered later in this manual.) (*Note – To access this storage area, the vehicles exterior passenger sliding door must be opened or you can remove the seating and backrest cushions and lift up on the board to expose the entire storage area.)
Picture 18.1
Pass Through Storage View.

19
© Erwin Hymer Group North America, Inc., R00
Lights The 12V oval ceiling lights are individually controlled and are turned on by lightly pushing the lens area of a given light until you hear a click, then release. (Picture 19.1)
NOTE: The battery disconnect switch must be on for any of these lights to work. These are LED lights which consume very little electricity. (Pictures 19.2 and 19.3)
Picture 19.1 Picture 19.2 Picture 19.3
Picture of 12V Lighting Up Close with Light In the Off Position.
Picture of 12V Lighting. Gently Push Upwards on Lights Lens Cover Until You
Hear a Click and Release.
Picture of 12V Lighting in the On Position. Gently Push Upwards on Lights Lens
Cover Until You Hear a Click and Release to Turn Them Off.

20
© Erwin Hymer Group North America, Inc., R00
Table Legs and Leg Mounts The table(s) can be set up to use either for front seating or galley lounge area for dining, computer, gaming, or other recreational use. (See Pictures and Further Description on Page 21 and 22.) The table legs are stored in the rear passenger side between the bathroom and rear chassis door. (Picture 20.3)
The leg keys into a T-Nut fitting in the slot of the floor plate(s). (Picture 20.1) *Note – All table leg floor plates come with covers, remove and store in a safe place before inserting T-Nut into the floor plate. *
To install the table leg in the floor plate, unscrew the T-Nut all the way on the end of the table leg and insert the T-Nut into the slot in the floor plate. Rotate the table leg clockwise until the table leg is secure and does not wobble. If it does not tighten after 2-3 turns, remove the table leg unscrew the T-Nut all the way and repeat. (Picture 20.2)
Do not force the T-Nut. If it's set up right, it will lock in place with little effort. If not setup correctly don’t force the T-Nut. Remove and insure that the T-Nut is fully extended and check the keyway on the floor for any obstructions.
T-Nut Fully Extended – Leg Mount Base.Leg Mount Bases by Front Seating,
Forward and Mid Galley for 1 or 2 Table Setup.
Double Table Leg Storage – Inside Rear Passenger Door on Bathroom Cabinet.
Picture 20.1 Picture 20.2 Picture 20.3

21
© Erwin Hymer Group North America, Inc., R00
Table Storage and Mid Lounge Table Setup
The table tops are stored in the rear doors. The table tops are stored in the compartments with 2 white plastic clips to hold the tables in place.
Large Table Storage in Rear Drivers Door. Small Table Storage in Rear Passengers Door.
Single Small Table Setup Mid Coach View from Rear.
Double Table Setup Using Both Aisle Leg Mounts View from Front.
Picture 21.1 Picture 21.2
The larger table fits in the driver’s door compartment (Picture 21.1), while the smaller table is stored in the passenger side door. Picture (21.2)
To release the smaller table from it’s storage location, lift the table upwards while pulling slightly forward to clear the door handle above.
Please note location and opened and closed position of table storage clips. (Picture 21.2)
Picture 21.3
Picture 21.4

22
© Erwin Hymer Group North America, Inc., R00
Front Table and Front Swivel Seats
This vehicle will not drive unless the front seats are forward facing and locked. The vehicle will not go into gear.
The two captain's seats in the front of your Carado are adjustable fore-and-aft by pulling up on the metal bar under the front seats. (Picture 22.2)
Always return the seats to the forward-facing position before driving. They must lock into position, and stay locked.
To create a front lounge area, first ensure that the seats are fully upright by rotating the dial on the outside of the seat base and bringing the backs of the seats forward. (Picture 22.1) Do not attempt to pivot a reclined seat. Use the forward-aft adjustment bar while pivoting the seats to allow the sides of the chairs to clear the armrests on the vehicle doors, the console cover, and other obstructions. (Picture 22.2) Do not force the seats around. Swiveling the driver's seat may require you to loosen the telescopic steering wheel adjustment and adjust the steering wheel. Opening the front doors slightly will allow you to clear the door armrests easily but is not required.
To rotate the seats, slide the seats all the way forward, lift up on the yellow rubber covered metal tab underneath the front seat bases. (Picture 22.3)
Front Seats Backrest Forward/Rear Reclining Dial. Bring Seat Back Forward
Prior to Swiveling.
To Rotate the Front Seats, Lift Up on the Yellow Tab and Start Rotation.
Front Seat(s) Forward/Aft Release Bar.
Picture 22.1 Picture 22.2 Picture 22.3

23
© Erwin Hymer Group North America, Inc., R00
Front Table and Front Swivel Seats (Continued)
This vehicle will not drive unless the front seats are forward facing and locked.
The two captain's seats in the front of your Carado are adjustable fore-and-aft by pulling up on the metal bar under the front seats. (Picture 23.2)
To create a front lounge area, first ensure that the seats are fully upright by rotating the dial on the outside of the seat base and bringing the backs of the seats forward. (Picture 23.3) Insert a table leg into the leg mount receiver between the front seats and insert the table of your choice.
Emergency Brake Handle Must be in Down Position for Seats to Swivel
Properly.
To Move the Front Seats Forward/Backward, Pull Up on the Metal
Seat Bar Under Seat Cushion.
Picture 23.1 Picture 23.3 Picture 23.2
To Create a Front Lounge Area, Rotate 1 or 2 Front Seats and Choose the Table
of Your Choice.

24
© Erwin Hymer Group North America, Inc., R00
Window Treatments
Your Carado Drivers Side Windows and Passengers Side Sliding Glass Door Come with Dual Window Coverings. (Picture 24.1)
Extend the Bugscreen side from the right by sliding the covering all the way to the left until the 2 track guides meet. (Picture 24.2)
The nightshade curtain blocks airflow. If you leave the window open, then close the nightshade, close all other windows, and then close the side door, it is possible for the curtain to get blown out of the track. Always close the window prior to closing the nightshade.
The window shades set slide to the right and left. The plastic clip on the nightshade covering is not a pull tab; it is a locking tab. Always pull on the aluminum bar. (Picture 24.3) *Failure to do so could cause damage to window screen or cause the screen guide to come off track.* The shades are configured so that the nightshade side covers the window opening for additional privacy.
Carado Window Showing Both Bugscreen and Nightshade Coverings.
Carado Window Showing Nightshade Covering. Clip Locks onto Bugscreen
Metal Glide for Complete Window Coverage. * Note: Do Not Use Clip to
Slide Covering. Use Metal Bar. *
Picture 24.1 Picture 24.2
Carado Window Showing Bugscreen Covering Fully Extended. Metal Glides on
Track, Meet Showing Full Extension.
Picture 24.3

25
© Erwin Hymer Group North America, Inc., R00
Rear Windows
The window shades slide up and down. Shades in up position. (Picture 25.1)
Always lift/lower the rear shades using the aluminum bar. (Picture 25.3) The shades are configured so that the nightshade covers the window opening for additional privacy.
The Rear Windows Do Not Open.
The Rear Windows Shade in the Open Position Provide Visibility from Anywhere Within the Coach.
The Rear Windows Shades in a Closed Position Provides Privacy
When Using the Restroom/Shower or When Your Carado is Occupied.
Picture 25.1 Picture 25.2 Picture 25.3
The Rear Windows Closed. View from Inside of Coach.
Note: Use Aluminum Bar to Raise/Lower Shade. Apply Even
Steady Pressure on Both Sides of Shades for Easy Operation.

26
© Erwin Hymer Group North America, Inc., R00
Ventilation Your Carado is equipped with 2 ceiling mounted ventilation fans; 1 in the washroom area and the other in the kitchen galley area. (Picture 26.1 shows ventilation fan in washroom area.)
The fans have covers that must be raised by pushing up on the curved handle. (Picture 26.2)
Raise the cover, then push the red button to turn the fans on. (Picture 26.3)
For more details, please refer to the appliance manual.
Turn the fan off and close the cover completely before driving. The cover will rattle and might be damaged by wind pressure if you drive with it open.
Open the side windows and open the nightshade slightly to allow for airflow.
Ventilation Fan in Closed Position. Ventilation Fan in Open Position. Push the Red Button to Turn the Ventilation Fan On/Off.
Picture 26.1 Picture 26.2 Picture 26.3

27
© Erwin Hymer Group North America, Inc., R00
Sleeping Facilities Your Carado has twins (76”x27”x2) and king bed (76”x74”) configurations. Follow the steps on Pages 27 & 28 to setup your sleeping facilities.
Remove the Backrest Cushions to Create 76”x27” Twin Size Beds. (View from Rear.)
All Cushions Shown on the Side Sofas Will be Used to Construct Your Beds.
Remove the Drivers Side Backrest and Seating Cushions to Reveal the Bed Board
Used to Convert Your Twin Beds Into a 76”x74” King Size Bed.
Picture 27.1 Picture 27.2 Picture 27.3
Picture 27.5 Picture 27.4
The Metal Railings on Drivers and Passenger Side for Bed Board Support.
Bed Board in Place for Construction of Your 76”x74” King Size Bed.

28
© Erwin Hymer Group North America, Inc., R00
Twin and King Bed Instruction (Continued):
Completed King 76”x74” Bed View from Rear of Coach.
Use the 4 Backrest Cushions to Supplement Seating Cushions to
Complete Setup.
Picture 28.2 Picture 28.1 Picture 28.3
Completed King 76”x74” Bed View from Front of Coach.

29
© Erwin Hymer Group North America, Inc., R00
Bathroom FacilitiesUsing the Toilet
The bathroom in your Carado contains a macerating toilet. (Picture 29.1)
To flush the toilet, use your foot to press the foot pedal located at the bottom left of the toilet to expel the waste, then release the foot pedal.
Do not use standard toilet paper which will clog your black water tank - use only camping grade paper which will dissolve easily when it gets wet. *For detailed information on this appliance consult the Products/Appliance Owner's Manual that accompanies your coach.
Toilet, Toilet Pedal and Shower Drain.
Picture 29.1

30
© Erwin Hymer Group North America, Inc., R00
Shower Setup:
The Carado comes with a rear washroom/toilet area. It takes several steps to create the washroom. An outline to those steps is as follows: *Please refer to pictures starting on page 31.*
The sliding shower door is held in place by a clear plastic strap and button snap. (Picture 31.1 Next Page)
Open the storage cabinet door (left side) directly opposite the sliding shower door to reveal catch magnets on the inside of the door at the top and bottom. (Picture 31.2 Next Page)
Unsnap sliding shower door strap and slide shower door across washroom until magnets on shower door arm catch magnets attached to storage cabinet door. (Picture 31.3 Next Page)
Slide shower curtain all the way around enclosing the washroom area. (Picture 31.4 Next Page)
Unscrew the drain stopper from the bathroom floor and store for safe keeping. (Picture 31.5 Next Page)
When finished showering, air dry or wipe off sliding shower door and shower curtain before securing.
Taking A Shower • To take a shower, unscrew the drain stopper in the bathroom floor and store for safe keeping and reinstallation after your
shower.
• Release loop fastener straps retaining the shower curtain and slide the shower curtain along its track to enclose the showerspace.
• Pull the faucet/showerhead up and adjust the water temperature as desired. There is a water cutoff on the handle toconserve water.
• When finished, either towel off or air dry the curtain and sliding shower door before storing it.
• Refasten the drain stopper to prevent the contents of the waste tank from sloshing up into the shower area while driving.

31
© Erwin Hymer Group North America, Inc., R00
Shower Setup: (Outside View)
Sliding Shower Door in Closed Position with Clear Strap and Button Snap.
Left Side Cabinet Door Opened. Sliding Shower Door Catch Magnets at
Top and Bottom of Door.
Left
Sliding Shower Door Secured to Cabinet Magnets Catch.
Pull the Shower Curtain All the Way to End of Track.
Remove Drain Stopper and Store for Safe Keeping While Showering.
Picture 31.1 Picture 31.2 Picture 31.3
Picture 30.1
Picture 31.5 Picture 31.4

32
© Erwin Hymer Group North America, Inc., R00
Shower Setup (Inside View):
Step One: Open and Fully Extended Upper Cabinet Door.
Step Two: Unsnap Sliding Shower Door and Slide Until Magnets on Door
Meet Magnets on Cabinet Door.
Step Three: Extend Shower Curtain Until Washroom is Fully Contained.
Note: Shower Curtain Not Pictured.
Picture 32.1 Picture 32.2 Picture 32.3

33
© Erwin Hymer Group North America, Inc., R00
Washroom Light and Ventilation Fan. Switch for Washroom Light Is Located on
Rear Wall in Seating Area. See Picture 32.5
Shower Light, Sink and Pull Handle:
Washroom Sink in Storage Position. Release with Push Tab.
Washroom Sink in Open Position and Sink/Shower Faucet in Closed Position.
Picture 33.1 Picture 33.2 Picture 33.3
Picture 33.5
Washroom Light Switch Located on Rear Cabinet Wall on Passenger Side.
Picture 33.4
Faucet Extended for Shower Use.

34
© Erwin Hymer Group North America, Inc., R00
Refrigerator The refrigerator is a 12-volt DC compressor model. (Picture 34.1) When shore power is available, the inverter charger provides enough power to run the fridge without discharging the batteries.
* Refer to the appliance manual for operation details.
Microwave Oven The 0.7 cu. ft. microwave is a standard microwave oven. (Picture 34.4)
It operates much the same as the microwave at your house.
It is probably lower powered then a home unit, so cooking may take a bit longer.
The microwave will operate from the batteries through the inverter for power.
For extended microwave use, you should be connected to shore power or have the underhood generator running.
Refrigerator Located on Left Side of Galley Facing Towards Side Entry Door.
Push Down on Latch and Pull Door to Open Refrigerator.
Refrigerator Latch
Refrigerator View from Front with Door Open.
Picture 34.1 Picture 34.2 Picture 34.3
Picture 34.4
Microwave Oven.

35
© Erwin Hymer Group North America, Inc., R00
Propane CooktopThe propane cooktop needs fresh air for its safe operation. Make sure to open a window, roof vent and/or a door for proper ventilation and to exhaust fumes.
Turn the burner knobs left to the Lite position, once lit turn the knob(s) to the right for the desired flame height. (Picture 35.1)
* For detailed information on this appliance consult the cooktop Owner’s Manual.
Water HeaterYour Carado is equipped with a propane fired water heater. The water heater has a 6.0 Gallon capacity manufactured by Suburban, located on the Driver’s Side of the Vehicle. (Picture 35.2) For detailed information on this appliance consult the Suburban Owner's Manual.
Propane Cooktop.
Water Heater Access. To Open, Lift, Slightly Pull and Rotate Clip to Vertical. Do Not Block or Obstruct at Anytime.
Water Heater Access in Open Position. Propane Must be On to Ignite Pilot Light.
*Note -Area Very Hot During Operation.
Water Pump Switch in On Position. Water Heater Switch Directly Above.
Water Heater Reset Warning Above Water Heater Switch.
Picture 35.1
Picture 35.2 Picture 35.3 Picture 35.4

36
© Erwin Hymer Group North America, Inc., R00
Outside Your Carado
Awning
Your Carado has a roll-up awning. The awning is extended with a manual crank. (Picture 36.1) The awning has two support struts that must be used to support the awning while extended. These are secured to the two attachment points on the side of the Carado. (Picture 36.2)
Awnings are susceptible to damage from wind, for this reason the awning should never be left extended when you are away from the vehicle. If a thunderstorm or other windy weather is imminent, stow your awning until the wind calms down. (Picture 36.3)
Carado Manual Awning in Closed Position.
Carado Awning Leg Bracket. Awning Crank Mounted in Rear of Coach Behind Washroom Cabinet and
in Front of Rear Passenger Door.
Picture 36.1 Picture 36.2 Picture 36.3

37
© Erwin Hymer Group North America, Inc., R00
Awning (Continued)
*Refer to the awning manual for the proper way of securing the awning supports to the attachments. The following pictures will show you how tooperate your awning. It will also show you how to release the support legs, attach to coach and secure your awning legs.
Picture 37.1
Crank Handle to Right to Open and Left to Close. Extend Crank with Orange Dial.
Picture 37.2
Awning Leg Release Clip in Closed Position. Awning Leg End Secured.
1. To Release Awning Leg, Pull AwningLeg Clip Outward.
2. Slide Awning Leg End Away fromLocking Screw Point. Once Released, Pull
Awning Leg Away from Track.
3. After Releasing Leg from Awning TrackEither Secure Using Brackets Attached to
Coach or Secure into the Ground.
Picture 37.3
Picture 37.4 Picture 37.5

38
© Erwin Hymer Group North America, Inc., R00
Outside Connections and Dumping
The driver's side of your Carado contains multiple components to use in various situations.
The grey/black macerator dump hose is housed in a compartment on the driver’s side between the front and rear axles under the running board. (Picture 38.1)
The grey/black gate valve handle is visible just to the rear of the dump hose housing box and just in front of the rear axle. (Picture 38.2)
Positon the dump hose securely to the dump location, open the grey/black gate valve and use the macerator button to dump the contents of the grey/black tank. (Picture 38.3) * Note: 12V battery disconnect must be in on position for macerator to operate. *
While dumping, pouring water down the toilet will assist in cleaning out the grey/black tank as well as clean out the dumping hose of sediments that may remain.
* See the HOW TO’s: Waste Water Dumping section to learn how this works.
Grey Tank Gate Valve
Grey/Black Tank Gate Valve. In Closed Position. Position the Dump Hose Located
in Closed Housing in a Proper Dumping Location.
Open the Gate Valve So Contents Can Flow Through the Hose. Push the
Macerator Button Located Just Inside the Drivers Door to Dump the Contents of the
Grey/Black Tank. * Note 12V Battery Disconnect Must be in On Position for
Macerator Button to Operate. *
Grey/Black Tank Dumping Hose in Housing. Housing is Located Under
Drivers Side Flexible Running Board.
Picture 38.1 Picture 38.2 Picture 38.3

39
© Erwin Hymer Group North America, Inc., R00
Monitor PanelThe monitor panel is located inside your Carado above the kitchen galley area.
Power Sources The monitor panel controls 2 separate power sources; the 12-volt DC power and the 120-volt AC power via the inverter, shore power, or optional underhood generator. (Picture 39.1)
12-Volt DC PowerThe power to the 12-volt DC outlets and appliances is controlled by the battery disconnect switch second button from right on top row. (Picture 39.2)
The battery disconnect switch supplies 12-volt battery power to the 12-volt lights and other cabin appliances. This switch must be on for any of the 12-volt electrical devices to work. To avoid discharging the batteries when your Carado is not in use, remember to turn off two switches:
• The inverter switch• The battery disconnect switch
When your battery disconnect switch is turned on, you will see your Battery Voltage Meter displaying the level of your coach batteries. When in the off position no lighting, 12V appliances, electronics or 12V plugs will operate.
Battery Disconnect and Voltage Meter. Inverter Switch.
12V,U
SB and
110
Outlets are
Available
ThroughoutYourCarado
12V, USB and 110 Outlets are Available Throughout Your Carado.
Picture 39.1
Picture 39.2 Picture 39.3

40
© Erwin Hymer Group North America, Inc., R00
Inverter The inverter provides 120-volt AC (household current) to the 120-volt appliances and wall outlets. The inverter has a power draw when turned on, ensure that it is turned off when 120-volt power is not needed.
ü * Only use the inverter power switch located on the monitor panel to operate the inverter. In the on position, the inverter will run all 120-voltitems in the coach including the A/C, refrigerator, microwave and power to your 110 outlets. * (Picture 39.3 on Previous Page)
ü NEVER USE THE SWITCH LOCATED ON THE INVERTER TO TURN IT ON OR OFF. THIS SWITCH IS THERE FOR MAINTENANCEPURPOSES ONLY AND SHOULD ONLY BE ACCESSED BY A CERTIFIED CARADO SERVICE FACILITY.
Shore Power Shore power is the name for power supplied by a utility company that you plug into to provide external power to your coach.
Other Switches
Monitor Panel with Awning Light Switch in the On Position.
Monitor Panel with Water Pump Switch in the On Position.
Picture 40.1 Picture 40.2

41
© Erwin Hymer Group North America, Inc., R00
Awning Light On the monitor panel, the top right switch is the awning light switch. Press the top of the button to turn the lights on, and the bottom to turn them off. These are LED lights and use very little power. (Picture 40.1 on Previous Page)
Water Pump Switch The lower left switch of the five switches is the water pump switch. It should be on only when you have water in the fresh water tanks and wish to use the sinks, showers, or toilet. The pump should not be on without water in your tanks or supplied from an exterior water connection source. As with the patio light switch, pressing the top of the button turns the pump on, and pressing the bottom turns it off. (Picture 40.2 on Previous Page)
Tank and Charge Indicators The battery charge level indicator is located directly over the battery disconnect switch. The fresh and black/grey water tank levels are located just over and to the right of the water heater switch. The button to check these levels are located just to the right of the level indicators. Your battery disconnect switch must be on for these displays to work. Press the button for each to see the display. These will give you an approximate reading, to the nearest third, of how much is in each tank. The four indicator levels for the water tanks are full, 2/3, 1/3 and empty. (Picture 41.1)
Tanks, LP and Charge Indicators.
Picture 41.1

42
© Erwin Hymer Group North America, Inc., R00
Distribution Panel The distribution panel is located on the driver’s side box frame seating area. The 120-volt AC breakers and the 12-volt DC fuses are behind a black plastic cover on the right side. (Picture 42.1)
The breakers and fuses are labeled on the distribution panels cover.
AC Breaker Flip the cover to the right and note the sticker under the cover with the identifying information on each breaker. When storing the Carado for the winter, turn off the battery disconnect switch, the inverter and all circuit breakers in this panel.
12 Volt Fuse Panel The 12-volt fuses are on the right side of the distribution panel with labels for each fuse on the inside cover.
Breaker and Fuse Access.
Picture 42.1

43
© Erwin Hymer Group North America, Inc., R00
Propane System
Propane (LP) Tank Typical View
Your Carado is equipped with a propane system which, when properly handled and maintained will provide trouble and worry-free operation of your propane fueled appliances.
The propane tank is located on the passenger side of the vehicle behind the flexible running board. (Picture 43.1) To access the tank for filling and to turn the main tank shutoff valve off and on simply reach behind the bar to complete these tasks. Propane level can be viewed on the tank mounted gauge (left-most fitting). (Picture 43.2)
Your Carado comes with a BBQ quick connect adapter. (Picture 43.3) * BBQ and quick link adapter sold separately. *
You must close the tank shutoff valve when the vehicle is not in daily use. Further, you must close the shutoff valve when the vehicle is in motion.
Propane Tank Located on Passenger Side Behind Side Door Step Up Bar.
Picture 43.1 Picture 43.2
Propane Fill Under Yellow Protective Cover and Level Gauge Indicated by Point
Out Line.
Picture 43.3
BBQ Quick Connect Adapter. Remove Yellow Protective Cover and Save to
Replace When Finished Using.

44
© Erwin Hymer Group North America, Inc., R00
UtilitiesJust like your house, your Carado has fresh water, electricity, waste water disposal, heating, and cooling systems. In the Carado, these systems are self-contained and travel with you. Your vehicle should be reasonably level to allow normal operation of these systems.
Fresh Water Your fresh water tank uses a gravity fill system, located in the driver's side door pillar. (Picture 43.3) You can fill the fresh water tank from a convenient water spigot and designed water fill hose. (Do not use a garden hose unless it is for potable water).
To fill the tanks with fresh water, open the driver's side front door and remove the orange plug in the fresh water fill port. Fill until water comes out the hole. If using a fresh water hose to fill, do not turn the water pressure up all the way. Water will start to back up in the lines before the tank is filled and you will get a return splash at the fill point. Always check your monitor panel after filling fresh water to make sure your tank is filled.
City Water The city water connection is on the driver’s side of the vehicle (Picture 44.2). Before making the city water connection, the ball valve located in the front section of the driver’s side storage needs to be closed. (See Picture 49.1) Unscrew the plastic protective cap, rinse the area with clean water and connect your clean hose to the water faucet and this connection point. Turn the faucet on and check for leaks, tightening the connections as necessary. There is a pressure regulator in the connection. See HOWTO’s: Potable Water Use for instructions on how to hook up to city water.
Picture 44.1 Picture 44.2 Picture 44.3
Water Pump Switch on Monitor Panel in On Position.
City Water Connection Located on Drivers Side Between Axles.
Fresh Water Tank Fill Located in Driver’s Side Door Pillar.

45
© Erwin Hymer Group North America, Inc., R00
Water Pump To use the water in the tank, you need to turn on the water pump. (Picture 44.1 on Previous Page) Check correct valve position for use with fresh water tank and correct position when hooked up to an exterior water supply.
Black/Grey Tank
The bathroom sink and shower water drains into the black/grey water tank. The shower and sink have traps to prevent tank odors from entering the living space. Be sure to replace the screw-in plug in the shower floor after use to prevent black/grey water from sloshing up into the shower pan from the black/grey water tank while driving.
The black/grey water tank contains human waste material.
Please refer to the HOW TO’s: Waste Water Dumping section for an explanation of which materials you can and can't flush down the toilet.
Indicators The black and fresh water tank level indicators located on the monitor panel will give you an approximate indicator of your tank levels. (Picture 45.1) When the black water tank is full, water will no longer drain down the shower and sink drains, and you need to dump the tank before running any more water. If you see fluid below the toilet valve in the bowl of the toilet, your black water tank is full and needs to be emptied before further use.
See Monitor Panel for more information.
Ensure that both the black and grey water gate valves are closed before using the waste water system. It is possible for the valves to open slightly especially after extensive driving.
Black and Fresh Water Tank Level Indicators on Monitor Panel.
Picture 45.1

46
© Erwin Hymer Group North America, Inc., R00
Heating and CoolingThermostat The thermostat controls the furnace and the air conditioner. Set the thermostat on "furnace" or "cool" and set the desired temperature.
The third setting, "fan", recirculates cabin air using the fan inside the air conditioning unit.
Air Conditioning The air conditioner (AC) provides cooling for your Carado using electric shore power, batteries or underhood generator. (Picture 46.1 and 46.2) The AC can be operated normally when you are plugged in to shore power or running the underhood generator while driving or idling. *Your RV is not designed to run the AC for extended periods of time on battery power alone.
• If your Carado is parked on an incline, it is possible for condensate to leak into the living space. If this happens, park in a morelevel location.
Air Conditioning, Furnace and Fan Thermostat.
Roof-Mount Air Conditioner. Picture 46.2 Picture 46.1

47
© Erwin Hymer Group North America, Inc., R00
Heating and Cooling (Continued) Propane Furnace
The propane furnace is controlled by the thermostat located on the passenger’s side rear wall. (Picture 47.1) The furnace requires propane and 12-volt power. The furnace can be used without shore power or generator use. Keep the aisle in front of the furnace vent clear of any obstructions when using the furnace to allow air circulation. (Picture 47.2) The furnace can operate when outside temperatures are below freezing.
The furnace will push air inside the coach. Please read the How To’s for further operation information.
Picture 47.1
Propane Furnace Heater Thermostat Controller.
Picture 47.2
Aisle Furnace Vent Located in Seating Area on Drivers Side of Coach.
“Never Block or Obstruct the Air Ducting When Operating Your Furnace.”
48
© Erwin Hymer Group North America, Inc., R00
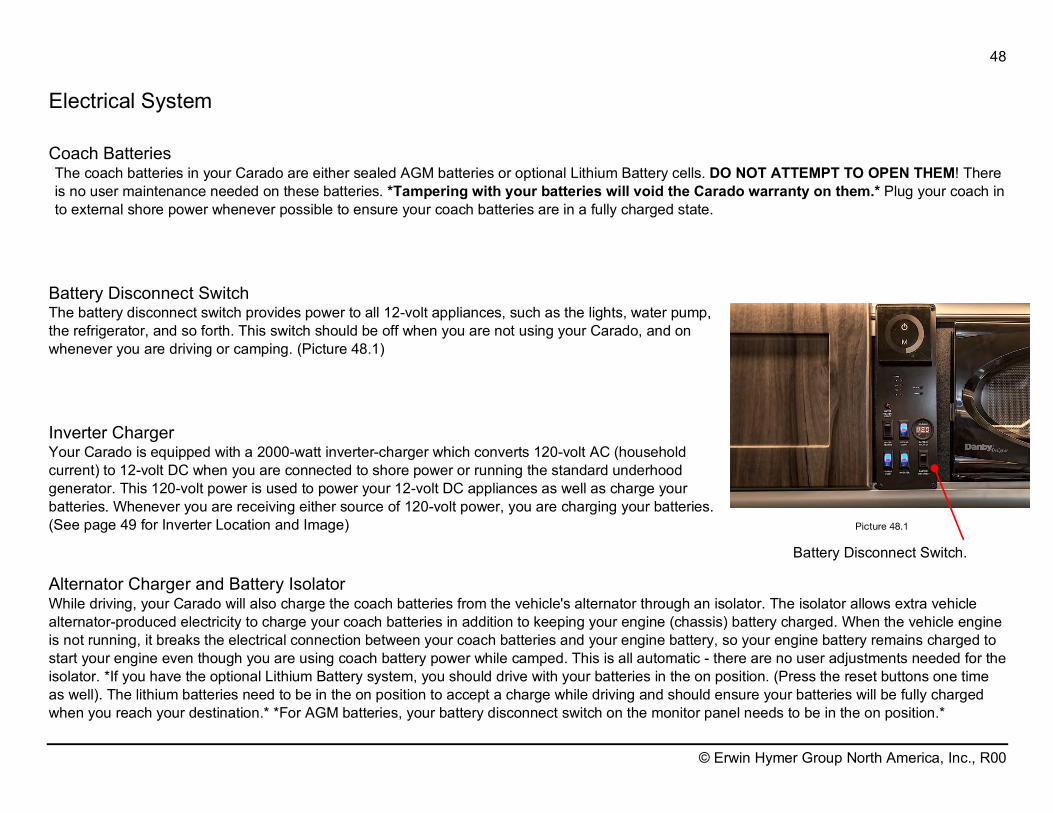
Electrical System
Coach Batteries The coach batteries in your Carado are either sealed AGM batteries or optional Lithium Battery cells. DO NOT ATTEMPT TO OPEN THEM! There is no user maintenance needed on these batteries. *Tampering with your batteries will void the Carado warranty on them.* Plug your coach in to external shore power whenever possible to ensure your coach batteries are in a fully charged state.
Battery Disconnect Switch The battery disconnect switch provides power to all 12-volt appliances, such as the lights, water pump, the refrigerator, and so forth. This switch should be off when you are not using your Carado, and on whenever you are driving or camping. (Picture 48.1)
Inverter Charger Your Carado is equipped with a 2000-watt inverter-charger which converts 120-volt AC (household current) to 12-volt DC when you are connected to shore power or running the standard underhood generator. This 120-volt power is used to power your 12-volt DC appliances as well as charge your batteries. Whenever you are receiving either source of 120-volt power, you are charging your batteries. (See page 49 for Inverter Location and Image)
Alternator Charger and Battery Isolator While driving, your Carado will also charge the coach batteries from the vehicle's alternator through an isolator. The isolator allows extra vehicle alternator-produced electricity to charge your coach batteries in addition to keeping your engine (chassis) battery charged. When the vehicle engine is not running, it breaks the electrical connection between your coach batteries and your engine battery, so your engine battery remains charged to start your engine even though you are using coach battery power while camped. This is all automatic - there are no user adjustments needed for the isolator. *If you have the optional Lithium Battery system, you should drive with your batteries in the on position. (Press the reset buttons one time as well). The lithium batteries need to be in the on position to accept a charge while driving and should ensure your batteries will be fully charged when you reach your destination.* *For AGM batteries, your battery disconnect switch on the monitor panel needs to be in the on position.*
Battery Disconnect Switch.
Picture 48.1

49
© Erwin Hymer Group North America, Inc., R00
Optional Equipment
Optional Solar Panels
The optional solar panels will charge your Carado batteries when a sufficient light source is available. The solar charge controller is installed at the factory for the type of panels and batteries installed on your Carado, and Erwin Hymer Group NA strongly recommends that you make no adjustments or changes to the charge controller or its programming. If equipped with a display, the charge controller usually displays either system voltage or amperes generated by the panels.
(* Please check the coaches MSRP or your build sheet to see if your Carado is equipped with the optional 200W Solar Charging System. *)
Optional Solar Charge Controller Located Under the Drivers Side Bedding Platforms.
Picture 49.1

50
© Erwin Hymer Group North America, Inc., R00
Optional Equipment Continued Optional HDTV with Blu-Ray Player The optional HDTV with Blu-Ray player are located on the passenger’s side of the coach, just aft of the sliding side door. The Blu-Ray system is located in the first overhead cabinet. (Picture 50.1)
The television is on a swivel mount that allows viewing from anywhere within your Carado as well as from outside your Carado. (Picture 50.2) (Picture 50.3)
(* Note: Do not use the TV in the outside coach position during inclement weather. Moisture or other elements may affect the TV’s performance or permanently damage the TV.
Optional Blu-Ray Player Located in First Upper Cabinet on Passenger Side.
(*Note the Dual 12V Power Plugs. These are for the Blu-Ray and Your TV Power.)
Picture 50.1
Optional HDTV in Intended Stowage Position.
Picture 50.2
Optional HDTV Swiveled to Face Outside of Coach.
(*Note That the TV Will Swivel Left/Right to Face Multiple Angles.)
Picture 50.3
(* Note: If the television arm starts to loosen or move while driving, there are slot screws on the tension catch that can be tightened or loosened as needed. * )

51
© Erwin Hymer Group North America, Inc., R00
On Board 120-Volt AC Power
Standard 2000W Inverter The standard configuration includes a 2000-watt Pure Sine inverter. This inverter provides 120-volt AC (household current) for all of the outlets in your Carado; including the ones running the microwave and the air conditioner.
The inverter is configured at the factory for the battery type and power sources in your Carado. Please do not change any settings without consulting the factory.
Your refrigerator will run on either 12-volt battery power or 120-volt inverter (DC) power.
The power button on your 2000W inverter must always stay in the off position. If the switch is turned to the on position your inverter will be running continuously draining your battery levels. It also overrides the inverter switch that is located on your monitor panel of your Carado. (Picture 51.4)
* Always use the Inverter button on the monitor panel to power your inverter on or off. (Picture 51.1) Failure to do so will result in aconstant drain of your battery system and will deplete the batteries to an unsafe level. *
Inverter Switch In on Position.
Inverter Storage Compartment. Located Under Drivers Side Hinged Board.
Inverter Inside Storage Compartment. Inverter Must Be in Off Position.
Notice Power Button in Off Position and No Display on LCD Screen.
Picture 51.1
Picture 51.2 Picture 51.3 Picture 51.4

52
© Erwin Hymer Group North America, Inc., R00
Shore Power The shore power connection is through the shore power cord, stored in the rear large compartment drawer in the washroom/shower area. (Picture 52.1)
The shore power cord connect port is located in the driver’s side running board next to the running boards that house the dump hose and black/grey gate valve. Notice that the bottom prong on the receptacle has a slight bend to it. (Picture 52.2)
Match up slightly bent opening on shore power cord to bent prong in 30AMP connect port. (Picture 52.3) After lining up the receptacle prongs to the shore power cord, gently push the cord until the prongs are fully inserted. Then proceed to take the plastic black piece and attach it to the threads on the connect port. Turn clockwise to tighten and secure the power cord to the connect port. When connected and plugged into a power source, the red light on the power cord will illuminate. (Note – Use caution not to cross thread when tightening the power cord ring to the power port.)
The switchover from shore power to inverter is automatic. Before plugging in, turn on the inverter switch on the monitor panel.
To connect to external (shore) power, plug your power cord into a 30-amp power source. At this point your inverter will recognize the power source.
If a true 30-AMP power source is not available, adapters are available that allow for plugging into 110-outlets.
See HOWTO’s: Shore Power for a concise guide on how to connect and disconnect to shore power.
30AMP Shore Power Cord.
Picture 52.2
30AMP Shore Power Cord Connect Port. (*Note – Bottom Prong has Slight Bend
to it.)
Picture 52.3 30AMP Shore Power Cord. (Note the Bend
in One Slot. Attach to Prong in Picture 52.2.)
Picture 52.1

53
© Erwin Hymer Group North America, Inc., R00
OutletsThere are several outlets throughout your coach. (Picture 53.1)
The outlets are operated from the inverter, generator, or shore power and are protected by GFCI.
Several outlets have ground fault circuitry (GFCI) - the button in the middle of the outlet pops out when the circuit becomes overloaded, they sense an anomaly has occurred or sometimes when the circuit undergoes transitional conditions. These outlets also protect other outlets in the Carado. If you are not getting power from an outlet, check and reset this button on the GFCI outlet itself if needed.
All the outlets are connected so if the GFCI trips on any outlet in the coach you will need to rest this breaker that is located on the electrical panel located underneath the seating cushion on the driver’s side of the coach.
12V, USB and 110 Outlets are Available Throughout Your Carado
Picture 53.1

54
© Erwin Hymer Group North America, Inc., R00
Alarms and Warnings Propane and CO Alarm
Your vehicle has been equipped with a combination propane leak and carbon monoxide detection device for your protection. It is located slightly above floor level on the seating area next to the vents towards the front of the coach. (Picture 54.1)
Be sure the detector is operating while using your vehicle. Do not block air circulation in the area where the propane leak detector is located. The detector runs on 12-volt power, and is operational whenever the battery disconnect switch is on. Whenever the vehicle is occupied, the battery disconnect switch should be on the "on" position for this reason.
Coach power on the Monitor Panel must be in the on position for the CO detector operation.
Make sure your battery disconnect switch is on.
Do not disable, unplug, or otherwise hinder the operation of this detector or the smoke detector.
The CO and Smoke detectors have a useful service life, beyond which it needs to be replaced. Alarms will occur from these detectors when the battery voltage is low.
See Manufacturer’s Owner’s Manual for other operating instructions, or look for the sticker which is sometimes placed on the detector to see the replacement date.
The detector may chirp if the coach batteries are running low.
Smoke Alarm
The smoke alarm is located near the front of the coach just inside the side entry door by the kitchen galley. (Picture 54.2)
The smoke alarm requires a 9-volt battery and periodic replacement. Please refer to the Appliance/Products Owner's Manual for the unit in your vehicle. Smoke alarm is shipped with battery reversed. Check battery installation if the smoke alarm does not work.
Propane and Carbon Monoxide Alarm.
Smoke Alarm.
Picture 54.1
Picture 54.2

55
© Erwin Hymer Group North America, Inc., R00
Fire Extinguisher Your Carado comes equipped with a dry chemical fire extinguisher suitable for all fires. It is attached to the passenger seat base on the backside facing towards the passenger side storage compartment. (Picture 55.1)
Before every trip, check to see that the needle on the dial is in the green range. If not, replace the fire extinguisher.
DO NOT test your fire extinguisher by discharging it - total discharge time is 8 to 12 seconds, so it will become rapidly depleted if you test it this way. Service life on fire extinguishers currently supplied is 12 years; replace the fire extinguisher if it is more than 12 years past the year of manufacture stamped on the base of the cylinder.
Fire Extinguisher Located on Passenger Seat Base on Backside.
Picture 55.1

56
© Erwin Hymer Group North America, Inc., R00
Inside Rope Lighting Controls
Your Carado comes equipped with dimmable 12V rope lighting. (Picture 56.1)
The 1 button power control is located at the top of your monitor panel within a fading black to white circle above the letter M. (Picture 56.2) The 12V rope system will not operate unless you have your Battery Disconnect switch in the On position.
• To make your lights brighter, gently run your finger from the left side of the black to white circle to the right side. Stop at any pointwhen lighting has reached desired brightness. For full brightness slide your finger all the way to the end of the circle on the right-hand side.
• To lower the lighting, run your finger from the right side of the circle to the left. (Picture 56.3)
• *Note: The lights can be dimmed all the way to complete darkness. Please make sure your 12V rope lighting is off by usingthe On/Off power control switch. Leaving the lighting dimmed to complete darkness will still draw on your batteries unlessthe Battery Disconnect is in the Off Position*.
Rope Lighting Wrapping Inside of Coach.
Rope Lighting On/Off Control. Please Note That 12V Battery Disconnect Must Be in On Position for Lighting to Work.
Slightly Run Finger from Left to Right to Make Lights Brighter and Opposite Right
to Left To Dim.
Picture 56.1 Picture 56.2 Picture 56.3

57
© Erwin Hymer Group North America, Inc., R00
Flat or Leaking Tire Maintenance
Tire Jack and Inflation Kit
The spare tire removal kit is stored on the passenger side storage compartment. To access, you can slide the side passenger side entry door open and open the storage door or remove the backrest and seat cushions on the passenger’s side and lift up the hinged cover to reveal the spare tire kit. (Picture 57.1)
Your Carado will come with a 12V OEM Dodge portable tire inflation kit. This kit will be included in your coaches’ accessory box. (Picture 57.2)
Carado recommends that you have roadside service replace a flat or leaking tire or that you stop at a nearby tire shop as soon as practical.
Your Carado comes with a 2 Year Roadside Assistance membership included with your purchase. Check your owner's documentation for information.
Refer to the ProMaster® Owner's manual for proper spare tire replacement technique.
Spare Tire Jack Kit Stored in Passenger Side Full Length Storage
Compartment.
OEM Dodge Portable Tire Inflation Kit is Included with Your Carado.
Coach.
Picture 57.1 Picture 57.2

58
© Erwin Hymer Group North America, Inc., R00
Optional Tow Hitch and Tow RatingTow Hitch
Your Carado may come with a Class III hitch with 350 pounds of tongue weight capacity. It is equipped with a 4-way wiring hook-up. (Picture 58.1)
Your Carado can tow a maximum amount of 3,500lbs.
*Note – Remember to deduct the approximate amount of tongue weight for anything being towed on the rear of your Carado from youroverall Occupant Cargo Carrying Capacity. These numbers must be taken into account so that you do not overload your coach andsurpass the listed Occupant Cargo Carrying Capacity on your vehicles information sticker. *
*Note – If unsure of your overall Occupant Cargo Carrying Capacity when fully loaded and your tow item is hooked up to your Carado, you can find weight scales at all major truck stop facilities, state inspection areas and some RV facilities. Check your local area for a weight facility. *
Carado Class III Hitch Receiver with 4 Way Wiring Adapter.
Picture 58.1

59
© Erwin Hymer Group North America, Inc., R00
Maintenance
Tires See the automotive chassis manufacturer's owner's manual and documents for tire warranty information. Inflation pressure information is located on the driver’s door post. The current RAM ProMaster® manual recommends checking tire pressures regularly, at least every other week and before a long trip. Tire rotation intervals depend on wear and other factors but tires should be rotated at least every maintenance interval, defined in your ProMaster® owner's manual.
Occupant Cargo Carrying Capacity
See the information labels attached to the driver door post. (Picture 59.1)
Sample EHGNA Vehicle Door Sticker. Information Includes Tire Inflation Information, Occupants and Cargo Carrying Capacity and at the Bottom of the Label You Will Find Your Coaches Paint Codes.
Picture 59.1

60
© Erwin Hymer Group North America, Inc., R00
Owner Maintenance Checks Listed below are vehicle maintenance checks and inspections that should be performed by the owner or qualified service technician at the indicated intervals. Any adverse conditions should be brought to the attention of your dealer or qualified service technician for expert service advice as soon as possible. The owner maintenance checks are generally not covered by warranties and you may be charged for labor, parts and supplies used
When You Stop for Fuel or Weekly • Check engine oil level.• Look for low or underinflated tires.• Walk around your RV, check for damage and correct light function.
Every Other Week • Check tire pressure on all tires and your spare.• At Least Monthly• Check coolant level in the coolant recovery reservoir.• Check windshield washer fluid, brake fluid and power steering fluid levels.• Check operation of all exterior lamps, including brake lamps, turn signals and hazard warning flashers.
At Least Every Three Months • Flush water to the bathroom vanity sink. Use a hose or bucket to fill the tank through the sink and dump. Flush grey/black water holding
tank. Use a hose or bucket to fill the tank through the vanity bathroom sink and dump.• Flush and sanitize fresh water tank. The fresh water tank drain is located behind the running board skirt directly to the left of the city water
connection. See Picture 57.1 for fresh water door and city intake fill. Valve position allows for filling from either location. To flush the tank:o Fill it completely using the city fill and drain using the fresh water tank drain underneath the tank, under the coach behind front axle.o Sanitize by adding 1/2 cup chlorine bleach to the tank, fill with water, let sit for at least two hours, and drain. 1/2 cup vinegar added to
the next tankful, which will also be drained before filling with fresh water for use, will help dissipate the chlorine smell.
Refer to other sections in this manual for drain and fill locations.
Picture 59.1
Water Line Location Under Bedding Boards.

61
© Erwin Hymer Group North America, Inc., R00
Owner Maintenance Checks (Continued)
At Least Twice a Year • Check windshield wiper operation.
o Clean wiper blades with clean cloth dampened with washer fluid.o Wiper blades should be replaced at least once a year.
• Check radiator, heater and air-conditioning hoses for leaks or damage.• Check for worn tires and loose wheel lug nuts.• Check parking brake system and put the brake on and see if it will hold on a moderate hill. If not, get it repaired.• Check head lamp alignment.
o Shine your low beam headlights on a wall. The light patterns should be the same height. Measure headlight height at the vehicle witha yardstick and the light patterns should be the almost same height or slightly less with your vehicle level. If not, get the headlightsaligned.
• Check lap and shoulder belts for wear and function. Replace any belts with frayed spots or that do not smoothly retract into their holders.• Inspect appliance vents to ensure they are free from dirt, insects, spider webs and/or nests.• Inspect grey water tank vent and remove any debris or other obstructions. The grey water tank vent is on the roof, passenger side and in the
bathroom area.• Clean air conditioner filter. See air conditioner manual for details.• Thoroughly clean and wax the roof of the van.
o To wash the solar panel, use a garden hose to rinse dirt off the panel.o Do not scrub it with a brush or otherwise apply any abrasive material to the solar panel surface.o Rinsing the panel two or three times a year to remove excess dirt is all you need to do to keep the panel operating at full output.
• With the tank empty, add one cup of mineral oil and one cup of hot water to the grey/black tank.
At Least Once a Year • Lubricate all door hinges, locks and latches, especially the exposed hinges on exterior doors. These will freeze up and cause damage to the
doors if neglected.• Have appliances tested and cleaned.• Wax and polish and protect exterior surfaces. The wheels are coated aluminum and there is no bare aluminum on the vehicle, so do not use
aluminum polish on any surface of your Carado.

62
© Erwin Hymer Group North America, Inc., R00
Owner Maintenance Checks (Continued)
To prevent water from entering your vehicle, avoid spraying water directly into exterior vents or grills. Do not use a power washer to clean your Carado because damage to the paint, removal of decals and water leaks will result. Hand washing or commercial car washes accommodating large vehicles are the best way to keep your Carado clean and shiny.
Other Maintenance Checks Appliances
Follow the maintenance for your appliances as per the appliance’s manufacturer's manual.

63
© Erwin Hymer Group North America, Inc., R00
Specifications
For general chassis specifications, please refer to the RAM ProMaster® manual. For specifications relating to your vehicle, including occupancy, weight rating, tire size, inflation and so on refer to the sticker on the driver's side B pillar (right side of the door frame, near the latch). These specifications refer to the baseline Carado upfits. Options and upgrades may change these specifications.
This applies to Erwin Hymer Group NA upfits only.
Total fresh water capacity 66.8 L/17.6 U.S. gal. Black/Grey water tank capacity 83 L/22 U.S. gal. Battery type AGM, maintenance free (Options Available) Battery capacity 185 Ah Standard (Options available) Standard propane tank size 22 L/ 5.9 U.S. gal. Propane tank capacity at 80% 17.6 L/ 4.7 U.S. gal. Water heater capacity 2.2 U.S. gal Furnace Propane Automatic 18,700 BTU/hour Refrigerator 12 volt, 3.1 cu. ft. Air Conditioner 110V, 11,000 BTU/hour

64
© Erwin Hymer Group North America, Inc., R00
Carado Banff Limited Warranty
What This Limited Warranty Covers
A new Erwin Hymer Group (EHG) motorhome has a limited warranty by EHG. This limited warranty covers the repair or replacement, of any part of your new Carado Banff in which a nonconformity in materials or workmanship appears during normal use, maintenance or service within the limited warranty period, subject to the limitations and exclusions described below in “What This Limited Warranty Does Not Cover”. REPAIR OR REPLACEMENT OF COVERED MATERIALS BY A EHG DEALER IS THE EXCLUSIVE REMEDY UNDER THIS WARRANTY. The repair or replacement of any covered material does not extend the life of the limited warranty.
Materials covered by this warranty are limited to those installed by EHG, including but not limited to, the interior finishing behind the drivers and passengers seating area, rearward windows, roof mounting air conditioning, rear heating system, electrical generator, and plumbing for the kitchen, shower and toilet. This limited warranty excludes the warranty set forth by Dodge Ram Promaster® or any parts or components added to the vehicle by another party. In addition to this EHG limited warranty, original component manufacturers may provide their own separate warranties. This limited warranty is valid only in the United States and Canada. Coverage under this warranty is not subject to proration or deductibles.
How Long the Limited Warranty Lasts
The original limited warranty is in effect for a period of 24 month or 24,000 miles whichever occurs first.
Who is Covered This limited warranty covers the owner of a Dodge Ram Promaster® equipped with a EHG RV conversion. The warranty is non-transferrable meaning should the first retail owner sell the unit during the warranty period the subsequent owner will not be entitled to receiving the EHG limited warranty.
THIS LIMITED WARRANTY IS NULL AND VOID IF THE VEHICLE HAS BEEN LEASED OR RENTED FOR COMPENSATION TO ANOTHER INDIVIDUAL OR ENTITY.
What This Limited Warranty Does Not Cover The exclusive remedy under this limited warranty or under any implied warranty that arises under state or provincial law is repair or replacement of any Covered Part in which a nonconformity in materials or workmanship appears during normal use, maintenance or service within the limited warranty period, subject to the following exclusions.

65
© Erwin Hymer Group North America, Inc., R00
Carado Banff Limited Warranty (Continued) LIMITATION ON DAMAGES: EHG shall not be liable for incidental, consequential, direct, indirect, or other damages (such as, but not limited to, lost wages, loss of use, loss in value, lost profits, lost opportunities, alternative transportation, inconvenience, cost of lodging, or lost vehicle rental expenses) that result from breach of the written warranty or any implied warranty.
LIMITATION ON IMPLIED WARRANTIES: This limited warranty is in lieu of and in exclusion of any other warranties, express or implied, including any warranty of merchantability or fitness for a particular purpose. Any implied warranties that arise under applicable state or provincial law notwithstanding the foregoing, including any implied warranty of merchantability or fitness for a particular purpose, are limited in duration to the term of this limited warranty and are limited in scope of coverage to those portions of the motorhome covered by this limited warranty.
ITEMS NOT COVERED BY THIS LIMITED WARRANTY INCLUDE THE FOLLOWING: • The automotive vehicle / chassis is warranted by Dodge. Please refer to the Dodge Ram Promaster® Warranty information for details.• Normal vehicle maintenance such as lubrication, batteries, tires, filter and oil replacement, belts and hoses, brake lining and
adjustment and vehicle alignments.• Damage caused by improper maintenance or use including, but not limited to, failure to follow the required or recommended
maintenance schedule, failure to maintain operating parameters (e.g. plumbing leaks, fluid levels, battery life) and failure to follow operatinginstructions.
• Additions or accessories not originally installed by EHG and any problems resulting from such additions or accessories.• Damage caused by misuse, carelessness, abuse or neglect, anything outside normal use.• Damage caused by collision, fire, theft, vandalism, weather, freezing, flooding, acts of God, or other casualties.• Damage or nonconformities with respect to Covered Materials in a vehicle that is leased or rented to another party for compensation.• Damage as a result of corrosion or corrosive agents and their contact with EHG materials
Third Party Representations EHG does not authorize any person to create for EHG any other obligations or liability in connection with its motorhome vehicle content, and EHG is not responsible for any representation, promise or warranty made by a dealer, component or vehicle manufacturer, or other person beyond what is expressly stated in this limited warranty.
How to Obtain the Limited Warranty The original retail purchaser is responsible for submitting, or having the vehicle dealer submit, a Carado Limited Warranty Registration form to EHG within 30 days of the date of delivery. This limited warranty is not valid if the Carado Limited Warranty Registration form is not sent to EHG within 30 days after the date of delivery. This form is located within the Owners & Maintenance manual, or may be completed on-line http://caradorv.com/warranty/.

66
© Erwin Hymer Group North America, Inc., R00
Carado Banff Limited Warranty (Continued)
How to Get Service To obtain warranty service for your Carado, call toll free 7 days a week 844-496-3735. Our customer care specialist can help answer questions regarding our products and services, provide information about warranty coverage and maintenance issues, help you arrange for service under other manufacturer warranties, and locate a Carado authorized dealers and service centers in your area. To find a current list of Carado authorized dealers and service centers on-line, go to http://caradorv.com/dealer-locator/. When you call, please have the following information available so that we may expedite your service:
• Your Dodge Ram Promaster® VIN (Vehicle Identification Number)• First retail owner’s date of purchase• The current actual mileage
NO WARRANTY CLAIM WILL BE PROCESSED OR PAID WITHOUT PROOF OF ACTUAL MILEAGE AND FIRST RETAIL OWNER’S DATE OF PURCHASE.
Roadside Assistance Plan You are enrolled in a 24/7 roadside assistance plan for the first 2 years of the limited warranty upon registration of your Dodge Ram Promaster® Carado. If your motorhome is disabled because of any nonconformity covered by this limited warranty or in certain other situations, our roadside assistance provider will assist by providing the following services: towing, mobile mechanic (where available), fuel delivery, tire change, battery jumpstart, lockout service and emergency fluids. To obtain roadside assistance, call 877-844-7309.
PLEASE NOTE THAT THE ROADSIDE ASSISTANCE IS ONLY AVALIABLE TO THE FIRST RETAIL OWNER AND IS NON-TRANSFERRABLE TO ANY SUBSEQUENT OWNERS.
Arbitration Provision Any claim or controversy arising out of or relating to this limited warranty, or breach thereof, shall be settled by arbitration administered by the Canadian Arbitration Association in accordance with the Arbitration Rules of the Canadian Arbitration Association. The determination of the arbitrator(s) shall be in writing and shall include an explanation of the basis for the determination. The determination of the arbitrator(s) shall be final and binding and judgment upon such determination may be entered in any court having jurisdiction.

67
© Erwin Hymer Group North America, Inc., R00
RegistrationPlease send the following form in or email the information to http://www.roadtrek.com/warranty-information-and-registration/ when you purchase your Carado. Your new Carado should be registered on your behalf by your dealer. However if that step is overlooked, the please visit the following link to insure that you are properly registered with EHGNA: http://www.caradorv.com/warranty

68
© Erwin Hymer Group North America, Inc., R00
Aftermarket Disclaimer
The compatibility of aftermarket systems and components should be researched thoroughly either with the dealer or manufacture as they may interfere with the performance of Erwin Hymer Group North America (Roadtrek, Hymer, Carado etc.) recreation vehicle systems and components, further affecting the warranty of the vehicle as designed.

69
© Erwin Hymer Group North America, Inc., R00
Regulatory Notices
If you believe that your vehicle has a defect which could cause a crash or could cause injury or death, you should immediately inform the National Highway Traffic Safety Administration, (NHTSA) in addition to notifying Erwin Hymer Group NA.
If NHTSA receives similar complaints, it may open an investigation, and if it finds that a safety defect exists in a group of vehicles, it may order a recall and remedy campaign. However, NHTSA cannot become involved in individual problems between you, your dealer, and/or Erwin Hymer Group NA.
To contact NHTSA, you may call the Auto Safety Hotline toll-free at 1-888-327-4236, (or 366-0123 in Washington, DC area) or write to:
NHTSA U.S. Department of Transportation Washington, DC 20590
You can also obtain other information about motor vehicle safety from the NHTSA Hotline.
HOW TO’s:
For access to more information on how to perform general functionalities of your Carado, please go to:
http://www.Caradorv.com/support
https://www.caradorv.com

70
© Erwin Hymer Group North America, Inc., R00