ed112008.tif - ERIC · Detailed procedurds for canning specific food products (in-lrafiaor cans)...
115
DOCUMENT RESUME 'ED 112 008 .CE 004 755 AUTHOR Lee, Jasper S., Ed.; Wood, Charles TITLE Food PreservationManual: A Guide for\ School-Community Canneries in Virginia. INSTITUTION Virginia Polytechnic Inst. and State Univ., Blacks rgt Div. of Vocational-Technical Educ tion. 'SPONS AGENCY Vir inia State Dept. of Education, Richmond. Ag icultural Education service. PUB*DATE 75 NOTE 116p.;.Portions of the illustrative material may not reproduce well on microfiche EDRS PRICE MF-$0.16 HC-$5.70 Plus POstage DESCRIPTORS Cooking Instruction; *Equipment; *Food; Food Processing Occupations; *Food Service Industry; Foods Instruction; *Manuals;,Nutrition Instruction;, *Preservation; School Community Relationship; Secondary Education IDENTIFIERS *Canning ABSTRACT i ,The%manual was intended primarily 'for use by lay: ,instructors and assistants involved in the daily operation of school-community.canneries under the supervision,of a. high school, agricultural education instructor.. The first half deals in detail with the fundamentals of food preparation and cannerr,optyation. Food preservation by canningt sanitation in the canning structure, cannery equipment, and general canning procedures are discussed and illustrated. Detailed procedurds for canning specific food products (in-lrafiaor cans) are presented for 34food prodUcts,in the general.categories of fruit; vegetables;, and meat, meat products, and poultry. Information cruthe fields 'of food proddCts and the use of sugar in canning fruit is included: Three sample/lesson plans'for planning instruction in various areas of nutrit* n and food preservation are also in the manual. These planS offer teacher . objeCtives, an introduction, group objectives, pr blems and concerns of students, references, suggested visual aids, s ecial_activities, and ideas for application a A evaluation. A conten summary provides basic information needed fo each ;esson. Apvended is a list of sources of instructional ma erials on food preservation. A 28-item bibliography contains sourc s of additional information on food preserveation. (MS). ************************ ********************************************** Documents acquired by ERIC include many informal unpublished * materials not availab e from other sources. ,EPIC makes every effort * * to obtain the best co y available. Neverkheless, items of marginal * * reproducibility are of en encountered aCd this affects the quality * * of the microfiche and hardcopy reproductions EMIC makes available * * via the ERIC Document Reproduction Service (EDRS* EDRS is not * * responsible for the quality of the original document. Reproductions * * supplied by EDRS are the best that can be made from the original. * *********************************************************************** ,
Transcript of ed112008.tif - ERIC · Detailed procedurds for canning specific food products (in-lrafiaor cans)...

DOCUMENT RESUME
'ED 112 008 .CE 004 755
AUTHOR Lee, Jasper S., Ed.; Wood, CharlesTITLE Food PreservationManual: A Guide for\
School-Community Canneries in Virginia.INSTITUTION Virginia Polytechnic Inst. and State Univ.,
Blacks rgt Div. of Vocational-TechnicalEduc tion.
'SPONS AGENCY Vir inia State Dept. of Education, Richmond.Ag icultural Education service.
PUB*DATE 75NOTE 116p.;.Portions of the illustrative material may not
reproduce well on microfiche
EDRS PRICE MF-$0.16 HC-$5.70 Plus POstageDESCRIPTORS Cooking Instruction; *Equipment; *Food; Food
Processing Occupations; *Food Service Industry; FoodsInstruction; *Manuals;,Nutrition Instruction;,*Preservation; School Community Relationship;Secondary Education
IDENTIFIERS *Canning
ABSTRACTi,The%manual was intended primarily 'for use by lay:
,instructors and assistants involved in the daily operation ofschool-community.canneries under the supervision,of a. high school,
agricultural education instructor.. The first half deals in detailwith the fundamentals of food preparation and cannerr,optyation. Foodpreservation by canningt sanitation in the canning structure, cannery
equipment, and general canning procedures are discussed andillustrated. Detailed procedurds for canning specific food products(in-lrafiaor cans) are presented for 34food prodUcts,in thegeneral.categories of fruit; vegetables;, and meat, meat products, and
poultry. Information cruthe fields 'of food proddCts and the use ofsugar in canning fruit is included: Three sample/lesson plans'forplanning instruction in various areas of nutrit* n and foodpreservation are also in the manual. These planS offer teacher
.objeCtives, an introduction, group objectives, pr blems and concernsof students, references, suggested visual aids, s ecial_activities,and ideas for application a A evaluation. A conten summary provides
basic information needed fo each ;esson. Apvended is a list ofsources of instructional ma erials on food preservation. A 28-itembibliography contains sourc s of additional information on food
preserveation. (MS).
************************ **********************************************Documents acquired by ERIC include many informal unpublished
* materials not availab e from other sources. ,EPIC makes every effort *
* to obtain the best co y available. Neverkheless, items of marginal *
* reproducibility are of en encountered aCd this affects the quality *
* of the microfiche and hardcopy reproductions EMIC makes available *
* via the ERIC Document Reproduction Service (EDRS* EDRS is not *
* responsible for the quality of the original document. Reproductions ** supplied by EDRS are the best that can be made from the original. *
***********************************************************************
,
DOal
r-4
L.,
U.S. DEPARTMENT Of HEALTH.EDUCATION i WELFARENATIONAL INSTITUTE OF
EDUCATION
THIS DOCUMENT AS BEEN REPRO-OuCED EXACTLY AS RECEIVED FROMTIE PERSON OR ORGANIZATION ORIGIN.ATING IT POINTS OF VIEW OR OPINIONSSTATEO DO NOT NECESSARILY REPRE-SENT OFFICIAL NATIONAL INSTITUTOFEDUCATION POSITION OR POLICY
FOOD PRESERVATION MANUAL
A Guide for School-CommunityCanneries in Virginia
compiled and editedby
Jasper S. LeeAgricultural Education
with the _assistanceof
.Charles B. WoodFood Science and Technology
,
It
AgriculturalEducativ ProgramDivision of Vocational and Telhnical Education
College of Education
Virginia Polytechnic Ihstitute and State University
Blacksburg, Viginia
In Cooperation WithAgricultural' Education ServiceDivision.of Vocational EducationState Department of Education
Richmond, Virginia
. 1975
t,.

. td
4
Preface
The patronage of school-community canneries has been increasing in .
recent years. Many of these canneries were originally established in the1930's, 40's, and 50's to Virginia. In the.1960's there was a decline in
the use of these facilities. Beginning in the early 1970's there was a
rather marked increase in usage._ Much Of.this increase can be attributedto rising food prices and shortages of certain food items.
A definite need arose to make available the latest inkormatitn onfood preservation practices. The purposes_of*this document are to (1)
review current standards for preservation, (2) present details on
the preservation of specific'foodfood products, and (3) present samples oflesson plans for teaching food preservation, including sources of in-structional materials. In other words, this document is the result, of anattempt to combine the technical aspects of food preservation with the ed-ucational functions of school-community canneries. To this end, joint
planning and writing were conducted by food scientists and educators.
A primary consideration in the development of this document was themethod in which school-community canneries are operated. In most cases,
a high school agricultural education instructor has responSibility for
the overall supervaion of canneries. Home economics teacilers are also
involved, but to a lesser extent. The actual day-to-day operation ofthe canneries is often under the direction(of a lay instructor and oneor more assistants. ts
This document stresses the essentials of presarvation as related tothe prope processing of food. The terminology has been simplified sothat a m" imum of formal instruction is reqUired in food science in orderto read Ind understand the fundamentals of cannery operation and food
preservation. A number of supplementary materials and references arelisted. 1These should be of considerable help to cannery supervisorsand instructors. N
1
1 %
ilA umber of persons have made substantial contributions to theevolut'on and development of this document. This is not the first doc-
ument or food preservation and school-community cannery operation in
Virgin a. The work in preparing previous materials had considerablebearing on the content and format of this current edition. One of the
ptrson making significant contributions in an earlier document wasClaude E. Richard, formerly a Professor of Agricultural Education at
Virgi ia Tech.
t
Many persons have ,been involveb in the preparation of this publi-r
.cation. Charles B. Wood, Associate Professor.of Food Science and
Technology is due considerable reco ition for his work in preparing
the 9t
ontent on the technical aspect' of food preservation and canneryoperation. $r. Wood has many years of experience in the field of foodpreservationand has. often consulted -with personnel involved in the
scho 1-community canneries.
Ackn wledgments
t

Other individuals who have provided considerable assistance are:
Mr. William C. Dudley, Assistant Supervisor of AgriculturaPEduea:-
tion, State Department of Education
Mr. J. H. Copenhaver, Assistant Supervisor of Agricultural Educe-,
tionState Department of Education
Mr. Robert A. Wall, Assistant Professor, Vocational and Technical
Education, Virginia Polytechnic Institute and State University
Dr. James D. Baldock,"Assistant Professor, Food Science and Techno-
logy, Virginia Polytechnic Institute and State University
Dr. Jamesj. Clouse, Professor and Program Leader, Agricultural
Education, Virginia Polytechnic Institute and State University,
Dr. Delene W. Lee, Research Associate, Virginia Polytechnic Ingti-
tute and State University
Jasper S. LeeApril 1975
5
N
Table.of C9ntents
/
PrefaceAcknowledgments
A.
Part i - Fundamentals of Food Preservation, and Cannery.Operation . .
Introduction to Food Preservation
Page
iii
iii
1
Food Preservation by Canning'3
Sanitation in the Canning Structure .7
Cannery Equipment.. 9
Procedures in the Operation of Retorts 17
-, Atmospheric CookerZ4
Steam Exhadst Box25
1
Steam-Blancher Looler ,
Sinks and grepqration Surfacese
26
26
Corn'Cutters . r, 26
Can Sealers28
Double Seam Inspection31
Steam'- Jacketed Kettle.1
35
N. Containeis . . . . . . . . . . . .. ., , .. . .. . .1 e ..r...:1 . 35
NN_ General Canning Procedures .- 37
p Filling Containers .1
44
ExhauStink45,
,
Sealing47
Summary48
. ,
Part II - Canning Specific Food Products 51
'Yields of Various Food Products. 53
.'"
Fruit .,
' Use of Sugar in Canning Fruit54
Apple Buttdr55
AppleS (Sliced or Quarteted)5'6
Amide Sauce57
Berriesi
.
Cherries.Fruit JuicesPeachesPearsPlums 1
58
59
60
61
6263
Vegetiables
Asparagus. ; 64
Beans - Butter-or Lima65
Beans - Green Beans (Snap Beans) 66
Beets . 67
Carrots68
Corn - Cream Style69
Corn - Whole Grain70
Greens71
Peas - Green (Ertglish) and Black Eyed 72
Pumpkin and Winter Squash -73
Rhubarb74
C

4
Sauerkraut ,
Summer SquashSweet Potatoes --Wet Pack (In Syrup)
'Tomatoes (Raw Pack Method)
Tomato Juice .
Vegetables (Mixed)Meat and Poultry.
)Chicken,Chicken Giblets .
Ground Meat Cakes or Hamburger. -.-:- .. :Headcheese .
Lard), Lard,
Pork. Sausage 4
Roasts, Steaks, and Stew Meat. . t
Broth and SOup Stock (Beef) .
,. .
,
.
, ,
,
Page
75
76
77'78
79
80
81-
82
838485
86
87
88
Part III - Providing Instruction in Nutrition and Food Preservation. 89
How to Use the Sample-Lesson Plans ,, 91
Sample Lesson Plan: Meeting Nutritional Needs -- 92
Sample Lesson Plan: Planning for Meeting Food Needs 99,
Sample Lesson Plan: Preserving Food' 105,
4Appendi - Sample Sources of Instructional Materials on Food, .P eservation
.
109
Biblio aphy,--, ,
111
1
7ti

- e
4
Part I
Fundamentals of Food Preservationand
Cannery Operktion
C
The purpOse of ,Part I of this pu6ication is to present a summary-/
of the fundamental considerations in food preservation and cannery °pet-.
ation. Various illustrations have been used`to clarify the manuscript,
as needed. Mayor sections of Part I deal with the.following topics:
Introduction to food preservation, specifically canning. c
Sanitation in school - community canneries.,
Inspection of cans and jars. , . e.
General procedurea'in canning.0
:10
0'
Vr
'IN
114
1
8'.
\` I
rer
"

Introductipn td Food Preservation
'- ',The primary purpose f'food preservatiOn'is the prevention, of food
spoilage. -Some' spoilage is-manlifesied 173; cdmparative minor changes-in
the normal character of foods, such as slight alteration in odor, flavor
and-texinre. ',Some types of .spoilage manifest more eXtremecalterations,
such as sduring, molding and petrification. Most spoilagris caused by
micro-organisms, such as yeasts, molds, and bacteria.
The yeast's, molds, and bacteria are very small organisms of the
plant kingdom which utilize tks,saMe foods in their. growth and develOp:-.
'thent thatArecommonly used. by man. These, organisms are- found in,a-bun-
dance in air, water, and soil. They undergo.verTrapid growth and
development. Some4iacterie may go through -100 generations in'a twenty-'
Our hopr'Peridd or one generationdja, fifteen minutes. When lodged in
or%onfoods, these spoilage organism4 utili& the food to 'support the
various phases of their life cycles. .As'a result, the natural characi,
teristics of the foods are- changed chemically,'physicallj,, or both,"
thus producing the condition commonly termed "food spoilage."
-Like all ,living Orgadisms, yeaSts, molds, and bacteria can survive .
only undet favorable conditions.- If external condition's to which they
are exposed become unfavorable, these spoilage organisms canrIbt.grow
or survive." Such 'chnditions'include extreme heat or cold; inadequate
Moisture, excess saltness and/or acidity of the food in which the or-
.ganisms are present. The underlying principle of all food preservation
methods is- =the creation of-unfavorable environmental conditions--tem-
5 porary or sustained--underuhich spoilage organisms cannot grow'or sur-
vive..
Keeping these conditions in mind, it will be found that all pre- '
served foods employ one or more of'these principles. Dehydrated milk,-
salted herring, froienorange juicd, canned vegetAbles, and jams and
jellies are a few examples of preserved foods employing some of the
principles' mentioned. .Therefore, food may be preserved by chemicals,
dehydration, and heat sterilization. For the purpose of thii publi-
. cation heat sterilization (canning) bill be the principal method dis-
Cussed.,
Food Preservation. by Canning%
-Canning can be defined asplacing carefully gelected and prepaied
foodin a container, that Is hermetically sealed and then subjected to
an elevated temperature for a time sufficient.to destroy spoilage orT
ganisms and then cooled. Heating the contents of the container Pro-
duces an unfavorable temperature condition for spoilage 'micro- organisms
whichmay bepreient in the food; consequently, such organisms are
destroyed or their growth' inhibited. After cooling, the permanent
seal of the container prevents recontamination of the product by spoil-
age organisms which are carried by air and water.'
3
9.4

fi
N.
Figure I-1. Photograph of Greatly Figure 1-2. Photograph of Greatly
Enlarged Yeast Cells. Enlarged Mold Showing Filaments and:Spare Heads,
CHAINS OF RODS SPORING RODS STREPTOCOCCI,
Figure 1-3. Photograph of Gieatly' Enlarged Bacteria.
10
4

am,
pH VALUE
M 31;0 --- .-
RHUBARB''ORAPEORUIT
.... PLUMS
. 0. APPLES,4HERRIES. 3. 5 . SAUERKRAUT
W in
PEACHESAPRICOTS
4.0
PEARS
415
5.0
5.5
6.0
6.5
7.0
7. 5
00
FIGS
OKRACARROTSBAKED BEANS, SNAP BEANS, PUMPKINBEETSASPARAGUS, WHITE POTATOESBROCCOLI
LIMA BEANS, CORNED BEEFPEASCORNCHICKENMUSHROOMS
SALMON
CRAB
SHRIMP WATER)
HOMINY
Representative pH Values of Different Foods
(Foods with low pH values are acidic and require
.less heat in processing.)
5
11

Selecting a method for commercially sterilizing a given can of food
requires knowledge of (1) the type of micro-organisms that will probably
be present in the food, (2) whether the food is an acid, or low acid food,
(3) \She oiloand fat content Af the food, (4) the presence of 84arches or
sugars, and (5) the sizetand shape of e container. Bacteria are the most
resistant to heat of the three spoi ge organisms. Yeasts exhibit the
least-resistance to heat whilt-mo ds have only slightly more resistance,
than iiasts. Yeasts and molds will grow and develop in acid foods while
bacteria are inhibited by the acid conditions. The combination of the
acids in foods and heat during processing is most effective in destroying
spoilage organisms. Therefore, the more acid a food has, the less heat
required to destroy the organisms present.
Acid foods can be safely processed in boiling water baths, 100°C.
(212 °F.). Most fruits and tomatoes are classified as high in acid.
However, some of the new varieties; parti.cularly new tomato varieties,
contain less acid than the older varieties ancl,, therefore, cannot be
.-., classified as acid foods. These varieties should be acidified with an
aproved organic food grade acid before processing.
Low-acid foods do not contain enough acid to destroy or inhibit the
growth of bacteria without the application of high heat during processing.
Processing under steam,pressure is necessary to obtain temperatures suf-
ficient to sterilize or process loW-acid foods.-,
The heat resistance of an organism may diffe4 depending on the
food in which it is heated. ProdUcts which contain oils and fats tend
to protect the spoilage organism!spores from heat $y keeping them "dry,"
that is, free from external moisture, in which condition :they are more
difficult, to destroy.
The addition of starches or sugars to foods increases the visco-
sity of the food consequently, the\rate that.the\heat penetrates the
food to the coldest point in the container is sloWed considerably.
Foods to which either of these two ingredients has been added must be
'processed for a longer time than those foods to which no starches or
sugars have been added.
The rate of speed at whichheat penetrates to the coldestpoint in a container of food isan important factor in determiningthe length of time required forprocessing. This is becausespore 'destruction involves bothtime and temperature. Heat moves
. from the walls of the containerthrough the product, either byconvection or conduction. Withconvection heating, there is anactual movement of the liquid in
the contkiner. Convection heat-
ing can only occur when there isa free liquid,which can cl.rculats.
Heat Panatratien. CA illustratesconvaction-baatisg and IS illustrates
conduction hiating.)
1 2 6

The addition of starches or sugar to foods increases the viscosity-of the
free liquid, thus slowing down the movement of the liquid and -retarding-
the rate of heat penetration. Foods containing fats and oils must alto
be given a longer process.. Semi-solid or solid produips, such as. pump-
kin, cream style corn, or baked beans, heat by conduction. Conduction
involves transfer of heat from one food particle tothe next. This is
a slow method of heating, and processingtimes for such products-a-re .nec-
essarily long.
Selecting the proper container in iahichthe food is to be canned is
most important. In most instances, glass is probably the most satisfac-
tory container for all classes Of foods. However, it does have some
disadvantages, such as being fragile, requiring special techniques and
time to process, and glass containers must be stored in dark places to
prevent chemical changes from taking place in the food due to light.
Metal containers (cans) are lighter weight, somewhat less fragile, ,and
easier and quicker in procelssing than glass containers. Cans are made
with several kinds of inside, enamel linings or coating for different
types of foods. Care should-be givenin selecting the proper can coat-
ing for the food to be canned. Metal containers also have certain dis-
advantages, such as, the necssity of exhausting to eliminate all air
from the food and container before sealing and using special techniques
in processing and cooling to prevent distOrtion of the container. Dis-
tortion could result in the container leaking, followed by spoilage.1 In
sealing, it is necessary to frequently examine the dlosure seam to be
sure that the seam is adequately strong and tight.
Foods are chemicals. Chemicals react more readily in warm -tem-
peratures than they do in temperatures just above freezing. Acid foods
are more reactive than foods.low in acid and, as.a result, they are less
stable and have a 'relative short storage life. Because low acid foods
are more stable thanoacid foods, little change takes place in them when
stored under proper conditions. Canned foods should be stored in as
cool a place as possible that is above freezing to minimize chemical
change.
Sanitation in the Canning Structure
Good sanitary conditions are important in food processing. This is
true not only because of public health and good appearance, but also be-
cause sanitary practices contribute to better quality and keeping char-
acteristics of canned foods. The cannery plant structure should be 'lo-
cated in a low dust -area with adjacent parking lot and roads either paved
or treated to control dubt. There should be good drainage away from the
building to prevent water puddling which is a'source of contamination to
food products through seepage or foot-borne filth. Standing water also
provides a breeding plaCe for insects and micro-organisMs. building
and the immediate. vicinitysurrounding it should be free from litter,
waste, refuse, and uncut weeds and grass. These may constitute an at-
tractant, breeding plade, or harborage for rodents, insects, and other
pests.
7
13

The building should be designed and constructed to facilitate main-tenance snd sanitary operation. The design of the building should pro-vide sufficielt space for placement of equipment and storage of materialsas necessary for sanitary operation and production of safe food. Floors,
walls and ceilings in the'plant processin& areas should be easily cleanedand kept in good repair. Fixture, ducts and pipes that drip may contami-nate foods and,should not be suspended over working areas, raw materialson food contact surfaces. Aisles and workingispaces between equipmentand= between equipment and walls_shdd be -unobstructed and wide enoughtopermit persons to perform their duties without contaminating foodsor ToOd-contact surfaces with clothing or other means. The'buildingshould have adequate lighting in hand-washing areas, toilet, rooms, anda/1 areas where food or food ingredients are examined, prodissed or storedand.where equipment and utensils arecleaned. Adequate ventilation shouldbeprovided to minimize odors, noxious fumes, or vapors (inclUding steam),in areas where they may contamini'ee food. The ventilating system shouldnot create conditions that might contribute to food contamination by air-borne contaminants. Effective screening or other protection againstbirds, insects and rodents should be provided.
a
All=equipment and utensils should be suitable for,the intendediuse.The design and construction of equipment'should facilitate cleaning, andmaintenance. The water supply should be sufficient for,the operation ofthe cannery and should be obtained from an adequate andafe source.Running water whici.i4under- pressure should be provided, to.all areaswhere focid is processed and equipment and 'utensils" are. cleaned. ;Sewage
should be disposed of;adequately. Provisions should be made to tra»solid waste and grease before reaching the disposal system. The plumbing
syStem=should be designed to do the following:/(1) carry sufficient quantities pf water to required 1,47a-,'
tionathrougyout thebuildini;(2) properly convey 'sewage and liquid disposal water from
' ' the building;(3) not constitute a source of contatinationtoloods, food
products or ingredients, water, supply, equiPment_orutensils or create unsanitary. conditions;
(4) provide adequate itaoi drainage in all areas where floorsare subject;to flood-type eleaning'or where normal opera-tions release or discharge water or liquid waste on thefloor; and
(5) adequate toilet and associated hand "washing fadi1itiesshould be provided within the cannery building.
,The facilities should be maintained in a sanitary condition and kept ingood repair at all times. Doors to toilet rooms should be,Iself-closingand should not open directly into areas where food is exposed-t air-borne contamination. 'Adequate and coxtvenient facilities f9r washin
I 7
14

N
should be provided. No periiAffected by disease in a communicable form
or while a carrier of such a disease, -Or while affected with boils, sores,
infected wounds or other,sources of microbiological contaminations,
should work in a cannery plant in any capacity in which there is a'reaSon-
able possibility of food or food ingredients becoming contaminated by such
person, or of disease being transmitted by/such a person to other indivi-
duals. All persons., while working in direct contact with food prepara-
tion, food ingredients, or surfaces coming into 6ontact,swith food should:
(1) wear clean outer clothing/maintain a high degree of
personal cleanline,s, and conform to hygenic practices
..while on duty to the/extent necessary to prevent con-
tamination of food products;
(2) wash their hands,thoroughly n an adequate hand-washing
facility before /starting to work, after each absence
from the work tation and at any other tittle when,the
hands may have' become soile&or contaminated; and
(3) not store clothing or other personal belongings, eat
food or drink beverages, or use tobacco in any form
in areas where food or food,ingredients are exposed or
in areas used for washing equipment Or utensils.
CanneuKatlimnt
Care should be exercised in the selection of equipment for a canning
operation. -Frequently, equipment offered at bargain prices turns out not
to be a bargain at all. .Obsolete equipment, even if it is in excellent
operating conditionat the time of purchase, will often require greater
' Maintenance. If such equipment should break down during the, busy season
and replacement parts cannot be 'obtained, it immediately becOmes expen-
sive. Everycanning operation should initiate a preventive maintenance
program in which all equipment is examined, repaired, and tested at
least three months in advance of the date, it is to be used. This will
allow time to orderparts fdi replacement and installation. Daily clean-
ing, greasing, and oiling must be performed on all pieces that require
It during the operating season.
Boiler. The boiler is the heart of the cann g plant. Therefore,
it should be selected with great care, with consi eration given to de-
pendability and..size. Boiler capacities are fre uently listed in terms
of boiler horsepower,. With improved firing mefhiods it was found that a
boiler coati develop more than "rated capacity.' The most cone on de-
scription used today is the number of pounds of steam per hour that a
boiler will produce under a specified set of conditions.'
Ins,estimattni-the steam requirements for a canning operation, one
must take into consideration the peak demands of "various operations
with respect to the number and frequencyofoccurrence of these peak de-
mands. These peaks will differ from operation demandb-)and it is impor-
tant that ansadequate steam supply be available to precynde the possi-
bility of affecting the efficiency of other operations which may be go-
ing on at the same time of peak demands. It is also important that the
Steam lines be adequate for the peak demands of the various operations
9 )
15'4

/.
(
'Figure 1-4. A Modern Boiler for Use in a School-Community Canner!.(Photograph courtesy Lookout Boiler Corporation,'Chattanooga, Tennessee.)

and installed in a manner to minimize condensation. The installation of
steam traps where Possiblewillhetp in reducing the demands on boilers
since they allow for utilization of4h11 the potential heat in the steam.
For traps to be effective in reducing the demand on the boiler, it is im-
portant that they be properly sized to'insure adequate condensate removal.
The boiler should be installed_ in --separate room adjacent to the pro-
cessing room, where the retorts are located.
For good operating performance, water pressure shoq10 be in excess
of 40 psi (pounds per square inch) and boiler steam pressure from 60 to
80 Tsi. Table presents the steam requireMenta for most kthe equip-
ment-used in a 6ommunity cannery.
I
Table 1
Steam Requirements. for Operating Canning Equipment
Pounds Per Hour)
Equipment PeakDemand(pounds)
OperatingDemand(pounds)
Total Demandper Hr..
(pounds)
Dixie No.-3 Ratoft..(1.5 cycles / hr.)
80 (venting and,come-up)
40 120
Dixie No. 3 Retort(as open cooker)
175
Dixie M-6 Blancher70 70
bixie.M-2,Exhauster345 345
7
10 Gal. Steam-Jacketed Kettle 20 (first 15-min.) 25 45
25 Gal.-Steam-Jacketed Kettle 45 (first 15 min.) 85 nt
40 Gal, StedM-Jacketed Kettle 70 (first 15 min,) 105 175
50 Gal: Steam-JA'cketed Kettle 85 (first 15 min :) 140 225....<..
Retort tion. A steam retort is a closes pressure
vessel designed,for processing low acid canned food wider steam pressure
at temperatures above boiling 1000C.(212°B): It'can also be used as an
open cooker for processing acid foods. The retort should be designed to
process under pressure metal or\glass containers and at atmospherid pres-
sure.
:The proper installation and
the.correct'use of the procesies,information provides a guide for
installing and operating retorts
operation of retorts is essential for
given in this handbook.' The following
the minimum requirements necessary for
for pressure processingelow acid foods
11 1,
'I% 17
`N.

(1) Steam Pressure. The steam pressure in the line to theretort should not be less than 70 psi at all times
during the operation.
(2) Steam Header The .aupply, line delivering the steam to
a group of iretbrts should be large enough to providesufficient-steam for-the installed number of retortsthat will be brought td retort -temperature simulta-neously. (A. 134-inch diameter steam header is usually
large enough.)
(3) Steam In'et. The steam inlet to each individual re-"h tort must`be,large enough (3/4 inch for Dixie"No. 3)
to provide sufficient steam for venting the retort ina reasonable length of time. It must enter the side
near the bottom of the retort opposite the vent.
(4) Steam Controller. Each retort should be equipped with
an automatic steam controller to accurately maintainthe specified retort temperature within ±.1°C. (10F.).This may be a self-actuated or air-actuated (air-to-
* open) type. It may be smaller than the steam inletpipe if a'by -pass is used during the coming-up time.
(5) Temperature Recorder. Each retort must be equippedwith a temperature recorder, which is calibrated toagree with an accurate mercuryzin-glass thermometer.The chart must be easily. ieadable to 1°C, (l0r.) andthe graduations should not exceed 2°C. (20F.) withina range of 50C. (10°F.) of the processing temperature.All charts should have a working scale of not less
than 3 inches. The recorder may be combined with the
steam controller and be a recording-controller instru-
ment.The sensing bulb mayIbe installed within, the
retort thell below the, steam spreader or in a ther-mometer well attached-to the shell. A 1/8 -inch or
larger bleeder must be, installed near the sensinii,bulb
in the retort or well and left open at all time's-dur-ing the processing period.
(6) Steam Spreader. The steam Spreader is a perforatedcontinuation ofthe steam line inside the bottom ofa retort in the form of a cross and is the same size
as the, steam inlet. The perforations should be op/
the sides bf each length of pipe in the cross. /
. (7) Steam By-Pass. A steam by-pass'for the control shouldbe installed to make possible hand operation of theretdrt in the event of .a failure of the control. valve,
and also to admit steam rapidly duri:4g venting and
coming-up period when steam is usually demanded inlarger quantities than the control valve is capable
12
1

0
I°I
4
0
-I
0
0
00
I-1
O
41.
0
I
0
A
0
0
NMI PINIICINONS
0 MAU 'it'll/AWN* VAll consotua 1110)0116 VALVI, Mt m NI
PAM MUM 111191141V111 0 NAM 11911 IKIMMS INOICATINS
P711111110111761 MOM SAWN 505 SANn VALVe WM' W"OlnAK PpitCONTSOLLN MANS OfFlOW ILONA VA AL'
Figure 1-5. Diagrpm Showing.Parts of a Retort.
/-
Figur 1-6. Air-Actuated Tem-
13
Figure 1-.7. Temperiture Recorder.
1,9

of b4ndling. This steam by-pass should be the same
size as the steam inlet with an orifice of 3/8-inch in
diameter for a Dixie No. 3 Retprt.
(8) Safety Valve. A safety valve of adequate capacityis necessary to prevent\excess piessure in a retort.The relieving,capacity-Of tiles-safety valve should
be slightly in,excessia -fbe quantity of steam that
will be emitted -info the retort through the bypass
valve wide open.
(9) Vent. Vents are large v,lve-controlled openings inretorts, used for the elimination of air during the
venting period. They should be installed in such a
way that all the air can be removed from the retortbefore timing. of the process is started. Vents must
be controlled by a gate or quarter-turn quick open -.ing-type valve which must be 'fully open topermitrapid discharge of air from the retort during the
venting period. The vents and all external lines,manifolds, etc., should be short and as free as
/ possible from bends and other conditionswhich mightretard rapid discharge of air. Such lines shoulddischarge to the atmosphere as close to the retort
as possible. They must not be connected *directly
to the drain. If the overflow is used as-,a vent,
there must be an atmosph4ric break n the line be-
fore it .connects to the drain. T s is required toprevenp tack preisure Oring Vent ng and to meet
plumbihg codes. The vent must be- \l ated-in the
extreme op cisite side Of the reto t from thatthrod'h which the steam isadmitted. ,During' vent-ing, the vent valve, steam valve, and steampass valve are fully opened and the water, and air
valves are closed. The vent 'valve should be wide
open for 5 minutes at 107°C. (225°F.).
(10) Water Line. The water inlet and supply line sand line pressure should be adequate to allow fo
rapid f ill fig of the retort. Globe valves shoul
"Se used on water lines.' Water valves must be ingood conditiOn to insure that water does not elitethe retort through a leaking valve, resulting in
underprocessing.
(11) Air Line. A globe valve must be installed on theair line to avoid air leaege into the retort dur-ing processing, since stea=air mixturp will reducethe effectiveness of the'process and lesult in
linderprocessing. The air is used to cool down glassand large size cans (No.21/4-7401 x 411--and larger)under pressure to prevent losi of liquid from jarsand prevent"peaking" and "buckling" of large size
20. 14.
1

_(l2) Indicating'Mereurytin-Glass TherMometer;, Each re-
tort must be equipped with at least 'one mercury-in-
',glass thermometer haviqg a range of not more than
55°C. (100°F.) : 75° - 130°C. (17-0° - 270°F.) on
a scale at least 7 inches'in length. The scale d'vi-
sions should be no More than 1°C, or 1°F.
.Bulbs of indicating' thermometers May be in-
stalled within. the retort shell below the steam
spreader .or in an external well attached to the re-
tort. The well must be cdnnected to the retort'
'through-at least a 1-inch diameter opening, and be
equipped with a l/8- inch', or larger, bleeder so 16-
csted as to:provide a full flow of steam past the
entire length of the thermometer bulb. The bleed-
er must emit steam continuously'during the prO7.
cesaing period. .Should a thermometer be located in
the lid of a.,retort,apeciat care must be-used in
opening and closing t'he lid to prevent.the mercury'.
aolumn fromdiyiding A thermbmeterth a divided
mercury column must be replaced immidtately, Ther-
mometersshould betested for accuracy against a
known acourfite,standird thermometer upon installa-
tion and.at'leist once a year thereafter or any -
time. .
its,acccuracy;is ,questioned. THE MERCURY THER-
MOMETER, NOT THE PRESSURE cAGE.OR THE-RECORDER
CHART, MUST BE' THE OFFICIAL INSTRUMENT FOR,INDr-
MING THE PROCESSING'TEMPERATURE.t.
(13) Pressure Gages. Each retort should be equipped
with a-spressure'gagesgraduated in one podnd divi-,
with a rangeof 0 to 30 pounds. The mini-
mum diameter of the dial ShdUld betk-inches, and
the gage should prefeKablY be of a type in, which
th operating mechanism is.independent,of.the case. ,
Thegage should be donnected to the retort by beans
of a siphon or a goose neck to protect.the gage. ?
Preesure gages 'should be tested nst, a known
acci. rate Standard gage upon installation and at
leas once a year therodfter or at anytimeaccu-
raey is questioned.
.Proce s Timing. A large, easily-read clock or
accur to timing deyice with an alarm should be in-
stalle where it can be observed readily.by the
retort operator. Processes should not be timed
by the ec6rding thermometer: Extreme dare is re-
quirecL4or process timing at retort temperatures
Even a process time slightly shorter than recom-
mended will drastically lower the lethality of the
process.
-.15
21
1
.1

0.
I
4, 4 \
/, -
.,
Figure f-S. Steam Spreaderbat Figure 1-9. A Safety Valve.
Bottom ofRetort.
A
S.-°-,,
a.
4
a
p
v
Y.4
woeory00.errix
if
Figure 1-10. A Mercury-in-Glass
Thermometer.
4
S
16!2
r
A
Figure I-11. A Pressure Gauge.
t
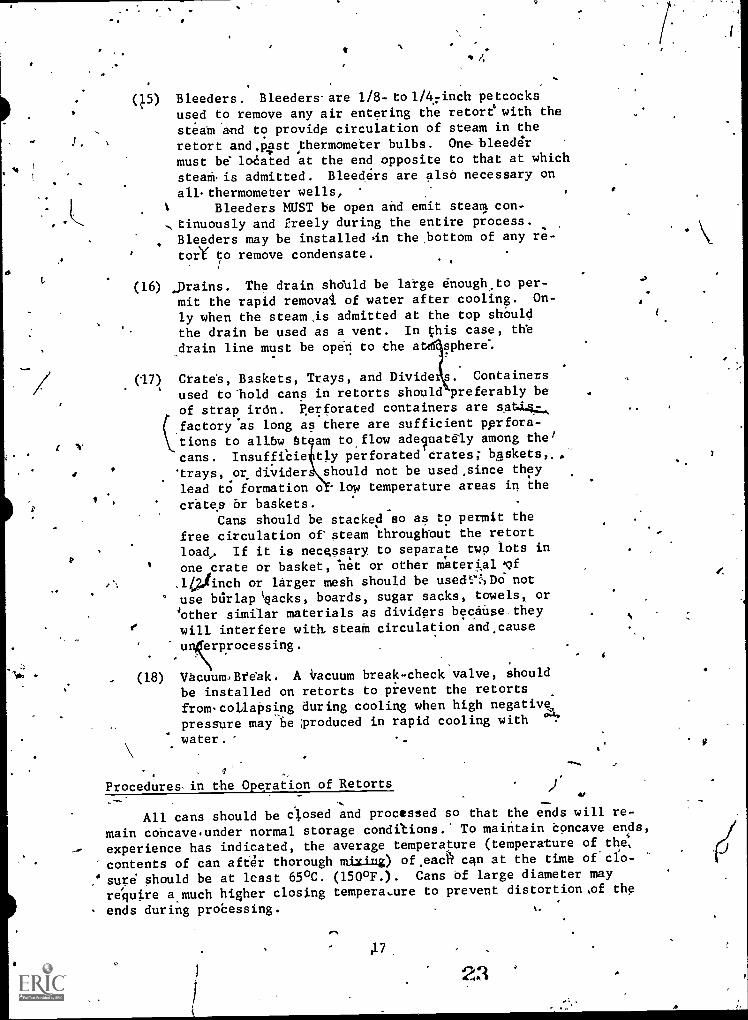
(15) Bleeders. Bleeders-are 1/8- to 1/4-inch petcocksN
,
used to remove any air entering the retort' with the
steam and to provide circulation of steam in the
retort and.piast thermometer bulbs. One bleeder
must be iodated at the end opposite to that at which
steais admitted. Bleeders are also necessary on
all. thermometer wells, .
i Bleeders MUST be open and emit steam con.tinuously and freely during the entire process.
. Bleeders may be installed .in the,bottom of any re-
tor' to remove condensate.
.,
(16) _Drains. The drain sho'uld be lakge enough,to per-mit the rapid removal of water after cooling. On-
ly when the steam_is admitted at the top shOuld
the drain be used as a vent. In this case, the
drain line must be open to the a sphere:
(17) Crates, Baskets, Trays, and Divide s. Containers
used to-hold cans in retorts should preferably be
of strap irdn. Perforated containers are W44.7_,
cfactory as long as there are sufficient perfora-tions to allbw at am to flow ade uately among the/
cans. InsuffiCie tly perforated crates; baskets,..'
'trays, or divider should not be used,since they
lead to formation o low temperature areas in the
t"
crates or baskets.Cans should be stacked so as to permit the
free circulation of steam through -out the retort
load, If it is necessary, to separate two lots in
one crate or basket, net or other material vf
,1/inch or larger mesh should be usedD6 not' use bdrlap \sacks, boards, sugar sacks, towels, or
'other similar materials as dividers because,theywill interfere with steam circulation and cause
u erprocessing.
(18) VacuumBfeak. A vacuum break-check valve, shouldbe installed on retorts toprevent the retortsfrom' collapsing during cooling when high negative
pressure may be ;produced in rapid cooling with 4?
water.
/'
Proceduresin the Operation of Retorts 2
All cans should be closed and processed so that the ends will re-
main concave.under normal storage conditions.' To maintain concave ends,
experience has indicated, the average temperature (temperature of the;
contents of can aft4r thorough miximg) of.eaA can at the time of cio-
` suke should be at least 65°C. (150°F.). Cans of large diameter may
require a much higher closing temperature to prevent distortion,of the
ends during probessing.
2.3
7
4,7
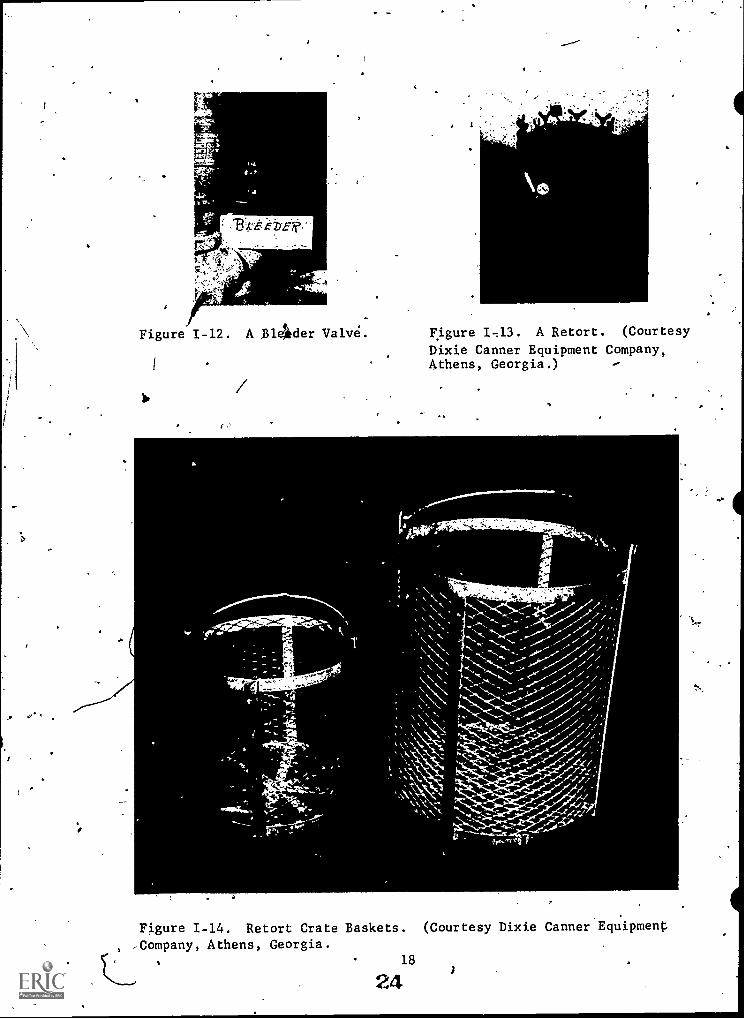
Figure 1-12. A B146der Valve. Figure 1,13. A Retort. (Courtesy
Dixie Canner Equipment Company,Athens, Georgia.)
Figure 1-14. Retort Crate Baskets. (Courtesy Dixie Canner Equipment
Company, Athens, Georgia.18
243

Coding. All containers should be coded to identify the patron, con
- tents, and date.
Process. The term "process" as used in this handbook means the appli-
cation of heat to sealed containers for a definite time and at a definite
`temperature under specific conditions. The purpose of processing is,tb
produce a commercially sterile product. This must be,obtained with.the
. least possible adverse effect' -on quality. Commercial sterility for low-
acid foods may be defined as that condition in which all Clostridium
botulinum spores and all other pathogenic bacterlia have-been destroyed
as well as more heat resistant organisms, which if present, could pro-
duce spoilage under normal storage conditions. If the number of organisms
in the product is excessive, the processes listed might not be'adequate
to prevent spoilage.. Therefore, it is essential that contamination be
kept low.
Rapid Handling and PromptRetorting of Filled Containers. A long
holding period between closing and retorting may result in souring, off-
flavor, and loss of vacuum. Depending upon the nature of'the product,
processing should-follow within dne-half to three-quarter6 of an hour
after closure. If longer times are required to obtain enough containers
to fill a retort, processing of partial.retort loads should be practiced.
Position of Containers in Retort. Heat penetration in canned foods
containing freely flowingiliquids is mainly by,convection currents. The
general trend of these currents is in a vertical direction.' Consequently,
in the product being heated, the currents seek channels which permit such
motion. Where progress is impeded or baff-led by solid material, the cur-
rents flow around the obstruction to the nearest point at which they can
'pass. For this reason, the alignment..of certain foods in the container is
of the greatest importance in heat penetration.
Where the packing or.filling of any product in the container results
in stratification, the containers should.be processed in such position
that the plane of stratification is vertical. In the case of asparagus
for example, the spears are generally parallel and tightly Packed in a
vertical position. This means that the channels containing liquid are
parallel to the spears. As a result, the speed of heat penetration is
greater when the containers are placed upright in the reto t. Another
example is spidach. In large containers, the spinach is aced in more
or less horizontal layers. .Convection currents, therefor ,travel to
the center of the containers faster when the containers are processed on
their sides rather than in a vertical position, Products such as peas
and cut green beans consist of small solid bodieS, fai4y,uniform in
size and_ evenly distributed througHbut a liquid mediumf consequently, the
rate of heat penetration is little affected or influenCed by the posi-
tion of the containers in the retort.
Cans or glass ars should not be laced directl on to of one
another but should 'beculation of steam which will aid in eliminating air from the retort.
19
J= ;25

Solid or insufficient perforated metal retort ,crates should notibe usedbecause such equipment can lead to the formation of low-temperature re-gions. Sufficiently perforated dividers between layers of cans or jars
facilitAes stacking.
When processing glass jars in a retort, adjust the load in the cratesso that when the lid is closed there will be a space of 6 or 8' inches
between jar tops and the spray nozzles in the retort lid. This is neces-
sary to assure even distribution of the vater on the jars during cooling.
Starting....a Process. At the time the steam is turned on, all bleed-ers and all vale- controlled vents should be wide open. All bleeders
should be left open during the processing period.
(1) The valve-controlled vents should be left open for a sulfi-.
cient time after steam is turned on to ensure that all air .
is swept out of the retort, so that no "pockets!' of air.re-:main among thecontainers. There, is a tendency for steamto by:pass the load of containers and to escape through the
vents before, all air has been driven from the stacks of
containers. An air-steam mixture in the retort will cause -
underprocessing.
(2) The timing of the process should not begin until the re-tort. has been properly vented and the processing tempera-
ture has been reached. When the retort has reached thedesired processing temperature, Lhe temperature indicatedon the mercury and recording thermometer should be checked.The pressure gage should not be relied on for an indica-tion of the retort temperature. If the pressure gage isup but the temperature is low it means there is still airin the retort and venting should continue until agreementis reached. The chart must never indicate a temperaturehigher than the mercury thermometer. When the tempera-ture is correct, start timing the process. Use an accu-rate clock for this purpose, not a wrist watch or therecorder chart.
(3) At the start of the process, enter on t4 production re-cord the time, the mercury thermometer reading, the pres-sure, and the temperature indicated by the reading then,mometer.
(4.). Keep a record of the come-up tc! make certain it has
been long enough to allow fur sufficient venting.
(5) Maintain the retort temperature about one degree abovethe recommended processing temperature. This helps tocompensate for unavoidable fluctuations.
,,(6) _As the process continues, check the temperature fromtime to time to make certain it is holding properly.
20

DAILY PRODUCT1ON RECORD
Cannery Location
Retort Operator
Date
19
Patron's
No.
Temp.
Chart
No.
Retort
No.
__
,Cont.
Size
No. of
Cont.
Time
in
----,
Time
up
Time
out
Cook
Min.
Mercury
Thermo.
Reading
t
/1
.-
..
,
.
.
.
ti
,1
Figure 1-15.
Sample Daily Production Record for Use in School-Community Canneries..

/
(7) Leave all bleeders open ddring the entire process.
(8) When the recommended time,for the process has elapsed,
turn off the team And immediately start the cooling
The quality of most products will be least affected by the process
if the retort is brought up to processing temperature quickly and the
process is followed by prompt and rapid cooling. This procedure not
only protects the quality of the product but also shortens .ihe total
--- time required for each processing cycle.
Cooling. Cooling is accomplished in several ways: (1) with a water,
tank or under water spray, (2) pressure cooling with steam and water, and
(3) pre sure cooling with air anCwater.
tooling with a water tank or uner'/ water spray is used for No. 2
or smaller cans. This is used following the "blow-down" method of re-
leasing pressure, and for larger containers, that have been partly
cooled under pressure, as follows:
(1)' Open the overflow, drain or vent'valve and permit the
pressure, to discharge until all/ the pressure is out of
the retort:
(2) Open the top water valve slowly and spray the cans with
water for about a minute to remove some ofthe heat.
Make certain that water is not admitted 'before the vent,
is open and the pressure has been down to zero for ashort lime, or a vacuum may be .created as the water con-denses the steam, causing the cans to budkle and, per-
haps, the retort to collapse. A vacuum-break check-
valve will also prevent atvacuum from being formed.Mgst insurance companies .now require a vacuum-break on
all retorts.
(3) Remove the basket of containers from the retort andtransfer it to the cooling tank or under water spray.
With the method of cooling with steam and water, steam is admitted
to the top of the retort and is used to maintain the pressure. It is
prevented from condensing in the cooling water by admitting the cold
water under a layer of hot water the bottom of the retort. The layer
of hot water may be obtained by connecting a steam line to the bottom
water inlet and heating the water as it is added for the first few, min-
utes of the'cooling. Proceed,with the cooling as follows:
(1) 14he;t the process is completed, close all the bleeders,
turn off the bottom steam inlet, open the top steam in-
let and raise the pressure in the retort about 2 pounds
above that used during the process.
(2) Open the steam line connected to. the bottom water inlet
and gradually open the water valve, thus running hot
water into the retort.
22
3

(3) Continue to admit steam with the water until the retort
is approximately one-fourth full. Then turn off the
steam and add cold water under the layer of hot water.A
(4) Maintaih a conftant pressure by gradually turning off
the top Steam valve as the retort fills with water.
(5) Maintain the pressure at that used for processing; or
slightly above, until the retort is nearly full of
water and thebcontainers are covered/
(6)' It is advisable to install a petco near the top of
the retort to indicate when the water has reached that
level. When the water'nears the top, open the over-
flow, vent or drain valve slightly an begim to close
the water inlet to.maintain the pressur= at the desired
point. If the retort is allowed to c' .letely fill .
with water under full pressurewithou relief, the
pressure in the retort may jurerrapid y to the pres-
sure in the water line. This might re It in .11apse
of the containers and damage to the reto
(Q) Maintain the desired pressure in the retort by a pro-
per balance of water inlet and overflow opening.
(8) Continue openi.ng the .overflow or drain to release the
pressure gradually.
(9) Cool with water entering at the bottom and leaving
through the overflow for a few minutes,'and then re-
verse the flow by using.water in at the top'and out
through the drain. However, keep the retort full of
water. This reversal of flow results in a uniform
cool.
Pressure cooling with air and water is used with glass mason-type
jars and large metal containers. The procedure is as follows:
(1) When the process has'been completed, close all bleeders.
(2) Admit air to the retort and increase the pressureabout 2 pounds above that used during the process.
(3) Turn off the steam.
(4) Gradually admit water through the spray nozzels in
top of retort, holding the pressure by means of com-
pressed air.
(5), Using a petc ck which has been installed near the
top of the r tprt to indicate when water has reached
that le el, open the overflow or drain valve ,slightly,close the air valve, and begin to close the,water
23
29.

inlet to maintain the pressure at the desired point.If the retort is allowed to completely fill with waterunder fall line pressure without relief, the pressurein the retort may jump rapidly to the pressure in the
water line. This might result in collapse of.cnn-
tainers and damage to the retort'.
forMaintain the desired pressure in the retort by a pro-
per balance of water inlet and overflow opening.
Continue cooling by running water in at the top and
out through the drain. This direction of water flow
gives uniform cooling if the water supply is suffi-
cient.
(8) Maintain the pressure at that used for processingforseveral minutes. Do not allow it to fluctuate.
Amount of Cooling Necessary. The amount and extent of cooling will
depend on the product and' the methods of handling containers after cool-
ing. In general, containers should be cooled to an average temperature
of 38,0 - 41°C. (100° - 105°F.). This leaves enough heat to dry the con-
tainers quickly but not enough to permit the growth of thermophiles, ifthe containers are cased immediately. If the containers are stored incases at temperatures above 41°C. (105°F.), stack burning may result as
well as thermophilic spoilage.
Production Record. A daily production record should be kept, w h
separate data for each retort load. Making recordings of the beginning
and,end of'the process, the time, and the thermometer, recorder, andpressure gage readings.
Atmospheric Cooker
The atmospherinoker functions as a steam bath at atmospheric
pressure. Steam enters at the top forcing the air downward and out
k through a water seal. Actually, it operates at,approximately 0.05pounds positive pressure due to head of water forming the water seal.
Savings in steam over water bath is-substantial. During the process
only a limited amount of steam escapes from the cooker. The cooker
is loaded and unloaded when the steam is off.
Operating Procedure. The following procedures are used in operat-
ing an atmospheric' cooker:
(1) Open steam valve and blow out the condensate in steamline before placing the cover over glass jars, as thecondensate may break the jars.
(2) Fill base with water and place the loaded insert crateon support in,base pane, Then lower the cover into placeover the insert crate with bottom of cover centered on
projecting legs of crate support.
24

(3), Open steam valve slowly for first minute, then conti-
nue opening valve until steam bubbles freely through
water seal ill base pan. When thermome'ter registers
100°C. (212°F.),,,throttle steam so that only a small
amount escapes_ through the water seal. Check the
Mercury thermometer to see that it maintains 1000C.
(212°F.) throughout the processing period." Start
the processing time when the thermometer-feaches 100 °C
(212°F.) and process for the length of time recom-
mended in the table. After the processing time is
completed, turn off steam valve, raise cooker cover
and remove the loaded insert crate and transfer it
to external cooling spray in cooling vat.
Cooling. The following procedure is used in cooling glass containers
with the atmospheric cooler:
(1) Open valve No. 1 (small fine spray) for about a minute
and open valve No. S (large spray).
(2) :leave both sprays open until products have cooled to
`approximately 38C: (100°F.).
The procedure for cooling metal containers is:
(1) Place metal containers either under the spray or in a
vat of cooling water.
(2) 'Cool as rapidly as possible to approximately 38°C.
(1000F.). This leaves enough heat in the containers
to dry theM and prevent rusting.
Steam Exhaust Box
A steam exhaust box is essentially a close fitting stearrichest into
which the open can of product maybe placed or through which the filled
container may be conveyed,. The exhaust box is used for heating the con-
tents of the container to remove air from the filled container, thus esta-
blishing-conditions whereby the finished canned product will show a sub-
stantial degree of vacuum. A properly exhausted hermetical sealed con-
tainer will be able to withstand the internal pressure that is produced
during processing without damaging the seams or steal of the container.
ib not necessary to exhaust glass jars with the two piece lids be-
cause air and gasses,escape during processing.
A batch-type exhaust box employing hot wafer heated by steam passing
through closed pipes in the box is economical in the use of steam and
adaptable to handling varied products. A batch-type box should be large
enough to exhaust enough containers at one time to fill a retort. If.
not, several boxes may be needed. A float-valve installed on the water
inlet pipe will maintain the level of water within lk inches of the top
of the open containers in the box.
25

1
A continuous steam exhaust box is constructed so that the containers
are -conveyed between two perforated steam pipes admitting steam very
close to the containers. The tunnel in a steam exhaust box is approxi-
mately twelve feet long. Norftip, the exhaust line, or box, conveysthe containers directly from the filling to the closing operations. The
speed of the conveyor is regulated to allow the containers to be in con-
tact witk...the steam sufficient time to raise the temperature of the con-
tents to thhdesirgA closing temperature.
Steam Blancher - Cooler
The steam blancher - cooler consists of a chamber in which the productis placed in trays two to three inches deep and exposed to a steam atmo-
sphere for several minutes. The length of time of exposure depends on the
product. The tray is then pushed from the blanching chamber to the cooling
area where a very fine water mist is allowed to spray onto the product
until its temperature is lowered sufficiehtly for either canning or freez-
ing. Steam blanching is preferred over hot water blanching because the
loss of water soluble vitamins and minerals is not as great.
Sinks and Preparation Surfaces
Sinks and preparation surfaces should be designed and constructed ofmaterial that will be easy to clean and maintain. The preferred material
is stainless steel. All inside corners should be cove in design to per-
mit easy cleaning. The number and' size of sink and preparation surfacesshould be sufficient to handle the volume of patr6ns and to utilize the
facilities to the fullest potential without crowding. Overcrowding
could create situations where the probability of the food being contami-
nated is increased.
Corn Cutters
The change in corn, resulting in loss of flavor, sugar and texture,starts as soon as the ears of corn are pulled from the stalk. To obtain
a-high quality processed product of fine flavor, it is necessary Co pro-
cess corn as soon after harvesting as possible. This cannot be accom-plished as effectively if preparation for canning'or freezing is done by
hand. Cutting corn from the cob by hand slows down preparation of thisproduct.to such a degree that quality of the finished product may be
adversely affected.
A corn cutter machine will remove corn, which is whole grain, fromthe cOb"at the rate of 20 to 25 ears per minute. This reduces prepara-tion time sufficiently so that the full flavor of fresh pulled corn may
be maintained in canning.
14
26

a
^1.
Figure 1-16. ..A Continuous Steam Exhaust Line. (Courtesy Dixie Canner
Equipment Company, Athens, Georgia.)
Figure 1-17. A'Blancher-Scalder-Washer. (Courtesy Dixie Canner Equip-
ment Company, Athens, Georgia.)27 3

Can Sealers
The number and size of can sealers needed are determined by the an-
ticipated daily output of 'the cannery and the sizes of cans that are to
be used, A motor-driven, bench-type semi-automatic can sealer is capa-
ble of sealing five or ,six cans per minute. At least three sealers of
this type should be provided for canneries having a capacity of 1500,to
2500 cans per day. Canning centers proCessing food in No. 10- -603,x 700- -
cans will require a larger size sealer for_this size can.
Can sealers should be located on a sturdy table adjacent to the hot
water exhaust box or mounted on the table of a continuous steam exhaust
tunnel so that the containers can be sealed immediately after being
exhausted before they hbve a chance to cool. The sealing of the can is
the operation that safeguards its contents. The success of the entire
canning project depends on this function,
Operating Principle of Sealers. A can sealer is a machine designed
to form the double seam whfoh attaches the cover "to the can in such a
manner as to effect a hermetic closure. While models vary widely in
design, speed of operation, and a number of other details, they all have
in common the following units essential in forming and rolling a double
seam.
(1) Chuck. The-chuck is machined to fit snugly into the re-
cessed cover or countersink of the can. It serves the
dual purpose of steadying the can and acting as an anvil
against which the seam is formed. In some machines, the
chuck is slightly knurled for traction which enables it
to 'rotate the can.
(2) Seaming Rolls. The seaming rolls are .divided into two
clasgeT\according to their purposes. The "first-opera-
/tion roll-Nas a roove which is semicircular and serves
the purposeft. ruing the edge of-the cover over the
top flange of;the cal-his puts the cover hook and the
body hook, as they are known, in proper position for,
sealing.
The "second-operation roll" is very similar to the
first in that it: bears the same relationbhip to thechuck, and that it is activated by the same force that
is automatically controlled. Its pdrpose is to smooth
down or flatten the loosely formed layers of tin plate
of the rounded seam wide by the first-operation roll.
For this purpose the beaming groove in the second-opera-
tion roll has a shallower and flatter groove contour
than the first-operation roll.
, (3) Base Plate. The base plate is a base or platform onwhich theccan is supported during the seaming opera-.
tion. In most machines it is free running and has,no
effect on driving the can. The purpose of the base
28
34
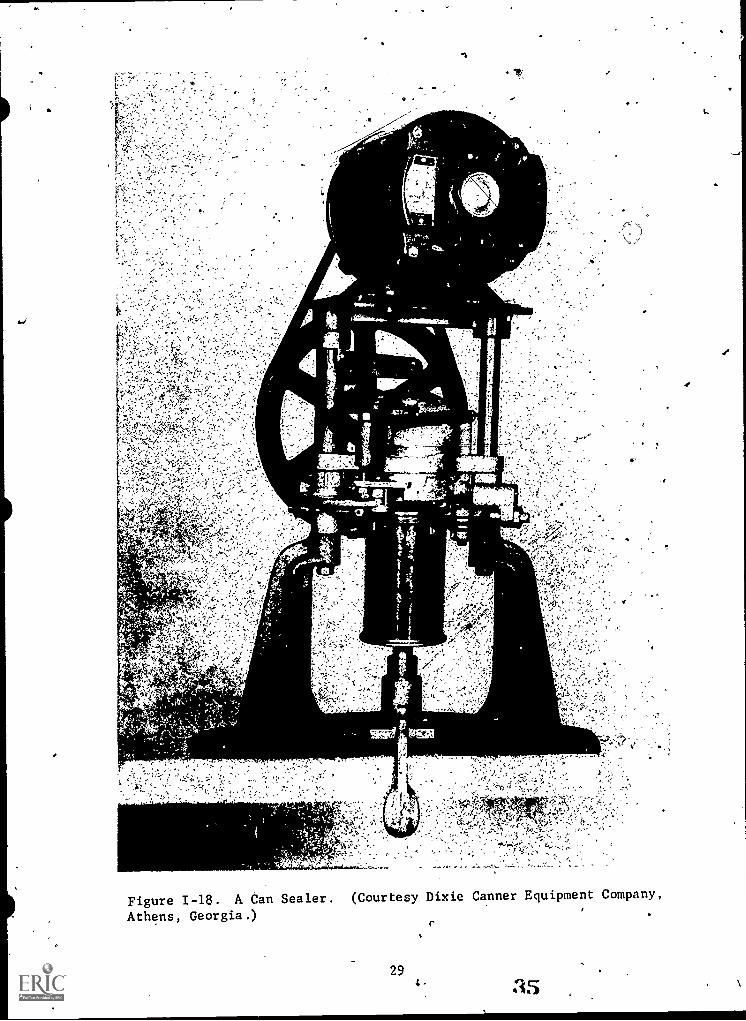
Figure 1-18. A Can Sealer. (Courtesy Dixie Canner Equipment Company,
Athens, Georgia.)
29L-
C
35
L
4.
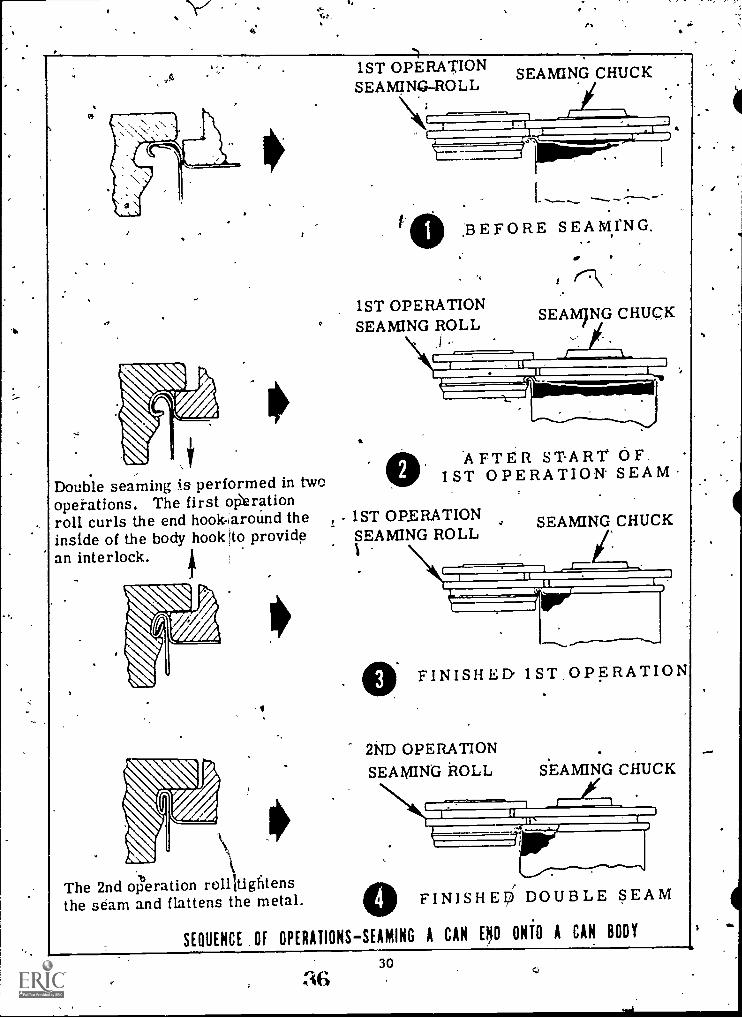
Double seaming As performed in twooperations. The first operationroll curls the end hook-aroUnd theinside of the body hook to providean interlock.
The 2nd o'eration roll tightensthe seam and flattens the metal.
,
1ST OPERATIONSEAMING-ROLL
1.1
SEAMING CHUCK
0 ,BEFORE SEAMING,
1ST OPERATIONSEAMING ROLL
.1
SEA1V9NG CHUCK
1ST OPERATION SEAM'AFTER ST-ART` OF.
1ST OPERATIONSEAMING ROLL
SEAMING CHUCK
FINISHED. 1ST OPERATION
2ND OPERATIONSEAMING ROLL SEAMING CHUCK
FINISHED DOUBLE SEAM
SEQUENCE . OF OPERATIONS-SEAMING A CAN END ONTO A CAN BODY
30

.t
'plate, is to give the can the proper pressdre Of distance,
between the bottom of the can and the chuck. This-is $6
ensure the correct body hook length and to provide a ro-\,
tating base. The rotating=base should be oiled frequent-
ly.
Each of these parts is so machined that it can be adjusted to assure
a perfect seam:
Double Seam Inspection
Seams of cans must be adequate to retain the product within the con-
tainer. -With some-products the double seam must be permanently resistant
to internal as well as external pressures. The double seam must be rugged
i enough to withstand normal conditions of processing, handling, and stOr-
age
When examining double seams, the following procedures are most,im-,
portant:
(1) Visual Inspection. Visual inspection consists of using the
hand as well as the eye. Some defects can be detected rore
readily by feel than by sight.
Run a finger around the seam both on the inside (chuck
wall) and the outside todetermine if any roughness, Uneven-
ness, or. sharpness exists. This, together with careful
visual inspection, will determine if.any of the following
defects are present: Areadheads (incomplete seam), knock
down flange, excessive droop, broken chuck, false seam,
jumpover or excessive scuffing in the chuCk wall area.4 ;
(2) External Seam Measurements. Alt seam measurements are to
be made at three points of the seam:
(a) ApproxiMately 1/2 inch left of the side seam.
(b) Approximately 1/2 inch right of the side seam.
(c) Approximately on the opposite side of the can from
the side seam.A micrometer, especially. made to facilitate measuring dou-
ble seams is ded. To measure the- seam width, hold the
flat surface of the micrometer against the can body.
When taking the thickness measurement of the seam, the
micrometer should be balanced with the index finger im-
mediately above the seam until the.anvil of the micro-
meter assumes the same angle as the taper of the counter-
sink. This instrument is also suitable for measuring.
overall lengths of Body Hooks. Care should be exercised
that the micrometer is in proper adjustment at all times.
A
31

KN OCKED -DOWNFLANGE
BODY HOOK
I1LUSIR11011 Of EXIERNBILI VISIBLE DOUBLE SEWING DEFECIS
.> 3238.

When the micrometer is set at zero position, the
zero graduation on the moveable barrel should match
exactly with the index lincon the stationery member.
If for any reason the zero graduation is more than
one-half a space from the index line at this setting,
and adjustment should be made.
THIMBLE
SPINDLE
ANVIL
HUB OR SLEEVEFRAME
END -SEAM MICROMETER GAUGE
(3) Internal Seam Measurements. Expose the body ah cover
hooks for measurement and inspection by separy'ing the
body and cover hook of the finished seam. 14,4:sure the
'cover.hook, beginning at least Ai inch to the '4ht of
the side seam. Measurements should be taken at three
equal locations around the perimeter of the can by using
the seam micrometer. For most sizes of cans, the mink-
mum length of cover hook should not be less than 0.070
inch and the maximum length should not exceed 0.090
inch. Body hook measurements beginning at least inch
,to the right of the side seam should be taken at three
equal locations around the perimeter of the can by
using a Seam micrometer. For most sizes of cans the
maximumrlength of body hook should not exceed 0.090 inch.
The minimum length should not-be less, than 0.070 inch.
Tightness Rating. The t.ightnes6 rating is very important and should
be evaluated carefully. This factor will determine whether the end seal-
44g compound is being held under sufficient hydraulic pressure to insure
sealing efficiency. In so doing, the compound will fill all spaces not
being occupied by metal. The tightness rating is determined by the wrin-
kle in the cover hook. A wrinkle is the degree of waviness occurringthe cover hook, indicating the tightness of the seam. Wrinkles are
classified by number, and the rating is determined by the large wrinkles
which are observed when examining the cover hook.
33
39

Figure 1-19. Gauging a Body Hook with a Micrometer.
COM Ont 1611.-114 1,
/01...at itwr 104.41 tat , "111111Wi ' "tbal 11111U1+11,1** eit, 111.11410.TA- gft_ 4....,,-.6
1
Figure,I-2a. Illustration of Cover Hdok Wrinkles.
34
f

In small cans,, under 301 diameter,"It i important to note that
ironed out first operation folds should not be nfused with the normal
wrinkle. The ironed out.folds will be apparent on in tightly rolled
seams. k
In small dig eter cans (202 to 404) wr kles should not exceed No. 1.
On larger than 4O diameter cans seams,sho ld h ve . 0 wrinkles. In
hemming a straight dge of plate, no wr k1 .s re formed. On curved
edges, wrinkling incr s he radii urvature decreases.
For this reason, different wria e ratings are specified for smaller
diameter cans as compared to la e diameter cans.
Note: The most critical le kage area is at the lap, or cross over.
ObEerve the cover hooko wria as adjacent to the -cross over for signs
of looseness or "jumped seamsIt
Pressure Ridge. The pressure r dge is formed on the inside of the
can body directly opposite the double seam and is the result of the pres-
sure applied by the seaming rolls during the seaming operation. The -
practice of visually inspecting the pressure ridge when a can is stripped
is an additional safeguard againstapproving double seams which may not
be as tight as they should 1?e even though the measurements of the double
seam and the cover hook wrinkle are within tolerance.
The pressure ridge, in appearance; should be clearly impressed
around the complete inside periphery of that portion of the can body
which is exposed when the cover, countersink wall is removed whenstrip-
ping the double seamlor inspection. An excessively deep pressure
ridge should be avoided. on inside enameled cans. However, a pressure
,ridge should be present and clearly'visible.
Steam - Jacketed Kettle
It is desirable to have several steam-jacketed kettles varing in
.sizes from 25 to 60 gallons for making fruit butters, tomato juice, soup
stocks,'rendering lard, and preheating products such as tomatoes, corn,
apples, and juices. The kettles 'should be of stainless steel and equipped
with a 141 inch stainless steel outlet pipe and valve. The kettles should
be located to provide sufficient work room around. Each kettle should
be provided with a pressure reducing valve in the steam line to control
the steam working pressure. A globe valve should be installed between.
the.pressure reducing valve and the kettle for admitting iteam"to the
kettle. In order that the operator may know at all times the pressure
being admitted to the kettle, a steam pressure gage should be placed-be-
tween the globe valve and the kettle. The pressure range on this gage
should ,be from 0 to 60 psi.
Containers
The number of different sizes of containers used in canning c nters
hould be kept to a minimum. This is because each size requires a dif-
ferent processing time and a can closing machine adjusted for that par-
ticular size. I
% 35
41
p
V

The sizes of glass jars commonly used are pints and quarts. Occa-
sionally 2-quart or 1/2-gallo jars are used for fruits, tomatoes, pickles,
and other acid foods. The larger jars are not recommended for loW acid
foods. No processing times and temperatures are available on this size'
jar.
Cans. In the paSt, No. 2-3-, and 10 -size cans have:been most
often used by community canneries. In recent years the popularity of they
No 2 and 3 cans have declined to the extent that manufacturers of the
cut-production of these sizes. Consequently, it has become increasingly
difficult to obtaln No. 2- and 3-size cans. These sizes are being
replaced by 303- and 2'? -size cans.
Tin plate'for fabricating Canned food containers came into use
%shortly after the discovery of the principle of the preservation of food
by heating hermetically sealed containers. Although more than a century
has'passed since the first use of tin plate "cannisters" for this pur-
pose, no material equal or superior to tin plate in economy, durability,
and retention of wholesomeness of food has been found. With the advent
of the sanitary style can, the tin plate container was improved for cer-
tain classes of foods by applying an enamel to the interior of the/Can.
The purposes of the enamel lining are (1) to increase the attractiveness
of the food, (2) to improve the appearance of the container, and (3) to
,make the ?container more resistant to internal corrosion. -
In the manufacture of enamel-lined c ns, the, enamel is ordinarily
coated on flat sheets of tin plate before nufacturing into can bodies.
A uniform film is applied to the sheet of tin_piate by a roller-coating---
process. On sheets to be manufactured in 9-can bodies, narrow strips
are left bare bythe coatingrollers52,p-ovid-dfor the soldering-of
side seams. From the coat, hegeets a e ediately conveyed through
long ovens at high emperatures where the a 1 is thoroughly baked 'on.
This leaves only an insoluble, inerr,,resino s film on the tin plate.
The cans are then forMed ffom enameled sheets by the same fabrication
methods as employed for sanitary cans made from Plain tin plate.
Two types of enameled cans are most widely used: (1) fruit enamel,
also known as -"R" or sanitary enamel,'and (2) C-enamel. Fruit enameled
cans are used for all acid foods, such as fruits, tomatoes, colored
fruits and berries. Beets and carrots are also canned in fruit enameled
cans to preserve color. If plain, tin cans are not available, green
beans, salad greens, asparagus, and sweet potatoes can also be canned in
fruit enamel cans. Vegetables, such as corn, peas, lima beans, dried
beans and mixed vegetables, which contain sulfur compounds should be
canned in C-enamel cans. Zihc oxide which is in the C-enamel lining
reacts with the sulfur to form zinc sulphide which is harmless and
white in appearance. .If the zinc oxide was not present, the sulfur would
react with the iron in the tin plate to form a bla* precipitate, iron
sulphide, which would cause the food to become dark and appear unattrac-
tive. Iron sulphide in this small quanitity'would not be harmful. If
enamel cans are nc,t available for meat products, C-enamel can be used.
However, meat products in C-enamel, cans will not have as long a shelf-
life as in meat enamel cans.
36
When possible, it is desirable from a standpoint of economy and
convenience to purchase the supply of cans for a canning season.at one
time. 41,t is also- desirable to place orders during the season when
canning activity is light. This -is because can companies are usually
looking for extra storage space and are more anxious to make sales.
Savings of up to 15 percent can often be made by purchasing cans, in
truckload or carload lots. A truckload of No. 303 cans will contain
from 25,000 to 30,000 cans and a carload will have 60,000 to 100,000
cans. There are 18,000 to 25,000 No. 2k cans ina'truckload and
38,000 to 60,000 in A carload. If at all possible, cans should be pur-
chased in reshipping cartons for easy handling and storage and to mini-
mize damage in shipment.
Glass Jars. Standard, mason-type jars designed for home canning
should be used when processing by the methods described in this manual.
It makes no difference whether the jars are regular or wide-mouth. All
jars should be of,the type that can be sealed with two-piece metal clo-
sures. This is the only type of.closure that is entirely satisfactory.
It permits the jar to vent during the processing period even though the
band is screwed down firmly and is. self-sealing. Being of metal, the lid
helps to absorb the initial shock to the jar when cold water sprays are
turned on for cooling. Only new lids should be used. The screw bands
may be' reused if they screw.down evenly. All jars should be carefully
examined, whether new or previously used, for defects, such as cracks,
chips, uneven sealing*surfaces, rough edges on rims, or rims that are
not perfectly round. Even the smallest defects may cause a poor seal.
Feeling the tops of jars with the fingers is a good technique for de-
termining uneven surfaces.. Defective jars should be discarded.- Glass
jars that are not intended for canning, such as coffee or mayonnaise
jars, should never be Wed. Such jars are not manufactured to withstand
the heat required in processing foods, and are likely to break during
processing and cooling.
If the proper jars are used and the correct methods of handling and
processing are followed,,breakage should not exceed three jars per -
thousand processed.
General Canning Procedure
Receiving Produce. Families using the canning center should be
assigned a permanent identification number. As they arrive with their
produce, they should label or tag containee of food with this number.
Proper identification is essential if, it fg,necessary to refrigerate or
hold over the produce. If families bring more produce than can be
handled promptly, it should be stored in a cool, well-ventilated place,
and preferably on slatted racks.
Family groups and others should be advised against canning unripe
fruit or tomatoes, wilted vegetables, produce showing marked signs of
spoilage, and produce which has matured beyond the stage for successful
canning. In the event that some persons insist upon canning such produce,
the canning should be delayed until after the other patrbns have finished
37
J

f
efts,Alugg PRESSURERIDGE RIDGE
FULL SEAM STRIPPED SEAM
Figure 1.21. Pressure Ridge Produced in Making a Good Double Seam.
Figure 1.22. A Two-Piece Jar Closure.
3844
1
so that produce showing spoilage will not contaminate the good produce
of other patrons. When undesirable produce is, canned, extra care wit
be needed afterward in cleaning and.sanitizir* the preparation area,
equipment, and other processing facilities to Prevent contamination of
foods in subsequent -operations.I
'Families do their own work and should beirequested to bring suffi-
cient help. The lay instructor assigns preparation space, issues the
necessary equipment, and keeps all the necegsary records. Upon comple-
tion of the canning work, those patrons u Ong the center shOuld tho-
roughly clean and return all equipment t the lay instructor. The lay
instructor should then check the equipm nt against the record and return
it to the storage room. Patrons of apdnnery
should not be permitted in
the storage room.,
The lay instructor should always explain the steps in the prepara-
tion of food according to the sequenceofoperatiOns and stress the neces-
sity for cleanliness and prompt handling of foods.
Preparation Procedure for Canniog. Sevdral important/ procedures
in the preparation of food for canning are-fd-i,ctssed belowl
Grading. Grading means separating according to size, matu-
rity, and quality. The purpose .is to facilitate canning ogeta'.
tions. Grading for uniformity of size'is,necessary where heat
penetration in processing is a factor or where produce-is to be
steamed for peeling. For example, beets are sorted according
to size so that they may be steamed uniformly for peeling. The
.., smaller beets may be packed whole and, because of tenderness
and lavor; this resUlti in a higher quality product. The larger
b , due to size and advanced maturity, must be sliced or
otherw e cut into suitable size pieces to insure heat penetra-
Ntioft dun. g processing.
Sorting. Sorting, as is most commonly used, refers to
inspection of the product to be canned to detect and remove
any extraneous' material, such as griss and weeds from greens
and silk and husk from cut corn, and any,individual pieces
of the product which may be unsuitable`-for use or which may
require Special treatment, such as trimming away worm eaten or
diseased parts. All bruised, shriveled, discolored, or soured
portions should be discarded. While sorting, immature -and
over-ripe produce should be removed.
Trimming. The final quality, grade, and value of many
canned foods may depend on the efficiency of the persons
responsible for trimming and sorting. Trimming should be
continued through all steps of preparation and questionable
pieces and portions should be removed rather than risk spoil-
age or having a low -quality finished product.
Eoging and Washing. Thorough-cleaning is one of the
first and most important steps in food processing. All vege-
tables and most fruits require considerable cleaning and
39
4S
a

gf.washing before the processing. Root crops M k:ay require soaping,before washin This step will slow up preparation timeunless the washing equipment is properly arranged or thesoaking and washing is done,before the produce is brought tothe cannery. The purpose of cleaning and washing is to removedirt and foreign material. Cleaning and washing also servesto reduce the amount of spoilage organisms that are usuallypresent on raw foods.
A clean, safe, and ample water supply is absolutely ne-.cessary. Ample quantities, of water should be used-to per-mit moving and turning of theproduce. Washing be
so thorough and complete that the produce will need no fur-ther cleaning before processing.
2&2 Breaking,sizes.
-All prOducts should be cutor broken into uniform sizes. .This permits the container tobe filled properly and facilitates heat pengtration durihgprocessing.
Peeling ordinarily is accomplished by one of the fol-lowing methods:
(1) Hand Peeling. This,is, the simplest and mostcommon method. It may be performed on raw pro-ducts but is usually done after the woduct hasreceived a hot water or ste m treatment, knownas "scalding." The purpode f scalding is toloosen the Teel so that it\ be removed easily.Tomatoes and peaches may be pe led in this manner.
(2) Steam Peeling.: With steam peeling, a heat temp-erature is used to 400sen skin from some fruitAnd root vegetables. Steaming is also used tobreak down or soften for pulping foods, such aspumpkin, pears, apples, and tomatoes. Steamingfor peeling is usually done} -in a steam blancher-
cooler. Some products, such as beets, are steamedunder pressure for peeling.
The prodUct should be steamed only long e-nough to loosen the skin but not to cook the pro-
duct. Produce should be graded for size andmaturity.' The time of steaming should be ad-justed accordingly to avoid uneven results. Pro-
duce that has been kept in storage will requirea longer time for steaming than that which isfresh.
When steaming is done to soften the productfor pulping, a'steam-jacketed kettle, enoughwater to prevent sticking and provide steam in-side the kettle to steam the product should be
40
AG

used. If ,a retort is used, the product should
be placed in a.stainless steel or aluminum pan
or basket. Only produce of the highest quality
should be used. In addition, the pioduce should
be washed carefully and cut into uniform pieces
for, even steaming. Pdels and rinds are usualiy
left,on since they are removed.in the pulping
process.
(3) Lye Peeling. This method of peeling is used fOr
many root crops and for some fruits. The prin-
ciple is simple in thatthe product is merely
immersed in a,hot lye solution for a period of
time, removed, and washed immediately with we-
. ter to remove the peel and excess lye.
The lye bath is never used to remove the
skin from the product. It is used only to treat
the suYface in.such a manner that the akin can
be easily removed by a spray of water. The pro-
duct should' always be removed from the lye bath
with the skin still adhering and in a soft and
somewhat gelatinous condition. The skin should
beloose enough tomash off easily. The removal
of too much skin in the lye solution results
from overexposure or too much stirring of the
product. Continued overexposure of the product
to the lye bath caused gradual thickening of the
solution to the point where it can no longer
be used and must be replaced. Overexposure is
expensive and wasteful. A very gradual thick-
ening of thelye "solution is a normal occur-
rence .becaust ofkaccumulated skins. All skins
should be removed in the first washing opera-
tion after treatinent of a product with a lye
solution. Experience has shown that best re-sults.are,obtaided when the temperature of the
solution is as near boiling (1010C: or 214°F.)
as possible and, never below 93.3°C. or 200°F.
It is impossible to set up a definite for-
mula for a lye solution to peel a given product.
Several examples are cited. Ripe peaches peel
quicker than those which are less mature. New
potatoes peel fasterAwith a weaker solution
than those which have been cured. Freshly dug
carrots and sweet potatoes peel more quickly
than those which have been in transit or stor-
age for several days or longer. The formula
for the startius solution fair each product and
the directionsvfor proper mse can, hoWever, be
given. The starting solution is one which will,
under perfect conditions, peel efficiently.
41
47
.'
4

The strength of the soluti ased on the
as4umption that,it will be sed at the recom-
me ded temperature, since peeling is actually
accomplished by a combination of temperatureand strength of solution. If a product to be
peeled does not emerge in properly peeled con-dition, small amounts of lye must be added un-til the desired peeling effect is produced.
Lye (caustic soda) is a strong alkali.Body contact with lye solutions can resultin chemical burns unless immediately rinsedaway with water or neutralized with a weakacid, such as vinegar, boric acid, or lemonjuice. Where the open vat method is used, itis essential that .the operator of the lye-peeling equipment wear, goggles, rubber gloves,rubber apron, and rubber boots. Proper pro-
tection should aid in preventing any possibleaccident to the eyes, hands, clothing, and
shoes. Boots are essential if the equipment ,
being used allows the solution to drip onto
the floor. Never use lye in an aluminum con-
tainer. Lye readily reacts with aluminumand will- render the container useless in a
short time. It is safe to use lye in enameledware, wrought iron, or stainless steel con-
tainers. Lye will damage wool and leather.Its effect'on cotton is slight. A small
speck of lye solution/inithe eyes can-resultin painful injuries and, possibly impairment
of sight./
'Caution: Lye should be added to waterslowly to prevent foaming and boiling overon the floor and possibly getting on the feet
of workers.
Discoloration of Fruits and Vegetables. Discoloration in pe:cles,
pears andapples can be avoided.by rapid preparation. When delay cannot
be avoided after the fruit is peeled and cut, the pieces of fruit may be
placed in salt and vinegar solution. This solution is made by adding
2 tablespoons of salt and 2 tablespoons of vinegar to a gallon of cold
water. Other products that oxidize rapidly after peeling are white po-
tatoes and eggplant.
Some products also are discolored through the use of khives that
have iron blades or when, the cut pieces are placed/in copper, iron, or
galvanized iron containers. It is best to use stainless steel, alumi-
num, or enameled containers. Beets will oxidize after steaming if pre-
paration is not completed promptly. It is important to use the proper
type of can lining to avoid discoloration of canned products after nor-
mal storage.
48 42

11,
Discoloration by oxidation\may also be present in canned foods when
(1) head space is too great, (2) the container is not properly filled
with the medium, or (3) exhausting has been insufficient. This type of
defect is not necessarily accompanied by spoilage.
Blanching. Blanching is an operation in which raw foods are im-
mersed iri,hot boiling water or exposed to live steam. Blanching is
important because it accomplishes a number of purposes in one operation,
as follows:
(1) Expulsion of respiratory gases. The expulsion of these
gases through the shrinkage of the product is necessary
to prevent strain on the can during processing. If dis-
solved and occluded gases within the cells of the raw
food are not removed, serious damage to the product, may
occur as a result of physical or chemical activity, or
both-. Apples, for example, can be very corrosive to
metal containers because of high acidity and air content.
Failure to remove the air from apple,cells increases'
corrosive action. This is a result of the combined ef-
fect of oxygen and-acid in the fruit on the container.
Corrosion often produces hydrogen gas resulting from the
chemical action of the acid upon the metal. Swelling
or "springing out" of one end of a can may. result.
This condition' causes strain on the can and combined
with corrosion, may result in perforations (holes) in
the container and spoilage.of.the food.
Gases expand or increase in pressure with a rise
in temperature and, if not removed, from the food before
'sealing the container, may cause "buckles" and strained
ends in the can during the steriliiation process. This
is due to pressure inside 'the can being greater than the
can is designed to withstand. This condition may result
in spoilage. The oxygen in the gases, if not expelled,
will oxidize some of the vitamins and make the food
less nutritious.
(2) Shrinkage wilting and increased pliability. These
three effects brought about thiough blanching promote
adequate filling of containers. Crisp foods, such as
apples or pears, are easily broken if not treated in.
some manner to increase pliability. Blanching in
steam softens fibrous plant tissues and permits handling
and filling into containers with a minimum amount of
breakage and tear. Shrinkage resulting from the re-
moval of the gases and some of the moisture content in
the product makes it possible to obtain a well-filled
container.
(3) Removal of undesirable flavors and.materials. If un-
desirable flavors and materials are not removed from
/ raw produce, objectionable flavors or an unattractive
. .
43
49
appearance ma result in the finished product. In thecase of peas and lima beans, blandhing removes a stickY,:.gelatinous substance which, when present, might contri-bute to an,increase.in potential spoilage organisms.
(4) Inhibits or checks further enzymatic action. InhibitionA of enzymes, especially. those Inducing oxidative reaction,
yields p4roducts of superior quality and nutritive value. .
(5) Blanching to "set" or "fix" the natural color. This wasoverlooked' in certain products for a number of years.Blanching. improves the color and appearance of processed .
products.
(6) Blanchin: serves as an added cleanin: measure. Blanch-ing helps to insure a more wholesome canned product.
Two main methods are commonly used in blanching food products forcanning'and freezing. These are (1) bailing watersimmersion and (2) steam.Ste" blanching is recommended over immersion-in boiling water becauseless ofithe water-soluble nutrients are lost by the steam method.
A steam blancher-cooler is recommended because: (1) it is well-sated to batch operation, especially when several commodities are being'simultaneously prepared for proceMEg; (2) it requires less steam andwater; (3) in most instances, a more desirable color can be obtainedbecause the needed 100°C. (212 °F.) temperature can be maintained moreuniformly and easier.
All blanching equipment should be checked and cleaned frequently.Blanching equipment is used over and over. The ,high temperature andmoist atmosphere are favorable to, the development and growth of thethermophilic or "heat loving" types of bacteria. If spoilage organismsare allowed to accumulate on blanching equipment, a whole pack of con-tainers may become contaminated. Not only should all blanching equip-ment be "washed-down" frequently during operation, but the equipmentshould be cleansed as thoroughly as possible after each day of operationand rinsed well before proce4sing operations are resumed the next day.
Filling Containers\\.
One of the most important steps in the,canning procedure is theproper filling of the containers. Under7filling may cause buckling ofthe cans due to the excessive amount of air in the large amount of head-space. The expansion of this large quantity of air will probably causethe cans to buckle during processing. The large quantity of air leftin the headspace will also cause the product to darken due to oxidation.Over-filling can also cause buckling and the ends to protrude beyond thethe point where they will remain convex, instead of becoming concave,after cooling. All containers should be filled so that there will be1/4 to 3/8 inch headspace after all solids have been completely coveredwith the liquid filling medium. As an aid in obtaining the proper fill,
SO44
I
a pair of "over and under" scales are useful. Cans shoul' never be
filled beyond the stated content for each size."4
All products should be packed into containers immediate after
preparation. Those products to which heat has been applied in prepara-
tion will deteriorate rapidly if left standing at room temperat re. If
packed promptly while hot,,the time of exhausting to the recomme ded
ycenter-can temperature will be shortened. Discoloration may occu if
fruits, such as peaches, pears, and apples, are left to stand afte pre-
paration.
A canning medium is a brine, syrup, or juice used. to cover a pro
duct after the container has been filled. A 1/4 inch headspace should
be allowed. Care should be exercised in choosing salt. Canners salt o
dairy salt which may be purchased froM any salt Manufacuturer, is pre-
ferred_since it dissolves faster and stays in solution better than ta-
ble salt. Salt tablets may be used. Iodized salt or any salt with a
filler added to prevent lumping should not be used for canning.
Syrup is used with most fruits and sweet potatoes. The correct pro-
portions of sugar to water should be folloi4ed 'in making various types of
syrups'.
In'making brine or syrups, water that,is exceptionally hard or
that contains an excessive amount of iron or other minerals should not
be used. In some localities it is necessary to treat or /filter water
to make it usable. Clean salt and sugar should be used in making brines
and syrups. The use of unclean salt or sugar could be a source of con-
tamination for the food.
Exhausting
Exhausting is the heat treatment given after the cans are filled
and before'they are sealed. It is normally the last operation in the
canning procedure before the containers are closed. Exhausting is to
remove trapped air and the cellular and head-space gases from the con-
tainer prior to closure. This may be accomplished by heating the pro-
duct to expand the gases just before the container is sealed. Several
reasons have been given for expelling the air and other gases from the
product and container:
(1) Exhausting reduces corrosion on inside of container dur-
ing storage. Dissolved and occluded gases within the
cells of the raw product may not be completely expelled
during blanching. Most fruits aie not blanched but are
packed into the container without removal of air from the,
fruit cells. Dissolvedand occluded gases within the
cells of the raw product, if not removed before canning,
may cause serious damage to the product as the result of
physical, or chemical activity. Corrosive action is
greatly increased as .a result of the combined effect of
oxygen and food acids on the container. Corrosion may
45
51
'produce perforations (pinholes) in the container result-ing in spoilage of the food.
(2) Exhausting preserves color, flavor, and vitamins. Re-\ =val of oxygen before closure of a container is neces-
sary. Many of the desirable qualities of foods' are de-stroyed or altered if the product is heated or'retortedfor relative long periods of time in the presence ofoxygen or when held in storage with appreciable amountsof oxygen present in the container. The color of thefood may become abnormally light or dark, the flavor maybecome slightly bitter, fats become rancid and otherchanges might occur in the food.
(3) Exhausting helps to prevent container failure. It is
necessary to remove the air and gases prom the food andcontainer-in order to prevent the occurrence of bucklesand strained ends during retorting. Since gases expandor increase in pfessure with a rise in temperature, thegases in foods,,unless removed before container closure,will exert undue strain on the container during the ster-ilization process. When the diffeience in pressure be-tween the-inside and the outside of the can is greaterthan the can is designed to withstand, buckling orserious injury-to the can closure occurs. Spinach dr
turnip greens may be well blanched, but may produce se-vere buckling of the container if the air trapped in thecan during the filling operation is not removed.
(4) Exhausting -produces a 'vacuum in sealed containerwhen stored at room temperature. As much vacuum as canbe obtained is desired in extremely corrosive products.Reaction of this type of product upon the containerproduces hydrogen gas, which may cause the ends to bulge.The higher the vacuum, the longer the shelf-life of aproduct. The exhaust must be regulated so as to producethe greatest vacuum practicable without producing'ex-cessive "panelling." With larger size cans, the vacuumshould not be so great that panelling occurs duringnormal handling.
Can-Closing Temperature in Relation to Vacuum. The center-can clos-ing temperature is the temperature of the con ents of a xan at the slowestheating point in the can at the time the can i sealed. The slowest heat-
ing point in products that heat by convection s about halfway between
the center and the bottom of the can. Products canned in a medium, such
as brine and fruit in syrup, heat by convection. The slowest heating
point in products that heat by conduction is at the center of the can.Products such as pumpkin, mashed sweet potatoes, cream-style corn, andground meat (solid pack) heat by conduction.
46
52

orderorder to maintain the canned product in good condition, it is
necessary to have a proper vacuum. The ends of the can should contract
or "pull-in" on cooling and remain concave under,average conditions.
The vacuum produced after processing and cooling will vary with the
can-closing temperature. The can-closig temperature is the temperature
of 1the contents of the can at the time of seating. For products packed .._
in a liquid-medium in number 2k (401 x 411) or smaller cans, the can-
closing temperature should be at least 79.4°C. '(175°F.) . to assure prOper
vacuum. For, products packed in a liquid medium in number 10 (603 x 700)
cans, the product is usually exhausted until a temperature of 71.1°C.
(160°F.) is obtained.
Initial Temperature. The term "initial tempetature" designates the
temperature at the center of the can at the time the retort reaches pro-
cessing temperature. Where an initial temperature is specified in the
instructions for processing time, it should be regarded as a prerequi-
site of the process given for that product. The coolest can in any re-
tort load should have an initial temperature equal to or:greater than the
temperature specified for the product. If a can'is closed at the recom-
mended center-can closing temperature and is then held for some time be-
fore it is proceSsed, the initial temperature will be lower than the
closing temperature.
Sealing
) Sealing, or the permanent closing ofthe can, must be /done as ra-
pidly as possiblE following the exhausting. The sealer must be properly
adjusted before sealing operations-begin. If not, there may be delays
which impair the quality of the product or cause spoilage. As cans are
sealed;_ periodic inspections should be made to determine, ,whether the
sealer is in need of adjustment. As lids are placed on tans before seal,-
ing, it is also 4 good practice to check the fill of the container.
,Glass jars shoilld be sealed promptly after filling, as follows;
(1) Check the rim of the jar to make sure no particlesof
food will be caught between the lid and the jar.
(2) Place the lid on the jar so that the sealing compound
is next to the glass.
(3) Screw the metal band down evenly with the fingers --
not with the palm of the hand. Over-tightening of the
band may prevent proper venting of the jars during pro-
cessing. Food contents in jars are not exhausted by
heating just before sealing as food in cans is. Jars
are exhausted during processing, therefore, the bands
should not be too tight.
(4) Do not tighten the band further after the jars are
processed. Any attempt to-do so may break the seal.
47 53
4
Summary.
The term "processing" designates the heat treatment -iirteims of
temperature and time given a product after the container is permanently
,sealed. The basic or minimum requirement for the processing of anyproduct is that it be heated suffidiently to destroy, bacteria of knownresistance to heat. In some cases the count of spoilage bacteria may be
so high that the suggested processing time atd temperatuie may be inad-
equate to prevent spoilage. It is, therefdre, essential to keep thebacteria count as low as possible by following approved methods in thepreparation of food ducts.
In the processing of 'tanned foods, it is always assumed that theheat-resistant micro-organisms will be located at the slowest heatingpoint of the contents of the can. Until this pOiril receives adequate
heat, the contents of the can are not sterilized sufficiently to controlthe bacteria. Processing times are partly based on the rate.at which
,heat is transferred to this point.' Heat is transferred by both convec-tion and by conduction. In the processing of canned foods packed inliquids, such as peas, snap beans and beets, heat transference takesplace mainly by convection and the r=ise in temperature is fairly rapid.Any substance which retards convection currents-decreases heat trans-
,ference.
Solid foods heat by conduction and the process is relatively slowsince there is no transfer of material from hot to the cooler part ofthe can. In products that heat slowly, such as pumpkin, squash, andsweet potato puree (solid pack), the_initialtemperature is part of theprocess as it determines the length of processing time that will be re-.
quirod to make the product keep safely. Both methods of heat trans-ference occur in tomato juice and fr'uit juices containing pulp. There-fore, longer processes are required gor these juices than for juiceswhich have been strained and the particles removed.
The sterilization of each container during "processing" in the re-
ftort is related to the maintenance of the temperature present duringexhausting. The higher the "initial" temperature at the beginning ofprocessing, the greater the efficiency in destroying heat resistant bac-teria during processing. It is most important, therefore, that all con-tainers be processed immediately or as soon as possible after sealingand before the-contents of the container lose the initial temperature.
Water -Bath Processing. The boiling-water process is used for acid
products, such AS fruit, tomatoes, and sauerkraut. The temperature ob-tained (100°C. or 212°F.) is sufficient to kill all actively growingbacteria, molds, and yeasts. The acid in the food tends to prevent the
growth of any heat resistant spores that may be present. Fruit juices
free from pulp can be preserved by pasteurizing them in water at 82,2°C.(180°F.) for 20 minutes, provided the containers are filled while hot.Tomato juice which contains considerable pulp must be processed in aboiling-water bath.
5448
a
The water-bath method may be duplicated by processing in a closed
retort at approximately 2 pounds steam pressure or 102.2°C. (216 °F.).
This will produce a transfer of heat throughout the containers equal to
oiling water bath.
Steam Pressure Processing.. The steam-pressure process is used for
ow-acid foods, such as vegetables, meats and fish. In order to sterilize
low-acid foods effectively in -a reasonable p*riod of time, it is necessary
to use a steam atmosphezeat a controlled temperature of,115.50C. (240°F.)
or 121.1 °C. (250 °F.). The retort used for this, purpose is essentially
an autoclave, or closed kettle, designed for processing or cooking canned
foods. I
In processing such products, the complete elimination of air from
the retort is a vitally important teeter. This is known,aS "yenting."
The time consumed in bringing the retort, to,precessing'temperature at the
start of the process is known as the "coming-uP"'or "come-up" time.
The importance of properly- venting the retort during the "come-up"
t me cannot be overemphasized. Inadequate elimination of air or gases
in he retort may be the direct cause of such difficulties as paneled
cans rusted cans, spoilage due to under=sterilization or' non-conformity
of coo between different containerain the, retort.A
Dur ng the process in the steam-pressure retort, a small amount of
steammus *be released thioughout the-period of process to insure maxi-
mum circul ion of heat and the elimination of. gases which may enter
with the,ste m. This,is known as "bleeding." All retorts should be
equipped with a bleeder or small 1,/8 inch petcock installed in the lid
of the retort,
Cooling Containers. The cooling of containers (tin and glass) af-
ter processingis a very important step in canning. Rapid cooling
complishes two'things: (1) deterioration because of over-cooking is
minimized and (2) the temperature of the product is reduced below the
ideal germinating temperature of heat-loving bacteria. These bacteria
are not completely destroyed by temperatures used in processing. It is
fortunate that these bacteria will not germinaterat ordinary room tem-
perature. Therefore, spoilage due to organisms of this type can be con-
trolled by cooling the product below the germinating temperature, which.
is abbut 43.3' ° -62.80C. (110°-145°F.) .r
Prompt coaling of containers immediately after processing will
prevent (1) stack burn in products such as corn and tomatoes', (2) cloudy
brine or liquid in peas, string beaha, lima beans, whole grain'corn,
(3) pink discoloration in light colored fruits such as pears, and
(4) softness or loss Of texture in berries, fruits, and leafy vege-
tables. Prompt cooling lessens cooked flavor, cOnservgpnatural color,
And retards action of food acids °A the container. All glass jars and
number 21/2-(401 x 411) size cans and larger, processed under pressure,
must be cooled under pressure. Follow closely, the instructions for
cooling under pressure. Can izes number 2 (307 x 409) or smaller, do
not require pressure cooling and may be removed from the retort imme-
diately after processing to e cooled in a cooling vat or under sprays.
49 55

O
Only potable or chlorinated water should be used for cooling sincethe contraction of the pan, as the vacuum is produced duting coolingmay draw water into the cans. If there are impurities, spoilage may
result. The water-cooling period should be sufficient to bring the
temperature of the product to 35°-37.8°C. (950-100°F.). This tempera-
ture should be low enough to prevent the growth of bacteria and high-
enough to dry the cans and prevent rusting.
Storage. Place anned foods in a dry, well-ventilated splice. Pto-
ducts packed in glasAc-c
jars should be stored in a dark place to prevent
loss of color or color chafige. The, temperature should te as near con-
stant as is possible and moderately cold but not freezing. Avoid stor-
age space in attics, near steam pipeS, radiators, or stoves, as high
storage-temperatures may impair the flavor, texture, and color, of thecanned products, and the excessive moisture will cause the cans to rust.Cannery patrons should be encouraged to report spoilage immediately andto return the containers of spoiled products to the canning center inorder that the cause may be determined and future losses from spoilage
be prevented.
4
SG 50

Part II
Canning Specific Food. Products
The purpose of Part II of this publication is to present the detailed
procedures in canning specific food products. Each product is discussed
in terms of canning in either glass jars or cans. The food products are
presented in three sections: fruit (including fruit juices); vegetables;
and meat, meat products, and poultry. The first page of Part II presents
basic information on the appropriate yield that can be obtained from a
given'quantity of food.
57
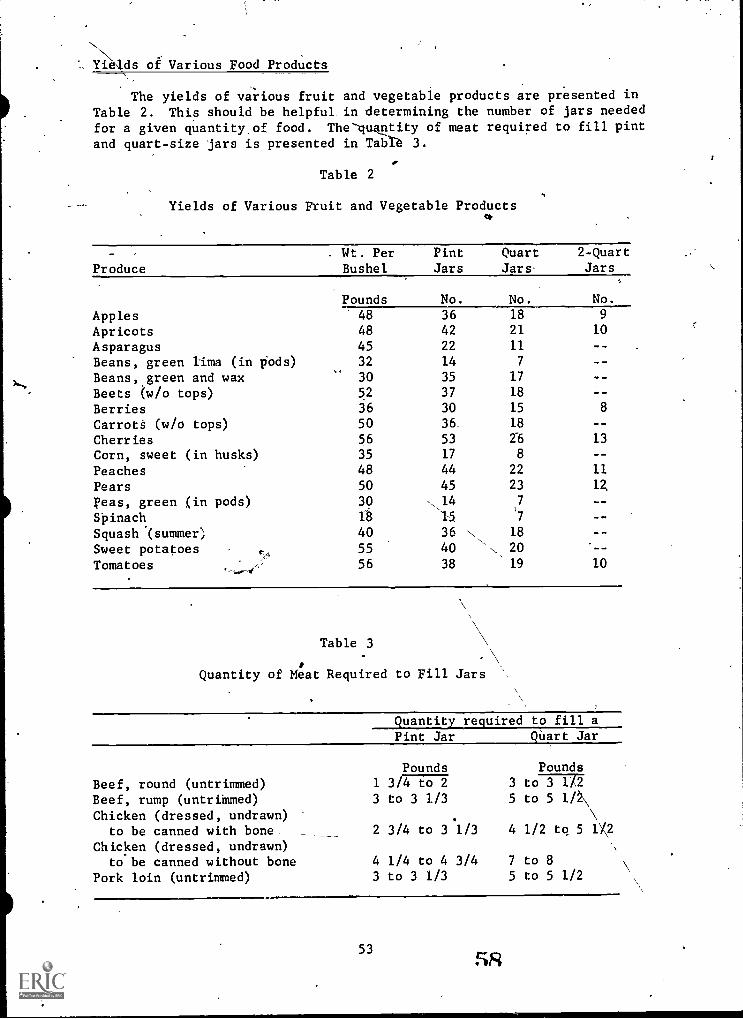
Yields of Various Food Products
The yields of various fruit and vegetable products are presented inTable 2. This should be helpful in determining the number of jars neededfor a given quantity,of food. The-quantity of meat required to fill pint
and quart-size jars is presented in Table 3.
Table 2
Yields of Various Fruit and Vegetable Productsa
Produce. Wt. PerBushel
PintJars
QuartJars.
2-QuartJars
Pounds No. No. No.
Apples 48 36 18 9
Apricots 48 42 21 10
Asparagus 45 22 11
Beans, green lima (in pods) 32 14 7
Beans, green and wax 30 35 17
Beets (w/o tops) 52 37 18
Berries 36 30 15 8
Carrott (w/o tops) 50 36. 18
Cherries 56 53 26 13
Corn, sweet (in husks) 35 17 8
Peaches 48 44 22 11
Pears 50 45 23 12
Peas, green (in pods) 39 14 7
Spinach 18 1-5
Squash .(summer) 40 36 18
Sweet potatoes 55 40 20
Tomatoes 56 38 19 10
Table 3
Quantity of Meat Required to Fill Jars
t....._m_ajtiy.tquired to fill a
Pint Jar Quart Jar
Beef, round (untrimmed)Beef, rump (untrimmed)Chicken (dressed, undrawn)
to be canned with bone -
Chicken (dressed, undrawn)to be canned without bone
Pork loin (untrimmed)
Pounds1 3/4 to 2
3 to 3 1/3
2 3/4 to 3 1/3
4 1/4 to 4 3/43 to 3 1/3
Pounds3 to3I725 to 5 la
4 1/2 to 5 1y,2
7 to 85 to 5 1/2
53fiR

FRUIT
Use of Sugar in Canning Fruit
Fruits and fruit juices may be canned. with or without sugar.
The syrup should be prepared in advance of the time it is to be used.
Reheat to boiling point before filling cans. From 3/4 to 1 cupful of sy-
rup should be allowed for each #2 can of fruit. The use of sugar helps
to preserve the color, texture,"and flavor of fruit.
The following table gives the proportion of sugar and water for va-
rious syrups.
Table 4
Proportions of Sugar and Water for Syrups
Percentageof Sugar Consistency of Syrup
Sugar Needed perGallon of Water
Dry Sugarper #21/2 Can
207. Light 2 lbs., 2 oz. or 5 cups , 1/8 cup
307.
,,
Moderately light 3 lbs., 10 oz. or 2 qts. 1/4 cup
407. Medium 5 lbs., 9 oz. or 3 1/8 qts. 1/3 cup
507. Moderately heavy 8 lbs., 6 oz. or 4 3/4 qts. 1/2 cup
607. Heavy 12 lbs., 8 oz. or 7 qts. 3/4 cup'
54

`\.
Apple Butter FRUIT
r'Select applesSelect'fully ripe, sound fruit. !Parings and cores of canning apples may be
`used in the preparation of apple butter.'
Prepare cans or glass jarsUse #2, #21/2, or #10 cans, or pint, quart or gallon glass jars having self-
sealing closuresN Wash cans or jars.
Prepare applesa. Wash apples thoroughly.
b. Remoye spots, bruised portions and blemishes- Do not peel.
c. Cut the apples in section and remove blossom and stem ends.
Precook and sievea. ,Cook in a small amount of water; not more than half as much water as fruit.
b. Put cooked apples through pulper or sieve to remove cares and seed.
Recipe3 gallons apple pulp
2 teaspoons ground cloves
3 pounds sugar (brown or white) IA teaspoons ground cinnamon
2 teaspoons ground allspicea., Set aside.b., Combine pulp and sugar and cook in steam jacketed kettle until product is
thick'and smooth, stirring frequently to prevent scorching.
cj Ten minutes before cooking is completed,add,spices mixed in small amount
:of cold water.d. Product is cooked when liquid does not separate after a spoonful is
dropped on a saucer.
CansGlass Jars
FillFill cans with hot apple butter to
within 1/8 inch of top.
ExhaustBring center of can temperature to
180°F.
ClosePlace marked covers on cans and seal
at once.
Processa. Process at once in boiling water
bath. (212°F.)
b. Processing timeSize Time
#303 10 minutes
#2 10 minutes
#21i 10 minutes
#10 ,10 minutes
c. Remove cans from cooker as soon
-N
as processing time is completed.
403b1513i7. cans.
Fill jars to within k inch of top
with hot apple butter.
Insert table knife blade down the
sides of jars to remove air bubbles.
Wipe tops of jars with clean, damp
cloth. Adjust lids.
a. Process at once at 212°F.
b. Processing time:
Size Time
Pints , 15 minutes
Quarts 15 minutes
gallon 15 minutes
Cool jars.
55

FRUIT Apples (Sliced or Quartered)
Select applesSelect ripe, firm fruit'. Sort and remove faulty fruit.
Prepare cans or glass JarsUse #2, #23/4 or #10 cans, or pints, quarts or k gallon glass jars having
self-sealing closures. Wash cans or jars.
Prepare applesa. Wash with cold water.b. Remove.spots, seeds, stern and bud ends. Peel if preferred.
c. Cut into slices or quarters.d. Drop into cold water, adding 2 tablespoons each of salt and Vinegar to
each gallon of water.
Precooka. Drain apples.b. Boil apples in thin syrup or water for 5 minutes or until tender, or
c. Cook slowly in steam jacketed kettle, or with steam until tender.
d. One-half cup sugar to each quart of apples may be 'added.,
Glass Jars
Fill jars with apples to within 3/4
inch of top. Add cooking liquid or
syrup to within inch of top.
FillFill cans with apples to within 3/4
inch of top. Add cooking liquid or
syrup to completely, fill.
Cans
ExhaustBring center of cam temperature to
180°F.
Close'Place marked covers on cans and seal
at once.1 '
Processa. Process at once-in boiling water
bath. (212 °F.)
b. Processing time:Size Time
.#303 10 minutes
#2 10 minutes
#23/4 10 minutes
#10 10 minutes
c. Remove cans from cooker as soonas processing time is completed.
*Cool
Cool cans.
40
6156
Insert table knife blade down thesides of jars to remove air bubbles.
Wipe off tops of jars with clean,
damp cloth. Adjust lids.
a. Process at once at 2)12°F.
b. Processing time:Size Time
Pints 20 minutesQuarts 25 minutes
gallon 30 minutes
Cool jars.

Apple Sauce FRUIT
§112clAlUag.Select ripe, cooking apples.
Prepare cans.or glass MarsUse #2, OA or #10 cans,, or pint or quart glass jars having self-sealing
closures. Wash cans or jars.
Prepare apples ,
a.- Wash with cold water.
b. tut into quarters. Do not peel.
c. Remove spots, seeds, stem and bud ends.
d. Drop into cold water, adding 2- tablespoons each of salt and vinegIr
per gallon.
Precooka. Drain apples.
b. Add just enough fresh water to keep apples from sticking..
c. Cook slowly in steam jacketed kettle or under steam drop until tender.
d. Put through colander to remove skins.
e. One-half Cup sugar to each quart of sauce mhy be added.
f. ,Return to steam jacketed kettle and bring to 212°F.A
CansGlass Jars
FillFill cans to top with boiling apples Fill jars to k inch of top with
sauce.boiling apple sauce.
ExhaustBring center of can temperature to Insert table knife blade down the
180°F.'sides of jars to remove air bubbles.
ClosePlaee marked covers on cans and seal Wipe tops of jars with clean, damp
at onte.cloth. Adjust,lids.
Processa. Process at once in boiling water a. Process at once at 212°F.
bath. (212 °F) b. Processing time:
b. Processing time: Size Time
Size Time Pints 15 minutes
#303 10 minutes Quarts 15 minutes
#2 10 minutes
#21/2 15 minutes
#10 20 minutes
c. Remove cans from cooker as soon
as processing time is completed.
CoolCool cans.
57
Cool jars.
62

FRUIT Berries
Select berriesSelect ripe, firm fruit. Overripe berries should be used for juice or jams.
Berries should be canned immediately after picking.
Prepare cans or glass tars
Use #2, #2 or # 10 R-Enamel cans and pint, quart or xi gallon glass jars
having self-sealing closures. Wash cans and jars.
Prepare berriesa. Wash with cold water, using colander or wire basket.
b. Dipiup and down and drain.
c. Remove caps, stems and berries not suitable for canning.
d. Berries may be precooked in syrup or packed raw and covered with syrup.
e.! Prepare and,use light or medium syrup according to syrup chart.
Cans Glass Jars
FillPut berries in cans shaking to se-
cure a full pack, Fill cans to top
with boiling hot syrup.
ExhaustBring center of can temperature to
160°F.
ClosePlace marked covers on cans and
seal at once.
1 Process
Put berries in jars shaking to se-
sure a full pack. Fill jars to
within inch of top with boiling
hot syrup.
Insert table 'knife blade down sides
of jars to remove air bubbles.
Wipe tops of jars with clean, dampcloth. Adjust lids.
a.. Process in boiling water bath. a. Process at once at 212 °F.
(212°F.) b. Processing time:
b. Processing til: Size Time
Size Time Pints 15 minutes
#303 I5minutes Quarts 4 minutes
#2 15 minutes k gallon 25 minutes
#21/2 , 20 minutes
#10 25 minutes
c. Remove cans from cooker as soonas processing time is completed.
CoolCool cans.
58
Cool jars.

Cherries . FRUIT
Select cherriesSelect well'ripened, firm, clean fruit. Sour che.ries are pitted and packed
in water or syrup for use in pies and cobblers. Sweet cherries are used for
desserts or salads and are usually canned wi,thout being pitted. Cherries
should be canned immediately after picking.,
Prepare cans or glass 'jarsUse #2, #3, or #10 R-Enamel cans, or pint, quart or i gallon glass jars
having self-sealing closures. Wash cans or jars.
Prepare cherriesa. Wash cherries carefully.
b. Chill in ice cold water for 10 minutes.
c, Pit the cherries.d. If cherries are to be sweetened, prepare a medium syrup (sour cherries)
or light syrup (sweet cherries).
Cans Glass Jars
FillFill cans to within inch of top Fill jars with raw cherries. Shake
with raw cherries. Fill to top with clAerries in jars to secure a full
hot syrup or hot cherry juice or pack. Fill jars to within inch
water. of top With boiling syrup, cherryjuice, or water.
ExhaustBring, center of can temperature to
160 °F.
ClosePlace marked covers on cans and
seal at once.
Insert table knife blade down thesides of jars to remove air bubbles.
Wipe tops of jars with a clean, damp
cloth. Adjust lids.
Processa. Process in boiling water bath. a. Process at once 212°F.
(212°F.) b. Processing time:
b. Processing time: Size Time
Size Time Pints 25 minutes
#303 15 minutes Quarts 30 minutes
#2 15 minutes li gallon 35 minutes
#21i 20 minutes
#10 30 minutes
c. Remove cans from cooker as soon
as processing time is completed.
CoolCool cans.
59
Cool jars.
fib
FRUIT Fruit Juices _
(Berries, Red Cherries, Currants, GraPeL Plums, ,or Blands of Fruits)
Select fruitUse only, sound, well. ripened fruit.
Prepare cans or glass jars
Use 12,, #21, or #10R-Enamel cans', or pint, quart or gallon glass
having self-sealing closures., Wash cans or jars.
Prepare fruit r
a. Wash the fruit. 4
b. 'ReMove caps or stems.
c. Crush fruit.
Precook and straina. Heat gently to:170°F. (below simmering) until soft.'
b, Strain through a "clean cloth bag. Re-train to give clearer juice.
c. 'Add sugar, if desired -- k to 1 cup sugar to 1 gallon of juice.
d. Heat to 170°F. (below simmering).
Cans Glass Jars
FillFill cans to top with hot juice,. Pour hot juice into clean, hot jars.
. .Fill jars to within k inch of top.
ExhaustBring center of can temperature to
160°F.
ClosePlace marked covers on cans and,seal
at once.
Processa. Process at once in water bath
at simmering point, 180°F.
b. Processing time:Size Time
#303#2
#21;
#10c. .Remove
20 minutes20 minutes20 minutes20 minutes
cans from cooker'as soonas processing time is completed.
CoolCool cans.
6560
Insert table knife blade down sidesof jars to remove air bubbles.
1
Wipe tops of jars with clean, dampcloth. Adjust lids.f
a.
b.
Process at once at 212°F.Processing time:Size Time
Pints 5 minutes
Quarts 5 minutes
k gallon 5 minutes
Cool jars.

Peaches
Select peachesSelect ripe, firm fruit.
FRUIT
Prepare cans or glass jarsUse #2, #2, or #10 cans, or,pint, quart or k gallon glass jars having
self - sealing closures. Mash cans or jars.
Prepare peachesa. Wash with cold water.b. Place peaches in blanching basket and dip into boiling water until
-skins slip off easily,c. Dip into cold water for a few seconds..d. Peel, remove spots, and halve or slice peaches. Discard.pits.
e. DrET into cold water containing 2 tablespoons each of salt and vinegar
to each-gallon of water.
Prepare syrupUse medium or light syrup as required.
Cans
FillPack raw peach halves into cans, cutside down, to within .k inch of top..
Fill to top with boiling hot syrup.
ExhaustBring center of can temperature to160°F.
ClosePlace marked covers on cans and seal
at once.
Processa. Process in boiling water bath.
(212°F.)
.b. Processing time:Size Time#303#2#21/2
20 minutes20 minutes
25 minutes
9610 40 minutes
c. Remove cans from cooker as soona& processing time is completed.
CoolCool cans.
61
Glass Jars
Pack raw peach halves into jars, cutside down, to within k inch of top.Cover fruit with boiling hot syrupleaving ? inch spade at top of jar.
Insert table knife blade down thesides of jars to remove air bubbles.
Wipe tops of jars with clean, damp
cloth. Adjust lids.
a. Process at once at 212°F.b. Processing time:
Size TimePints 20 minutes
Quarts 25 minutes
k gallon 30 minutes
Cool \jars.
GC
A

FRUIT Pears
Select pearsSelect firm, ripe fruit..
Prepare cans or glass jarsUse #2, 21/2, or #10 cans, or pint, 'quart or gallon glass jars having
self-sealing closures. Wash cans or jars.
Prepare pearsa. Wash with sold water.b. Peel, quarter, core and cut out defects.
c. Place in mixture made of 2 tablespoons each of salt and vinegar to one
gallon of water. This prevents pears from turning dark.
d. Drain off water just before placing fruit in boiling syrup.
Prepare syrupa. Use moderately light syrup.
b. Approximately 1 cup of syrup will be required for each quart of fruit
or #21/2 can.
PrecookPrecook Keiffer pears 15 to 20 minutes in syrup in steam jacketed kettle.
Softer flesh pears should be cooked only until thoroughly heated through.
FillFill cans with hot pears, to within
inch of top. Fill to top with
hot syrup.
Cans Grass Jars
ExhaustBring center of can temperature tc160°F.
ClosePlace marked covers on caps and seal
at once.
Fill jars with hot pears to withininch of top. Cover with hot
syrup leaving inch at top of jar.
Insert table knife blade down thesides of jars to remove air bubbles.
Wipe tops of jars with cleat, dampcloth. Adjust lids.
Processa. Process in boiling water bath. a. Process at once at 212°F.
(212°F.) b. Processing time:
b. Processing time: Size Time
Size Time Pints 30 minutes
#303 20 minutes Quarts 35 minutes
#2 30 minutes gallon 40 minutes
01/2 30 minutes#10 40 minutes
c. Remove cans from cooker as soonas processing time is completed.
CoolCool cans.
.6762
Cool jars.

Plums FRUIT
Select plumsSelect ripe, firm fruit. Plums that are green will be lacking in flavor
and sour. Soft fruit may be used for plum butter.
Prepare cans or lass _,jars
Use #2, #3, or #10.R-Enamel ans or pint, quart or gallon glass jars
having self-sealing closures Wash, cans or jars.
Prepare plums
a. Wash plums thoroughly, grade for ripeness and discard defective fruit.
b. Prick plums with fork or sharp knife to prevent bursting in processing.
c. Freestone; varieties may be halved and pitted.'
Prepare syrupPrepare medium syrup according to syrilp chart. Approximately 1 cup of
syrup will be required for 1 quart of fruit.
Cans
FillFill cans with plums to within k
inch of top. Fill cans to top with
boiling syrup.
ExhaustBring center of can temperature
to 180°F.
Glass Jars
Fill jars with plums to within '1/2
inch of top. Fill jars with boiling
syrup to within inch of top.
Insert table knife blade down the
sides of jars,to remove air bubbles.
ClosePlace marked covers on cans and seal Wipe tops of jal-s with clean, damp
at once. cloth. Adjust lids.
Processa. Process in boiling water bath. a. Process at once at 212 °F.
(212°F.) b. Processing time:
b. Processing time: Size Time
Size Time Pints 20 minutes
#303 15 minutes Quarts 25 minutes
#2 15 minutes k gallon 30 minutes
#21/2 20 minutes\`-----.
' #10 25 minutes
c. Remove cans from cooker as soonas processing time is completed.
ToolCool cans.
63
Cool jars.

VEGETABLES Aspara us
Select asparagusSelect fresh, tender, stalks
Prepare cans or glass jarsUse #2 .cans or pint jars!'for spears; #2, #21/2, or #10 cans may be used or
quart jars for cut asparagus. Sel'ect jars with self-sealing closures.
Wash cans or glass jars.
Preparea. Sort according to'slze; snap off the tough'butts.
b. Wash thoroughly.
c. Tie in uniform bundles ok 6 to-8 stalks or cut in 1 inch lengths.
PrecookSteam bundles or cut pieces for 2 to,3 minutes in steam jacketed kettle or
steam drop, Dr cover with boiling water and boil 2 or 3 minutes. Dip in
and out of cold water quickly.
Cans
Filla. Pack hot asparagus iri'fcafis to
within k'inch of top.
b. Add saltas follow*:#2 can - tsp. salt or one 60
grain salt tablet.#21/2 can - 1 tsp. salt,or two 60
grain salt tablets.#10 can - 3 tsp. salt or six 60grain salt tablets.
ExhaustBring'center of can temperature to
140°F.
ClosePlace marked covers on cans and
at once.
Glass Jars
a. Pack hot asparagus in jars to
within inch of top.
b. Add salt as follows:Pt. jar - tsp. salt or one 60
grain salt tablet.Qt. jar - 1 tsp. salt,or two 60grain salt tablets,
c. Fill jar to within 1/2 inch of top
with hot cooking liquid or boil-ing water. .
Insert table knife blade doWn the
sides of jars to remove 'air bubbles.
eal Wipe top of jar with clean, dampcloth. Adjust lids.
Processa. Process at 240 °F. or 10# pres-
sure.
b. ProcessingSize
#2#211
#10#303
c. Remove
time:
Time25 minutes25 minutes35 minutes25 minutes
cans from cooker aseoonas pressure has returned to 0.
CoolCool cans.
64
a. Process at once at 240 °F. or
1Q# pressure.b. Processing time:
Size Time
Pints 30 minutesQuarts 35 minutes
Cool jars.:

1
tBeans - Butter or Lima VEGETABLES
Select beansSelect young, tender beantI for canning. Beans should be canned as soon as
possible after being gathered.
Prepare cans,or glass jarsUse #2, #21/2, or #10 C-Enamel or plain ns, or pint or quart_glass jars
having self-sealing closures. W as ans or glass jars.
Prepare beansa. Wash pods in clean water.
b. Discard bad pods.
c. Shell beans and discard imperfect beans.
d. Drop into clean, cold water until ready to pre-cook. Do not put too
many beans in one pan.'
PrecookIf precooking is done in steam jacketed kettle or steam drop, cook smaller
beans for 21/2 to 3 minutes; more mature beans 4 to 5 minutes; or, cover beans
with boiling water and bring to boil.
Cans Glass Jars
Filla. Pack hot beans in cans to inch a. Pack hot beans in jars within
of top.1 inch of top.
b. Add salt as follows: b. Add salt as follows:
#2 can - tsp. salt or one 60 Pt. jars - tsp. salt or one
grain salt tab t. 60 grain salt tablet.
#21/2 can -.1 is . salt or two 60 Qt. jars - 1 tsp. salt or two
grain salt tab ets. 60 grain salt tablets.
#10 can - 3 tsp..salt or six 60 c. Fill jars within one inch of
grain salt tablets. top with boiling water.
c. Fill can to top with boiling
water.
ExhaustBring center of can temperature to Insert table knife blade down the
140 - 160°F.sides of jars to remove air bubbles.
ClosePlace marked covers on.cans and seal Wipe tops of jars with clean, damp
at once. cloth. Adjust lids. ,
Processa. Process at once at 240°F. or a. Process at once at 240°F. or
10# pressure. 10# pressure. .-.
"b. Processing time: b. Processing time:
Size Time Size Time
#303 35 minutes Pints 45 minutes
#2 35 minutes Quarts 50 minutes
#21/2 40 minutes
#10 55 minutes
c. Remove cans from cooker as soon
as pressure: has returned to 0.
CoolCool cans.
65Cool jars.

Pr
VEGETABLES Beans - Green Beans (Snap Beans)
Select beansSelect tender beans of good quality.
Prepare cans or glass jarsUse #2, #21/2, or #10 C-Enamel or plain cans, or pint or quart jars laving
self-sealing closures. Wash cans or jars.
Prepare beansa. Wash thoroughly with cold water, dipping up and down until free 4.om dirt.
b.- Be sure that last water is,free for all soil.
c. String and sort, cut off Ads, and cut-br break into short piecesL
PrecookPrecook 3 to 5 minutes in steam jacketed kettle or steam drop blanching
vat, or cover beans with boiling water and bring to boil. The beans should
have a bright green color. \
Cans Glass Jars
Filla. Pack hot beans in cans to with-
in 34 inch of top.
b. Add salt as follows:#2 can - 1/2 tsp. salt or one 60
grain salt tablet.#21/2 can - 1 tsp. salt or two 60
grain salt tablets.#10 can - 3 tsp. salt or six 60
grain salt tablets.
c. Fill cans to top with hot cook-ing liquid, or boiling water.
ExhaustBring center of can temperature to
140 - 160°F.
ClosePlace marked covers on cans and seal
at once.
Processa. Process at once at 240°F. or 10#
pressure.b. Processing time:
Size Time
#2 20 minuted
#21/2 25 minutes
#10 35 minutes
#303 20 minutes
c. Remove cans from cooker as soonas pressure has returned to 0.
CoolCool cans.
?Pi66
a.
b.
c.
Pack hot beans in jars /to with-
in inch of top.
Add salt as follows:Pt. jar - tsp. salt or one 60
grain salt tablet.Qt. jar - 1 tsp. -sale or two 60
grain salt tablets.Fill jars to within 11 inch oftop with hot cooki g liquid or
boiling water. ,
Insert table knifesides of jars to r
blade down themove air bubbles.
Wipe top of jars with clean, damp
cloth. Adjust lids.
a. Pr6cess at once at 240°F. or 10#
pressure.b. Processing time:
Size Time
PintsQuarts
Cool jars.
25 minutes30 minutes
c./'

Beets VEGETABLES'
Select beetsSelect young, tender beets. Beets should be canned soon after harvesting
to preserve color, flavor and texture.
Prepare cans on glass jarsUse #2, #21/2, or #10 R-Enamel cans or pint or quart glass jars having self-
sealing closures. Wash cans or jars.
Prepare beetsa. Wash beets in cold water.
b. Cut off tops leaving 1 inch of stem; if tender the tops may be canned.
Leave roots to prevent bleeding.
Precooka. Steam beets for 15 to 20,minutes, or cover with boiling water and boil
until skins slip easily.
b. Put in cold water until cool enough to handle; remove skins and trim.
c. Small beets may be packed whole.
d. Beets may be cut in halves, quarters, slices, or diced as preferred.
Cans
Filla. Pack hot beets to within inch
of top.
b. Add salt as follows:#2 can - tsp. salt or one 60
grain salt tablet.#21/2 can - 1 tsp. salt or two 60
grain salt tablets.#10 can - 3 tsp. salt or six 60grain salt tablets.
c. Fill cans to top with boiling
water.
ExhaustBring center of can temperature to
160°F.
ClosePlace marked covers on cans and
seal at once.
Processa. Process at 240°F.
pressure.
b. Processing time:
Size Time
#303#2#21/2
#10
C. Remove
Glass Jars
a. Pack hot beets to within inch
of top.
b. Add salt as follows:Pt. jars - tsp. salt or one
60 grain salt tablet.Qt. jars - 1 tsp. salt or two
60 grain salt tablets.
c. Fill jars to within inch of
top with boiling water.
Insert table knife blade down the
sides of jars to remove air bubbles.
Wipe tops of jars with a clean, damp
cloth. Adjust lids.
or 10# a.
30 minutes30 minutes35 minutes45 minutes
cans from cooker as soon
as pressure has reached 0.
CoolCool cans.
67
b.
Process at 240°F. or 10#
pressure.Processing time:
Size Time
PintsQuarts
Cool jars.
30 minutes35 minutes
72

VEGETABLES Carrots
Select carrotsSelect young, tender carrots. Carrots should be canned soon after har-
vesting to preserve color, flavor and texture.
Prepare cans or glass jars//
Use #2, #21, or #10 cans or pint or quart size glass jars having self-
sealing closures. Wash cans or jars.
Prepare carrotsa. Cut tops off close to the head of carrots.
b. Wash well in several waters.
c. Using brush and knife, scrape-or peel to remove skin.
d. Carrots may be packed whole or cut into circles or strips according to
preference.
PrecookSteam carrots for 10 to 15 minutes or cover with boiling WatexanPbail___ ----for 5 minutes.
Cans
Fill`a. Pack hot carrots to k inch of
top.
b. Add salt as follows:#2 can - tsp. salt or one 60
grain salt tablet.#2k can - 1 tsp. salt or two
60 grain salt tablets.#10 can - 3 tsp. salt or six
60 grain salt tablets.
c. Fill cans to top with hot cook-ing liquid or boiling water.
ExhaustBring center of can temperature to
160°F.
ClosePlace marked covers on cans and
seal at once.
Processa. Process at 240°F., or 10# pres-
sure.
b. Processing time:Size Time
#303 30 minutes
#2 30 minutes
#21/2 30 minutes
#10 45 minutes
c. Remove cans from cooker as
soon as pressure has reached 0.
CoolToil) cans.
68
Glass Jans
Lt J
a. Pack hot carrots to k inch of
top.
b. Add salt as follows:Pt. jars - k tsp. salt or one60 grain salt tablet.Qt. jars - 1 tsp. salt or two60 grain salt tablets.
c. Fill jars with cooking liquidor boiling wataF to within
inch of top.
Insert table knife blade down sides
of jars to remove air bubbles.
Wipe tops of glass jars with clean
damp cloth. Adjust lids.
a. Process at 240°F. or 10# pres-
sure.
b. Processing time:Size Time
Pints 30 minutes
Quarts 35 minutes
Cool jars.

Corn - Cream Style VEGETABLES
Select NANAKUse only tender corn in the milk stage. Corn should be in the can cooking
as early as possible after taking from the stalk. Gather in early morning .
and process as quickly as possible. If corn must be held, keep in a cool
airy place. Only as much as can be prepared and put, into the cooker within
2 hours from stalk to cooker is a good rule.
Prepare cans or glass jarsUse #2 or #303 C-Enamel cant, or pint size glass jars, having self-sealing
cAisures. Cream style corn should not be canned fncontainers larger than
pint jars or #2 cans. Wash cans or jars.
Prepare and precook corn
a. Remove shucks from the corn.
b. Silk with a clean brush.
c. Cut away any damaged parts.
d. Wait' in cold water.
e. Using a sharp knife, lightly cut off the tops of the kernels and with
the back of the knife, scrape out the pulp.
f. Measure corn. Add half as much boiling water as corn.
g. Heat corn and water to 1900 to 200°F. in steam jacketed kettle, or
heat just to boiling temperature. Do not boil.
CansGlass Jars
Filla. Fill cans to top with boiling a. Fill jars to within 1 inch of
hot corn.top with boiling hot corn.
b. Add tsp. salt or one 60 grain b. Add tsp. salt or one 60 grain
salt tablet.salt tablet.
ExhaustBring center of can temperature to
185°F.
ClosePlace marked covers on cans and
seal at once.
Insert table knife blade down sides
of jars to remove air bubbles.
Wipe tops of jars with clean, damp
cloth. Adjust lids.
Processa. Process at 240°F. or 10# pres- a. Process at 240 °F. or 10# pres-
sure./ sure.
b: Processing time: b. Processing
Size Time Size Time
#303 90 minutes Pints 90 minutes
#2 90 minutes
c. Remove cans from cooker as soon
as pressure has reached O.
CoolCool cans.
69
Cool jars.
74
``.4
VEGETABLES Corn - Whole Grain
Select cornSelect young, tender corn. Gather in early morning and process as quickly
as possible. If corn must be held, keep in a cool, well-ventilated place.
It is a good idea to process within two hours after harvesting.
Prepare cans or_glass jarsUse #2 or #2% C-Enamel cans; or, pint or quart glass jars having self-
sealing. closures. Wash cans or jars.
Prepare corna, Remove shucks\nd as h of silk as possible. Place ears in cold
water.b. Remove silk with clea brush.
c. Wash ears in clean cold water. Grade for maturity as removing from
water.d. Cut corn from cob at about two-thirds depth of kernel. Do'not scrape..
Precook d
To each quart of cut corn, add 1 pint of boiling water. Heat to boiling
o'r.2120F.
Cans Glass Jars
Filla. Pack hot corn to inch from top a. Pack hot corn to 1 inch from
and fill to top with hot cooking top and fill with cooking li.-
liquid. quid to within 1 inch from top.
b. Add tsp. salt or one 60 grain b. Add tsp. salt or one 60,grain,
salt tablet. salt tablet for pints, or two60 grain salt tablets for quarts.
4ExhaustBring center of can temperature to
185°F.
Insert table knife blade down sidesof jars to remove air bubbles.
ClosePlace marked covers on cans and seal Wipe tops of jars with clean, damp
at once. cloth. Adjust lids.
Processa. Process at once at 240°F. or a. Process at once at 240°F. oil
10# pressure. 10# pressure.I
b. Processing time: b. Processing time:
Size Time Size Time
#303 50'minutes Pints 60.minutes
#2 50 minutes Quarts 70 minutes
#2% 70 minutes
b. Remove cans from cooker as soonas pressure has reached 0.
CoolCool cans.
'7570
Cool jars.

Greens VEGETABLES
Select greensCan only tender greens, freshly picked.
Pre are cans or lass ars
Use #2 or #2 cans or pint or quart size jars having self-sealing closures.
Wash cans or jars.
Prepare greensa. Pick over carefully; remove tough stems and bad leaves.
b. Wash several times with cold water, lifting up and down in water from
one container to another to prevent dirt from getting back onto leaves.
PrecookPut into a small amount of boiling water or steam, and boil or steam until
leaves are wilted.
CadsGlass Jars
Filla. 'Pack hot green's loosely to with- a. Pack hot greens loosely to with-
in k inch of top. Cut through in k inch of top. Cut through
greens with long sharp knife to greens, with long sharp knife to
allow circulation of liquid. allow circulation of liquid.
b. Add salt as follows:, b. Add salt as follows:
#2 or #275 - add k pip. salt or Pints - k tsp. salt or one 60
one 60 grain sal 'tablet. grain salt tablet.
',,c. Fill cans to top/with boiling
water.
Quarts - 1 tsp. salt or tro 60
i.
. ..,
/ grain salt tablets.
c. Fill jars to within )5 inch of
top with boiling water.
ExhaustBring center of can temperature to
150 - 160 °F.
ClosePlace marked covers on cans and
seal at once.
'Insert table knife blade down the
sides of jars to remove air bubbles.
Wipe top of far with clean, damp
cloth. Adjust lids.
Processa. Process at once at 240°F. or a. Process at once at 240°F. or
10# pressure.10# pressure.
b. Processing time: b. Processing time:
Size Time Size Time
#303 60 minutes Pints 85 minutes
#2 60 minutes Quarts 105 minutes
#21/2 75 minhtes
c. Remove cans from cooker assoon as pressure has returned
to 0.
CoolCool cans.
71
Cool jars.

VEGETABLES Peas - Green (English) and Black Eyed i.+f
Select peasSelect young, tender peas
Prepare cans or glass jarsUse.#2 or #21/2 cans or pint or quart glass jars with self-sealing closures.
Wash cans or jars.
Pre-Pare teas -
a. Wash pods thoroughly, discarding bad ones.b. Shell peas, discarding faulty ones. Grade peas for size and maturity.
c. Drop into shallow pans, holding cold water.
Precook A
Cover with boiling water and simmer 5 minutes at 190°F; or precook under
steam drop from 3 to 5 minutes; or, cover with boiling water and bring toboil.
Cans Glass Jars
Filla. Pack hot peas in can to within a. Pack hot peas in jars to within
inch of top. 1 inch of to .
b. Add salt as follows': b. Add salt as llows:
#2 can - tsp. salt or one 60 Pt. jar - p. salt or one 60
grain salt tablet. grain salt tablet.
#21/2 can - 1 tsp. salt or two 60 Qt. jar - 1 tsp. salt or two, sa
grain salt tablets. grain salt tablets.
c. Fill to top of can with boiling c. Fill jars to within one inch of
water. top with boiling water.
/r- %ExhaustBring center of can temperature to140°F.
Insert table knife blade down sidesof jars, to remove air bubbles.
ClosePlace marked covers on cans and seal Wipe top of jars with clan, damp
at once. cloth. Adjust lids.
Processa. Process at 240°F. or 10 pres- a. Process at 2400F. /or 10# pres-
sure. sure.
b. Processing time: b. Processing time
Size Time Size Time
#303 35 minutes Pints
#2 35 minutes Quarts
#21/2 40 minutes
c. Remove cans from cooker as soonas pressure has returned tio/O.
CoolCool cans. Cool jars. j
40 minutes45 minutes

Pumpkin and Winter Squash VEGETABLES
Select squash or pumpkinSelect firm, fully ripened squash or pumpkin of good texture and color, not
frosted.
Prepare cans or glass jarsUse #2 or #21/2 R-Enamel .tin cans or pint or quart glass jars having self-
sealing closures. Wash cans or jars.
Prepare pumpkin or squasha. Wash with cold water.b: Cut off stem and blossom ends.c. Cut open, remove seeds and spongy pulp; remove rind by peeling.
d. Cut in small pieces about inch square.
Precooka. Add a small amount of water. Steam or boil until tender, stirring
occasionally. Allow steam to escape for last few minutes of cooking
so product will not be watery.
b. Put through a sieve or colander.
Cans Glass Jars
Filla. Fill can to within inch of top a. Fill jars to within inch of
with hot pumpkin or squash. top with hot pumpkin-or,squash.
b. Add salt as follows: b. Add salt as follows:
/2 can - 1/2 tsp. salt or one 60 Pt. jar - 1/2 tsp. salt or-one 60
grain salt tablet. grain salt tablet.
#21/2 can - 1 tsp. salt or two 60 Qt. jar - 1 tsp. salt or two 60
grain salt tablets. grain salt tablets.
c. Fill cans to top_with cooking c. Fill jars to within inch of top
liquid or boiling water. with cooking liquid or boilingwater.
Exha,Bring center of can temperature to
180°F.
ClosePlace marked covers on cans and seal
at once.
Processa. Process at 240°F. or 10# pres- a. trocess at 240°F. or 10# pres-
sure. sure.
b. Prpcessing time: b. Processing time:
Size Time Size Time
#303 75 minutes#2 85 minutes
#21/2 115 minutes
c. Remove cans from cooker as soonas pressure has returned to 0.
Insert table knife blade down sidesof jars to remove air bubbles.
Wipe top of jars with clean, dampcloth. Adjust lids.
CoolCool cans._
73 '
Pints 85 minutesQuarts 130 minutes
Cool jars.
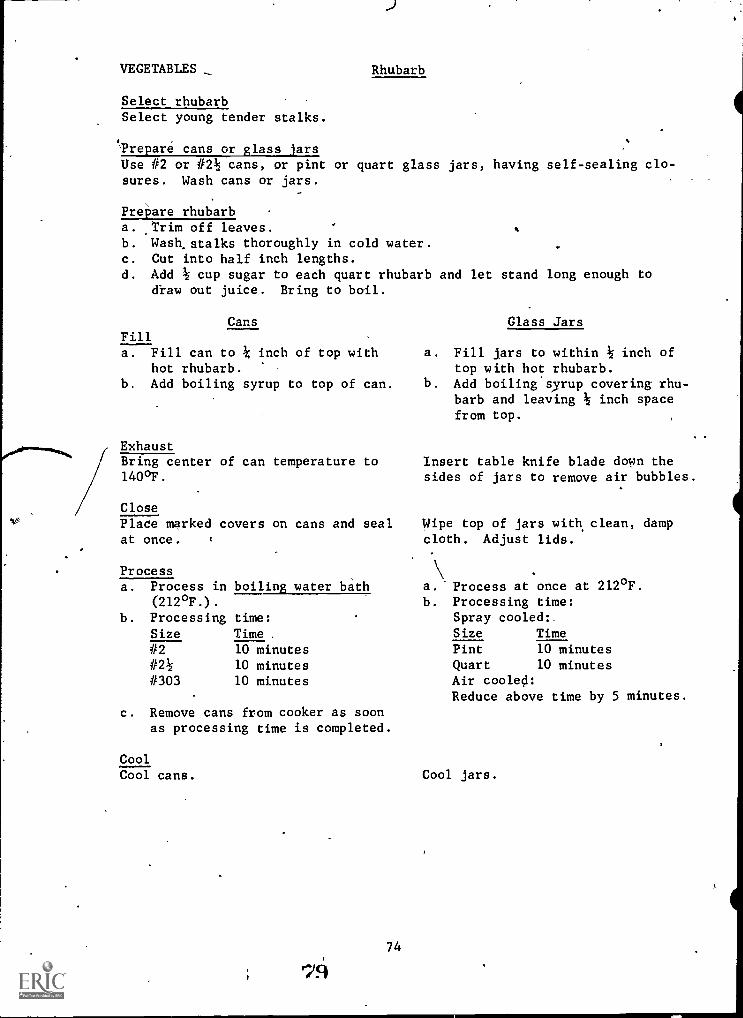
VEGETABLES
Select rhubarbSelect young tender stalks.
Rhubarb
'Prepare cans or glass jarsUse #2 or #21/2 cans, or pint or quart glass jars, having self-sealing clo-sures. Wash cans or jars.
Prepare rhubarba. Trim off leaves.b. Wash stalks thoroughly in cold water.c. Cut into half inch lengths.d. Add cup sugar to each quart rhubarb and let stand long enough to
draw out juice. Bring to bail.
Cans Glass JarsFilla. Fill can to inch of top with a. Fill jars to within inch of
hot rhubarb. top with hot rhubarb.b. Add boiling syrup to top of can. b. Add boiling'sxrup covering rhu-
barb and leaving inch spacefrom top.
Exhaust
/Bring center of can temperature to140°F.
Close
Insert table knife blade down thesides of jars to remove air bubbles.
Place marked covers on cans and seal Wipe top of jars with clean, dampat once. t cloth. Adjust lids.
Process \ .
a. Process in boiling water bath a.' Process at once at 212°F.(212°F.). b. Processing time:
b. Processing time: Spray cooled:.
Size Time Size Time
#2 10 minutes Pint 10 minutes
#21/2 10 minutes Quart 10 minutes
#303 10 minutes Air cooled:Reduce above time by 5 minutes.
c. Remove cans from cooker as soonas processing time is completed.
CoolCool cans.
74
Cool jars.
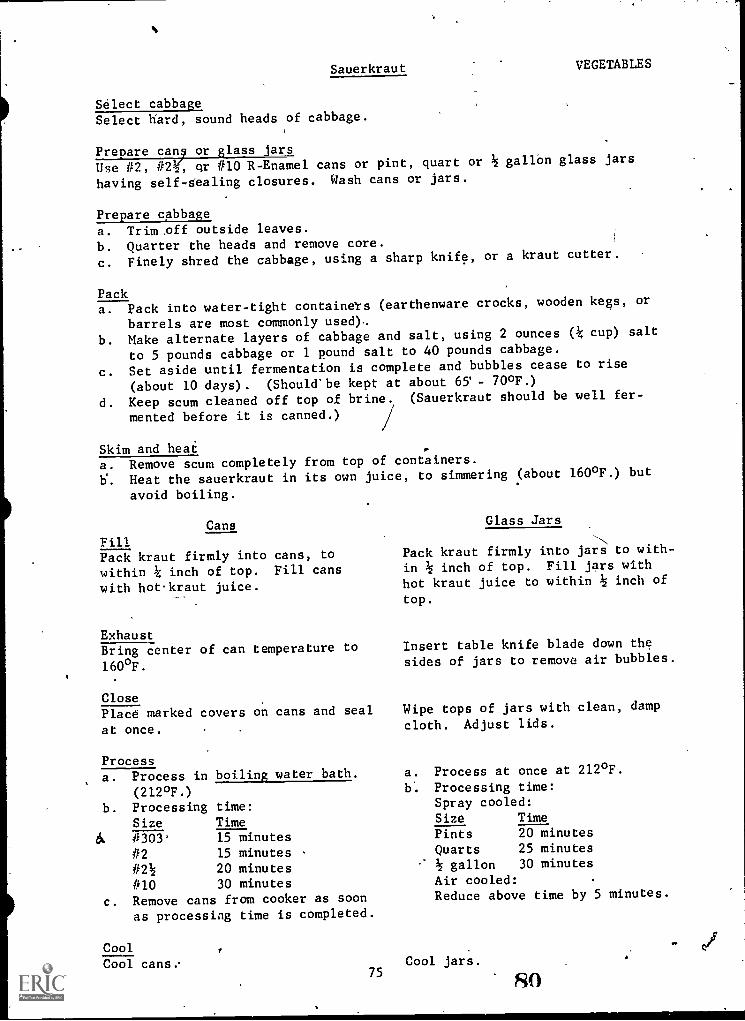
Sauerkraut VEGETABLES
Select cabbageSelect hard, sound heads of cabbage.
Prepare can, or glass jarsUse #2, #22, qr #10 R-Enamel cans or pint, quart or gallon glass jars
having self-sealing closures. Wash cans or jars.
Prepare cabbage
a. Trim ,off outside leaves.
b. Quarter the heads and remove core.
c. Finely shred the cabbage, using a sharp knife, or a kraut cutter.
Packa. Pack into water-tight containers (earthenware crocks, wooden kegs, or
barrels are most commonly used)-
b. Make alternate layers of cabbage and salt, using 2 ounces (3/4 cup) salt
to 5 pounds cabbage or 1 pound salt to 40 pounds cabbage.
c. Set aside until fermentation is complete and bubbles cease to rise
(about 10 days). (Should"be kept at about 65 - 70 °F.)d.Keepscumcleanedofftopofbrine.(Sauerkraut should be well fer-
mented before it is canned.)
Skim and heata. Remove scum completely from top of containers.
V. Heat the sauerkraut in its own juice, to simmering (about 160°F.) but
avoid boiling.
Cans Glass Jars
FillPack kraut firmly into cans, to
within inch of top. Fill cans
with hot kraut juice.
ExhaustBring center of can temperature to
160°F.
Pack kraut firmly into jars to with-
in inch of top. Fill jars with
hot kraut juice to within k inch of
top.
Insert table knife blade down thesides of jars to remove air bubbles.
ClosePlace marked covers on cans and seal Wipe tops of jars with clean, damp
at once. cloth. Adjust lids.
Processa.
b.
Process(212°F.)
Processing
in boiling water bath. a. Process at once at 212°F.
b. Processing time:Spray cooled:time:
Size Time Size Time
& #303' 15 minutes Pints 20 minutes
#2 15 minutes Quarts 25 minutes
12 20 minutes ' k gallon 30 minutes
#10 30 minutes Air cooled:
c. Remove cans from cooker as soon Reduce above time by 5 minutes.
as processing time is completed.
CoolCool cans. Cool jars.
75 80
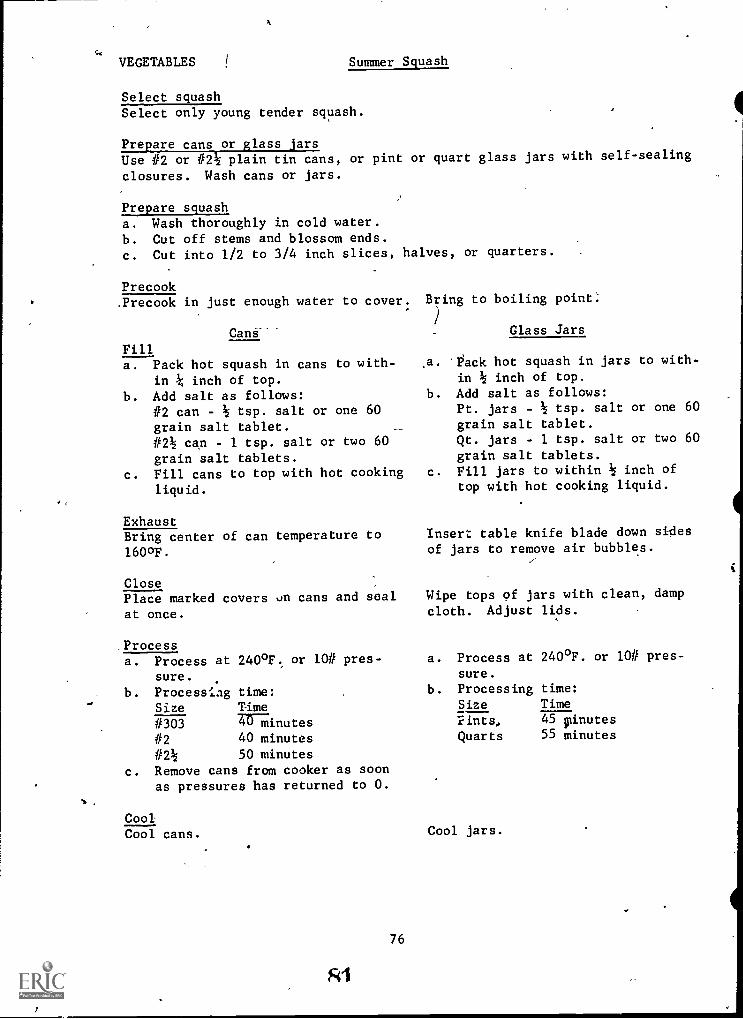
VEGETABLES Summer Squash
Select squashSelect only young tender squash.
Prepare cans or glass jars
Use #2 or #2 plain tin cans, or pint or quart glass jars with self-sealing
closures. Wash cans or jars.
Prepare squasha. Wash thoroughly in cold water.
b. Cut off stems and blossom ends.
c. Cut into 1/2 to 3/4 inch slices, halves, or quarters.
Precook.Precook in just enough water to cover. Bring to boiling point.
/
CaniFilla. Pack hot squash in cans to with-
in inch of top.
b. Add salt as follows:#2 can - tsp. salt or one 60
grain salt tablet.#2k can - 1 tsp. salt or two 60
grain salt tablets.c. Fill cans to top with hot cooking
liquid.
ExhaustBring center of can temperature to
160 °F.
ClosePlace marked covers on cans and seal
at once.
.Processa. Process at 240°F., or 10# pres-
sure.
b. Processing time:Size Time
#303 Tranutes#2 40 minutes
#21/2 50 minutes
c. Remove cans from cooker as soonas pressures has returned to 0.
CoolCool cans.
Si
76
Glass Jars
.a. 'Pack hot squash in jars to with-
in inch of top.
b. Add salt as follows:Pt. jars - tsp. salt or one 60grain salt tablet.Qt. jars - 1 tsp. salt or two 60grain salt tablets.
c. Fill jars to within inch of
top with hot cooking liquid.
Insert table knife blade down sidesof jars to remove air bubbles.
Wipe tops of jars with clean, dampcloth. Adjust lids.
a. Process at 240°F. or 10# pres-
sure.
b. Processing time:
----Size Time
Zints, 45 pinutes
Quarts 55 minutes
Cool jars.

Sweet Potatoes - Wet Pack (In Syrupy
A
Select sweet potatoesSelect freshly dung sound potatoes.
VEGETABLES,
Prepare cans or glass lasUse #2 or #21/2 cans or pint or quart glass jars having self-sealing closures.
Wash cans or jars.
Prepare sweet potatoesa. Wash thoroughly, scrubbing with a'vegetable brush.
b. Remove any bad spots and discard potatoes with unpleasant odor.
Precook and pEela. Steam at 240°F., 10 to 15 minutes, or boil untilskins slip easily.
b. Peel quickly.
Prepare syrupIf syrup is used, ptoepare a light syrup.
Cans
Filla. Pack hot sweet potatoes in cans
to k inch of top.
b. Fill can to top with boilingsyrup or boiling water. If boil-
ing water is used, add salt as
follows:#2 can - tsp. salt or one 60
grain salt tablet.#21/2 can - 1 tsp. salt or two 60
grain salt tablets.
ExhaustB-ing center of'can temperature to
175°F.
ClosePlace marked covers on cans and seal
at once.
Processa. Process at 240°F., or l0# pres-
sure.
b. Processing time:Size Time
#303 60 minutes
#2 60 minutes
#21/2 65 minutes
c. Remove cans from cooker as soonas pressure has returned to 0.
CoolCool cans.
77
Glass Jars
a. Pack hot ,sweet potatoes jars
to within 1 inch of top
b. Fill jar to within 1 in h of top
with boiling syrup or_ oiling'
water. If boiling wa er is used,
add salt as follows /Pt. jars - tsp. salt or one
60 grain!salts tablet.Qt. jars 1 tsp. salt or two
60 grain salt tablets.
Insert table knife blade down sides
of jars to remove air bubbles.
Wipe tops of jars with clean, damp
cloth. Adjust lids.
a. Process at 240°F., or 10# pres-
sure,.
b. Processing time:Size Time
PintsQuarts
Cool jars.
F2
60 minutes65 minutes
$.3

VEGETABLES Tomatoes (Raw Pack Method)._
Select tomatoesSelect firm, red ripe tomatoes.
Prepare cans or glass jarsUse #2, #2k, or #10 cans, or pint, quart or k gallon glass jars hakring
self-sealing closures. Wash cans or jars.
Prepare tomatoesa. Wash with cold water.
b. Scald in boiling eater 1 to 2 minutes.
c. Dip in cold water to crack the skins.
. d. Remove skin.and,core tomatoes.
e. Cut out all of core and hard sections of tomatoes. Avoid using any
tomato having a sour odor.
Cans
Filla. Pack raw tomatoes, leaving small a.
or medium sized ones whOle.Large tomatoes may be /halved gr
quartered. Press tomatoes gently
to fill spaces in can. Fill cans
to top with tomatoea.b. Add salt as follows:
#2 can - tsp. salt or one 60 b.
grain salt tablet.#21/2 can - 1 tsp. salt or two 60
grain salt tablets.#10 can - 3 tsp, salt or six 60
grain salt tablets.
ExhaustBring center, of can temperature to
140°F.-
4
Glass Jars
Pack raw tomatoes, leavingsmall or medium sized ones
-whole. Large tomatoes may behalved or quartered. Press-
tomatoes gent y to fill spaces
in jar. Fill jars to within
inch of the top.Addsalt as follows:Pt., jars - k tsp. salt,p one
60 grain salt tableiQt. jars - 1 tap-:' salt-or two
40 grain salt tablets.-gallon - 2 tsp. salt or four
,60 grain salt tablets.
Insert table knife blade down thesides 'of jars to remove air bub-
bles.
ClosePlace marked covers on cans and seal Wipe tops of jars with clean, damp
at once. J cloth. Adjust lids:
Processa. Process in boiling water bath
(212°F.)
b. Processing time:Size Time
#2 45 minutes
#21/2 55 minutes
#10 90 minutes
#503 40 minutes
c. Remove cans from cooker as soonas processing time is completed.
CoolCool cans.
Ft78 -
a. Process at once at 212°F.
b. Processing time:
/ Spray cooled:
Size Time
Pints 45 minutes
Quarts 55 minutes
k gallon 65 minutes ,
. Air cooled:Reduce above time by,10 min-
utes.
Cool jars.
a
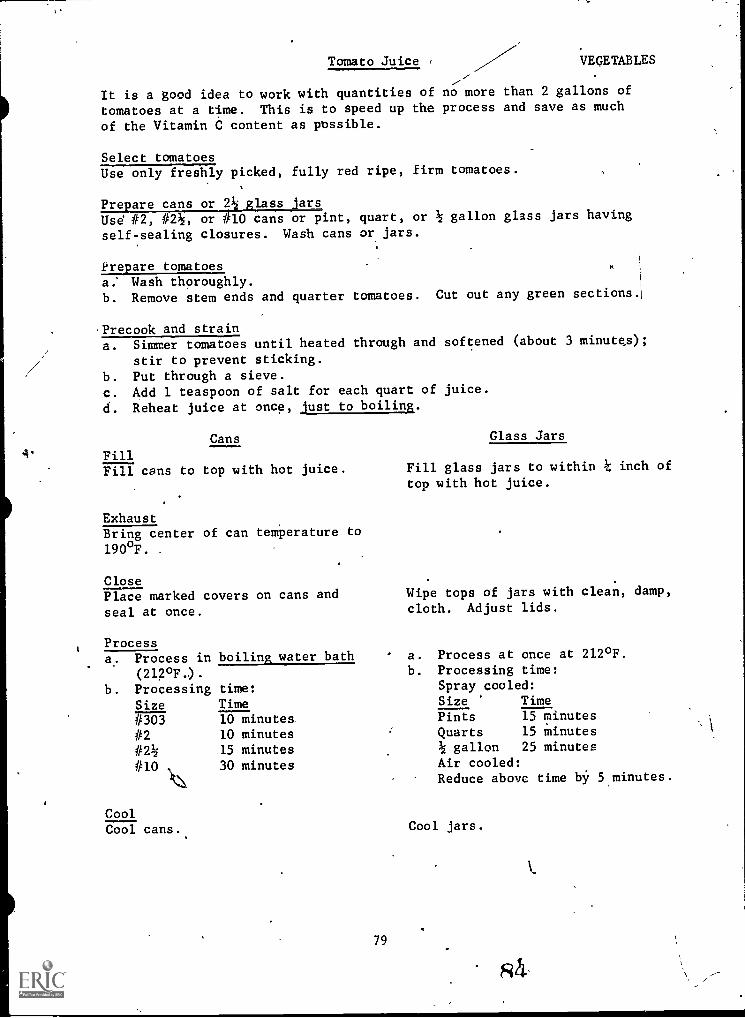
i
Tomato Juice VEGETABLES
It is a good idea to work with quantities of no more than 2 gallons of
tomatoes at a time. This is to speed up the process and save as much
of the Vitamin C content as possible.
Select tomatoesUse only freshly picked, fully red ripe, firm tomatoes.
Prepare cans or 21/2 glass ,JarsUse #2, #21/2, or #10 cans or pint, quart, or gallon glass jars having
self-sealing closures. Wash cans or jars.
Prepare tomatoesa: Wash thoroughly.b. Remove stem ends and quarter tomatoes. Cut out any green sections
Precook and straina. Simmer tomatoes until heated through and softened (about 3 minutes);
stir to prevent sticking.
b. Put through a sieve.
c. Add 1 teaspoon of salt for each quart of juice.
d. Reheat juice at once, just to boiling..
Cans Glass Jars
' FillFill cans to top with hot juice.
ExhaustBring center of can temperature to
190°F.
ClosePlace marked covers on cans andseal at once.
Fill glass jars to within k inch oftop with hot juice.
Wipe tops of jars with clean, damp,cloth. Adjust lids.
Processa. Process in boiling water bath ' a. Process at once at 212°F.
(212°F.). b. Processing time:
b. Processing time: Spray cooled:
Size Time Size Time
#303 10 minutes, Pints 15 minutes
#2 10 minutes Quarts 15 minutes
#21/2 15 minutes k gallon 25 minutes
#10 30 minutes Air cooled:Reduce abovc time by 5 minutes.
CoolCool cans.
79
Cool jars.

VEGETABLES Vegetables (Mixed
Select foods to combine
-The combination of foods to use may include two or more of the following:
tomatoes, lima beans, okra, corn, carrots, green or red peppers. A mix-
ture-may contain one-third tomato and two-thirds other vegetables.
Prepare cans or glass jars
Use #2 or #2 cans, or pint or quart glass jars having self-sealing closures.
Wash cans or jars.
Prepare vegetable mixturea. Wash vegetables.b. Prepare each vegetable as for canning alone.
c. Mix vegetables.
Precooka. Add small amount of water to mixture to prevent sticking..
b. Bring to boiling point and cook 10 minutes, stirring frequently.
Cans
Filla. Fill cans to within inch of
top with vegetables.b. Add seasoning as follows:
Size Salt Sugar
#2. tsp. k tsp.
#21/2 # tsp. tsp."
c. Fill to top of can with cooking
liquid.
ExhaustBring center of can temperature to
150°F.
ClosePlace marked covers on cans and seal
at once.
Processa. Process at 240 °F. or 10# pres-
sure.
b. Processing time:
Size Time
#303 35 minutes--
#2 35 minutes
#21/2 45 minutes /
c. Remove cans from cooker as soonas pressure has returned to 0.
CoolCool cans.
80
Glass Jars
a. Fill jars to within inch of
top with vegetables.b. Add seasoning as follows:,
Size Salt Sugar
Pints 17tsp. tsp.
'Quarts 1 tsp. 1 tsp.
c. Fill jars to within inch of
top with cooking liquid.
Insert knife blade down sides ofjars to remove air bubbles.
Wipe off tops of jars with clean,
damp cloth. Adjust lids.
a. Process at 240 °F. or 10# pres-
sure.
b. Processing time:Size Time
Pints 45 minutes
Quarts 50 minutes
Cool jars.
R5

Chicken MEAT & POULTRY
Preparea. Prepare chicken as preferred for serving. Bony pieces of chicken may
be used in making broth. It should be made as soon as possible in
order to have it ready when needed in filling cans or jars. Broth may
be made as follows:Place bony pieces in container and cover with cold water.
Place container in exhaust box and simmer until meat is tender.
Drain broth into bowl; skim off fat.
Meat stripped from bone may be canned.
Prepare cans or glass jars.
Cans
rill
I. Fill cans to top with firmlypacked raw chicken as follows:Pack second joints and drum-sticks with skin next to can,breasts;in center of can,smaller pieces fitted in.
b. Add salt as follows:#2,can - Xi tsp. salt
#212\ can - 1 tsp. salt
Precook and ExhaustPrecook 20 to 25 minutes 'at 10#
pressure. When pressure gauge shows
0, remove cans. Fill cans with hot
broth if liquid is not already to
this point. Check center of can
temperature. If not 170°F., reheat.
ClosePlace marked covers on cans and
seal at once.
Processa. Process at once at 240 °F.
b. Processing time:
Size Time
#303 75 minutes
02 75 minutes
#21i 100 minutes
c. Remove cans from cooker as
soon as pressure has returned
to O.
Coolr;ool cans.
81
Glass Jars
a. Fill jars to within 1 inch of
top with firmly packed raw chick-
en as follows: Pack second joints
and drumstick with skin next to
glass, breasts in center of jar
and smaller pieces fitted in.
b. Add salt as follows:Pint jars - 2 tsp. saltQuart jars - 1 tsp. salt
Precook 20 to 25 minutes at 104
pressure. When pressure gauge shows
0, remove jars. Fill jars to with-
in 1 inch of top with hot broth if
liquid is aot already to this point.
Insert table knife blade down the
sides of jars to remove air bubbles.
Wipe tops of jars with clean, damp
cloth. Adjust lids.
a. Process at once in pressure
cooker at 240°F.
b. Processing time:
Size Time
PintsQuarts
Cool jars.
ht;
80 minutes90 minutes

MEAT AND POULTRY
Prepare gibletsWhen dressing fowl, clean and wash gizzards and hearts. Remove gall bladder
from livers, being careful not to break the gall. Can the livers separately
as they have a distinct flavor, they also will discolor other giblets or meat.
Chicken Giblets
Pre are cans or lass ars
Use #2 or #2 cans, or pint or quart glass jars having self-sealing clo-
sures. Wash cans or jars.
Cans
FillPack giblets into cans to top ofcan. Add 35 tsp. salt for #2 cans.Add 1 tsp. salt for #2k cans.
Precook and exhaustPrecook for 25,minutes at 10#pressure.a. When pressure gauge shows 0,
remove cans.b._ Fill cans with hot broth if
liquid is not already to this
point.c: Check center of can tempera-
ture; if not 170°F., reheat.
ClosePlace marked covers on cans andseal at once.
Processa. Process at once at 2400F.
b. Processing time:Size Time
#303 75 minutes
#2 75 minutes
#21/2 100 minutes
c., Remove cans from cooker assoon as pressure has returned
to 0.
CoolCool cans.
82
Glass Jars
Pack giblets into jars to withininch of top of jar. Add tsp.
salt for pint jars. Add 1 tsp.
salt for quart jars.
Precook for 25 minutes at 10#
pressure.a. When pressure gauge shows 0,
remove jars.b. Fill jars to within one inch
of top with hot broth if liquidis not already to this point.
c. Insert blade of table kpifedown sides of jars to r'emove
air bubbles.
Wipe off tops of jars with clean,damp cloth. Adjust
a. Pro chess at once at 240°F.
b. Piocessing time:
Size Time
PintsQuarts
Cool jars.
gr?
90 minutes105 minutes

Ground Meat Cakes or Hamburger MEAT & POULTRY
Select meat for hamburgerBeef is usually preferred for meat cakes. Meat trimmings and cuts, such
as the meat from the neat, fore shoulder, or round, may be used.
Prepare meatTo 25 pounds of fresh beef and/or beef trimmings, add 2/3 cup salt. Omit
onion of other seasonings as they develop undesirable flavors. Spread the
salt evenly over the meat and put through food grinder twice using coarse
plate first and finer plate for second grinding.
Prepare cans or gla s jarsSize Of cans or jar :
For meat cakes, use #2 or #21/2 cans; or pint or quart glass jars.
For solid pack, use #2 or #21/2 cans.
If glass jars are to be used, the wide-mouth type will permit easier
packing and removal of meat cakes from the jar. Wash cans or jars.
Cans
FillFill cans to top with hamburger:
a. Hamburger may be packed solidand rounded:over top-to 1" height.
b. Meat may be` made_ into cakes and
packed into cans. - -------
Precook and exhausta. Exhaust in retort for 25 min-
utes at 10# pressure, or 240°F.
When retort is at 0, remove cans --working rapidly to secure clos-
ing as quickly as possible.Add hot broth to fill cans.
b. Check center of can temperature.It should be 170°F. or higher;
if necessary, reheat.
ClosePlace marked covers on cans and
seal at once.
Processa. Process in pressure cooker at
240°F.
b. Processing time:Size Solid Pack Cakes
#2 100 minutes 65 minutes
#21/2 135 minutes '90 minutes
c. Remove cans from cooker as/soonas pressure has returned to O.
CoolCool cans.
83
Glass Jars
Fill jars to top with hamburger:.
a. Hamburger should be made intocakes before packing, as solidpack is not recommended for
-glass
a. Exhaust in retort for 25 minutesat 10# pressures or 240°F. When
retort is at 0, remove jars,working rapidly to secure closing
as quickly as possible.
Wipe tops of jars with clean, damp
cloth. Adjust lids.
a. Process in pressure cooker at
240°F.
b. Processing time:Size Cakes
Pints 90 minutes
Quarts 105 minutes
Cool jars.
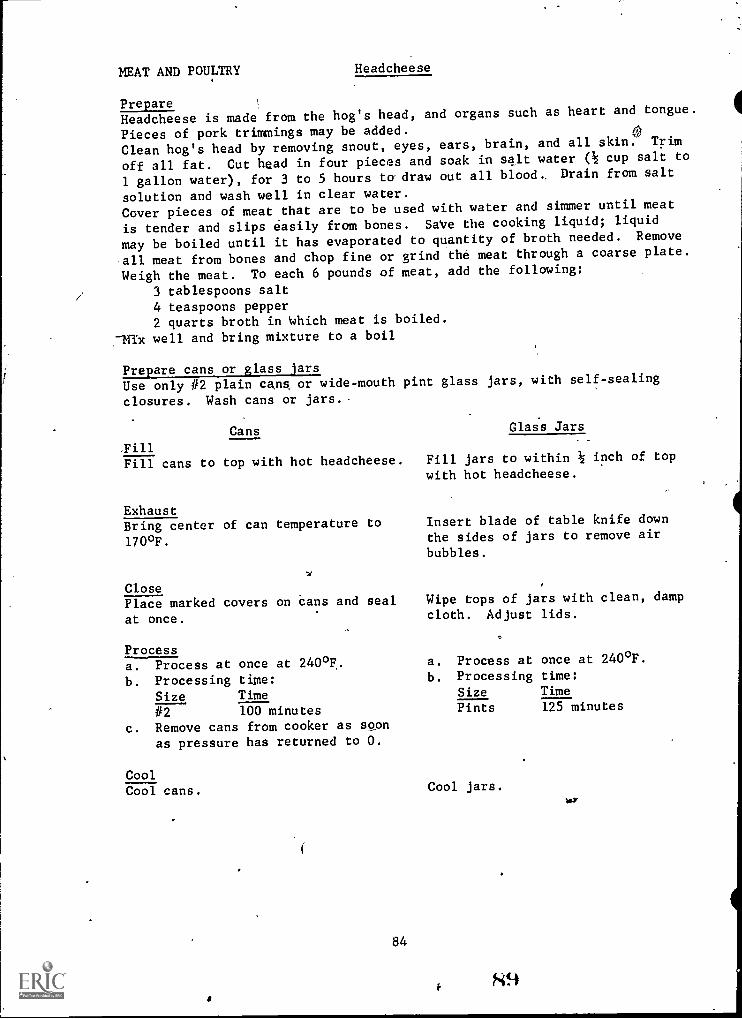
MEAT AND POULTRY Headcheese
PrepareHeadcheese is made from the hog's head, and organs such as heart and tongue.
Pieces of pork trimmings may be added. 6Clean hog's head by removing snout, eyes, ears, brain, and all skin. Trim
off all fat. Cut head in four pieces and soak in salt water ('0 cup salt to
1 gallon water), for 3 to 5 hours to draw out all blood, Drain from salt
solution and wash well in clear water.Cover pieces of meat that are to be used with water and simmer until meat
is tender and slips easily from bones. Save the cooking liquid; liquid
may be boiled until it has evaporated to quantity of broth needed. Remove
all meat from bones and chop fine or grind the meat through a coarse plate.
Weigh the meat. To each 6 pounds of meat, add the following:
3 tablespoons salt4 teaspoons pepper2 quarts broth in t..7hich meat is boiled.
7111x well and bring mixture to a boil
Prepare cans or glass jarsUse only #2 plain cans, or wide-mouth pint glass jars, with self-sealing
closures. Wash cans or jars..
Cans
Fill
Glass Jars
Fill cans to top with hot headcheese. Fill jars to within inch of top
with hot headcheese.
ExhaustBring center of can temperature to
170°F.
Insert blade of table knife downthe sides of jars to remove air
bubbles.
ClosePlace marked covers on cans and seal Wipe tops of jars with clean, damp
at once. cloth. Adjust lids.
Processa. Process at once at 240°F. a. Process at once at 240°F.
b. Processing time: b. Processing time:
Size Time Size Time
#2 100 minutes Pints 125 minutes
c. Remove cans from cooker as soonas pressure has returned to O.
CoolCool cans.
84
Cool jars.xr

Lard (Rendering Lard) MEAT & POULTRY
YieldThe following yield of rendered lard may betexpected:
Leaf fat (layer of fat around kidney of hog) - 90-937 of its weight.
Combination of leaf fat, back fat, and cutting fat - 80-857. of its
weight.Ruffle fat (fat covering intestines) - 50-65% of its weight.
A
Select fata. For white, creamy, high quality lard, the fat should be trimmed-and
rendered as soon as possible after the carcass is thoroughly chilled.
b. Ruffle fats yield a darker, less desirable product and should be
rendered separately.
Prepare cans or glass jarsUse #303, #2, #V2.- or #10 cans or pint or quart glass jars having self-
sealing closures. Wash cans or jars:
PrepareCut fat in thin strips or run through a meat chopper.
Cooka. Put a small amount of water in steam jacketed kettle. Add pieces of
fat.
b. Apply steam and cook slowly, stirring frequently until lard has reached
a temperature of 250 °F. When cracklings begin to settle to the bottom
of the cooker, greater care should be taken to prevent scorching. The
more nearly complete, rendering removes a greater proportion of the
moisture, producing lard that will be more likely to keep.
c. Allow lard to settle and cool slightly before removing from the kettle.
Fill containers and storea. Fill lard into cans or jars while hot.
b. Store permanently in a cool, dark place.
Seal cans or jarsNo processing is necessary.
Cool lardTo produce a fine grain lard, chill immediately.
Store _lardStore cans Or jars of lard in a cool, dark place.
NoteCanning meat and meat products requires careful, attention to sanitation
practice .Several important practices are listed below.
(1) Mi o-organisms grow faster at higher storage temperatures. (Do not
ke p fresh meat above 50 °F. for more than 4 hours.)
(2) M ro-organisms grow faster on moist, wet surfaces.
(3) K ep equipment which comes into contact with meat clean. (Cleaning
ould be done immediately after use of equipment.)
(4) Water used in cleaning should be 140°F., or higher.
(5) Persons handling meat should have clean hands and clothing. (Finger-
nails should, be trimmed.)
85
90

MEAT AND POULTRY Pork Sausage
Select meatSound, high quality pork meat should be used. In addition to meat trim-
mings, pork cuts, such as the shoulder, are sometimes made into sausages.
Prepare sausageThe proportion of two-thirds lean meat and one-third at will produce a
product which will brown easily without too great cooking loss. To 25
pounds of fresh pork and/or pork trimmings, add:2/3 cup, salt
1/2 ounce ground pepperOmit sage as processing develops a bitter flavor.
Mix seasonings and spread evenly over meat and grind through a fine plate.
Grinding may be done through a coarse plate first and then through a fine
one.
Prepate cans or glass jarsWash cans or jars; wide-mouth jars are preferred. Size of cans or, jars:
Sausage cakes, use #2 or #21/2 tin cans; or pint or quart glass jars. Solid
pack, use #2 or #2k tin cans.
CansFillFill cans to top with sausage: '
a. Sausage may be packed solid androunded over top to 1 inch height.
b. Sausage may be made into cakesand packed into cans.
Precook and exhaustExhaust cans in exhaust box untilcenter temperature of cans reaches
170°F.
ClosePlace marked covers on cans and sealat once.
Processa. Process at 240°F.b. Processing time:
Size Solid Pack Cakes
#2 100 minutes 65 minutes
#21/2 135 minutes 90 minutes
c. Remove cans as soon as pressurehas returned to O.
CoolCool cans.
86
1Glass Jars
Fill jars to top with sausage:a. Sausage should be made into
cakes before packing, as solidpack is not recommended forglass jars.
't*
Exhaust jars in exhaust box untilcenter temperature of jars reaches
1700F.
Adjust lids on jars.
a. Process at 240°F.
b. Processing time:Size CakesPintsQuarts
Cool jars.
tra
90 minutes.135 minutes

Roasts, Steaks, Stew Meat MEAT &'POULTRY
PrepareCut meat into canning portions. Cut tender pieces into roasts, steaks, or
chops, and less tender portions into stew meat,
RoastsSolid - cut meat in solid pieces to fit the diameter of the can or
jar, with the grain of the meat running lengthwise.
For cans - cut to fit inch above level of top of can.
For jars - cut to fit level with top of jar.
Rolled flank - roll flank or brisket to fit diameter of the can or
jar, tie and cut to fit correct length of can or jar.
For cans - cut to fit level With top of can.
For jars - cut to fit inch below level of top of jar.
Steaks and chopsCut across the grain approximately 1 inch thick. Cut sliced pieces
to fit the diameter of the can or jar.
Stew meatsCut in approximately 1 inch squares.
Prepare cans or glass carsUse #2 or #21/2 cans or wide-mouth pint glass jars,
for serving meals, with self-sealing closures.
Precook and exhaust
a. Precook meat in a steam jacketed kettle, with just enough water to
partially cover the meat, until slightly pink in the center.
b. Fill cans or jars with the precooked meat and add salt (as shown below)
and enough hot broth to cover meat and leave 3/8 inch headspace.
c. Exhaust to a center temperature of 170°F.
d. Use salt as follows:pint jars tsp. salt
quart jars 1 tsp. salt
according to quantity
#303 can k tsp. salt
#2 can k tsp. salt
#21/2 can 1 tsp. salt
Cans
Closea. Place marked covers on cans hn
seal at once.
b. Wipe cans clean to keep grease
out of retort.Processa. Place cans in basket as quickly
as possible. When basket is par-
tially filled, it may be placed
in retort with small amount of
steam to hold the temperature of
cans. Add cans as they are sealed.
b., Process at once at 240°F.
c. Processing time:
Size Time
#303#2#21/2
d. Remove
75 minutes75 minutes 4
100 minutescans from cooker as soon
as pressure has returned to 0.
CoolCool cans.
87
Glass .Jars
a. Wipe tops of jars with clean,
damp cloth. Adjust lids.
b. Wipe jars clean to keep grease
out of retort.
a. Place jars in basket as quickly
as possible. When basket is par-
tially filled, it may be placed
in retort with small amount of
steam to hold the temperature of
jars. Add jars as quickly as
lids can be adjusted.
b. Process at once at 240°F.
c. Processing time:
Size Time
PintsQuarts
Cool jars.
75 minutes105 minutes
92
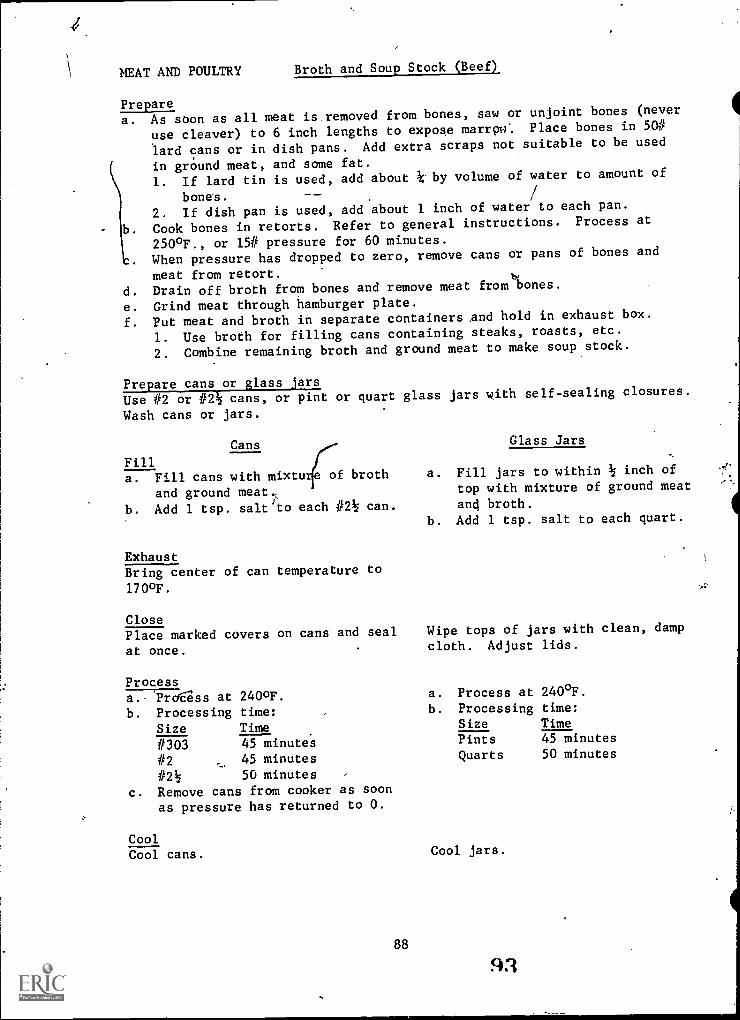
\ MEAT AND POULTRY Broth and Soup Stock (Beef)
Preparea. As soon as all meat is, removed from bones, saw or unjoint bones (never
use cleaver) to 6 inch lengths to expose marrow'. Place bones in 50#
lard cans or in dish pans. Add extra scraps not suitable to be used
in ground meat, and some fat.
1. If lard tin is used, add about k. by volume of water to amount of
bones.
2. If dish pan is used, add about 1 inch of water to each pan.
b. Cook bones in retorts. Refer to general instructions. Process at
250°F., or 15# pressure for 60 minutes.When pressure has dropped to zero, remove cans or pans of bones and
meat from retort. ts,
d. Drain off broth from bones and remove meat from bones.
e. Grind meat through hamburger plate.
f. Put meat and broth in separate containers And hold in exhaust box.
1. Use broth for filling cans containing steaks, roasts, etc.
2. Combine remaining broth and ground meat to make soup stock.
Prepare cans or glass jarsUse #2 or #21/2 cans, or pint or quart glass jars with self-sealing closures.
Wash cans or jars.
Cans
Filla. Fill cans with mixtuYfe of broth a. Fill jars to within k inch of
and ground meat., top with mixture of ground meat
b. Add 1 tsp. salt'to each #21/2 can. ancl broth.
b. Add 1 tsp. salt to each quart.
Glass Jars
ExhaustBring center of can temperature to
170 °F.
ClosePlace marked covers on cans and seal
at once.
Wipe tops of jars with clean, dampcloth. Adjust lids.
Processa.-'Pro rass at 240 °F. a. Process at 240°F.
b. Processing time: b. Processing time:
Size Time Size Time
#303 45 minutes Pints 45 minutes
#2 45 minutes Quarts 50 minutes,,..,
#21/2 50 minutes -
c. Remove cans from cooker as soonas pressure has returned to O.
CoolCool cans.
88
Cool jars.
93

Part III
Providing Instruction in Nutrition and
Food Preservation
The purpose of Part III of this-publication is to present examples
of lesson plans and instructional materials for use by the instructor in
teaching nutrition and food preservation. A variety of approaches is
suggested in providing the instruction, including demonstrations, indi-
vidual study of reference materials, practice sessions, discussion, and
using various charts and diagrams. Since. much of'ihe instruction is on
an individual basis, the instructor will need to be creative in selecting
and using the appropriate techniques to meet individual needs.
The need for a systematic program of group instruction in meeting
family food needs may exist in some communities. This need should be
assessed by persons involved with school-community canneries. If a need
is found to exist, some suggested units of instruction include the
following:Recognizing basic nutritional needs -Estimating family food needsPlanning a garden to meet family food needs
Selecting the location for the gardenSelecting varieties of vegetablesPreparing the seedbedFertiliwing the gardenPlanting the gardenCultivating the gardenControlling pests in the garden
'Harvesting vegetables
94

How to Use the Sample Lesson Plans
The sample lesson plans are presented to assist instructors in plan-
ning for instruction in various areas of nutrition and food preservation.
These are intended to serve as guides and are not designed to be used
without local adaptation. The following .1xplanations are given for the
various parts of the sample plans.
Situation. Theiteacher WiI1 need to understand the local situation
-as appropriate to the unit, considering such things as stu-
dent concern with the unit, prior instruction related to the
unit, student background, importance of the unit in.the com-
munity, and occupations for which'a knowledge of the content
is important.
'Teacher Objectives. These are f the teacher's use only. They
indicate the abilities the teacher expects the students to
develop as a result of studying the unit.
Introduction. This section provides for introducing the unit,
helping students recognize the prarems as. their own, giving
the teacher an indication of what the student's already know,
stimulating the interest of students in the content, setting
the stage for establishing student objectives and problems,
and providing the students an opportunity to destribe their
experiences related to the content areas. These things may
be accomplished through discussions, use of:visual aids, use
of field trips, or some other way. The introduction should
supply the students with one or more reasons for studying
the unit. A good introduction helps to increase student
learning.
Group Objectives. These are the students'reasons for studying
the unit and should be developed with the group. Students
should express why they should be knowledgeable concerning
the unit. The objectives listed in the outline are antici-
pated student responses and objectives are listed in some-
what general terms. Student objectives may be more specific
according to their desires or needs. Developing the group
objectives also should be motivating to the students.
Problems and Concerns of Students. This section reflects things
the students should know about each problem area in order to
accomplish their objectives. They should be drawn from the
group. The teaching outline'centains a list of problems
students would be likely to digest.
After the problems have been listed, the teacher should lead
the students in a discussion of each problem taking the pro-
blems one at a time or in logical groups. He should find out
what the students know, conduct supervised study on the items
they do not know or use some other teaching technique for
helping students secure needed information. These teaching
techniqu'es may include use of resource persons, lectures,
91
1
95

L
1
panel discussions, field trips, and/or visual aids. He should
then lead the students in a discussion for the purpose of draw-
ing conclusions appropriate tothe local situation and to su-
pervised agricultural occupation experience programs. .
References. A suggested list of references is included for each
problem area. Some of these are for teacher use and some
for student use, This is not a complete kist and the teacher
should use all available references in studying.this unit/
Visual Aids and Other Equipment. The outline contai s a list of
suggested visual aids and other equipment for u e in studying
each problem area.'
Special Events and Activities. These are suggested s ecial events
and activities. Those used should be planned we 1 in advance.
Application and Evaluation. Included are a ,few suggesFions for
occupational experience activities and testing. he teacher
may wish to giv examinations for the unit rather than for
each problem aria. 7
Content Summary. This section is for use only by the teacher. It
is related to the "problems and concerns" sections and con-
tains a summary of the material in the references.' It is not
intended to be all inclusive. The teacher will nee to supple=
ment this material when teaching the unit.
Sam le Lesson Plan: Meetin Nutritional Needs
Enteiprkse: Fathily Living
Unit: Meeting Food Needs
Problem Area: Meeting Nutritional Needs
Situations (local):'
Teacher Objectives:
Upon completion of this lesson plan, the students should be able to:
1. Explain the meaning of the terms "nutrient" and "nutrit on."
2. Name the food nutrients and explain the functions and so rces of
each.
3. Explain the four food groups necessary in meeting dietary requirements.
Introduction:
The introduction should place stress on the importance of prIper nu-
trition. Explain that poor nutrition can lead to health problems, includ-
ing disease, retarded mental development, and lack of normal growth in
children (if severe). Have students name various health conditions re-
sulting from improper nutrition which they'know about. Several examples are:
96 92

Anemia - Caused by a deficiency of iron which results in a shortage
or red corpuscles orthe corpuscles are deficient in hemoglo-
bin. Anemia shows, up as lack.of color, shortness/of breath,and palpitation of the heart. I
Scurvy - Caused by a lack of vitamin C and is characterized by
spongy gums and skin problems'.
Rickets - Caused by a lack of Vitamin D and is characterized by al-
teration inthe bones due to defective depositofof calcium.This disease is found in smafl children and responds well to
treatment with sunlight or vitamin D.
Goiter - Caused by a deficiency of iodine and is manifested tS,
enlargement of the thyroid gland. ,
Kwashiorkor - Caused by a diet low in protein and most often seenin underdeveloped countries with low nutrition levels. Symp-
toms include changes in color and texture oethe skin and/
swelling of the body. The intestines, liver, and pancreas
may be damaged. Kwashiorkor may be fatal to children unless
adequate protein is supplied.
Beriberi - Caused by a deficiency of vitamin B and is characterized
by , cracking and itching of skin, night blindnegs and lower
resistance to disease.
IMarasmus - Caused by a diet low in calories.74
The teacher, should indicate that it is easy to/Meet nutritional needs
if certain fundamental prin les are kept in mind/ ,
Group Objectives (develop with group or individua ly, depending On the
nature of he instruction):
A suggested lead question is: "Why is it important to und9rstand
r.Jtritional needs and how they are met?" The. following objectives
should evolve from a discuSsion of this question:
A. To explain the meaning of the term "nutrient."
B. To name the, food nutrients, and explain the functions of each
in the human body.
C. To select foods which supply the essential nutrients.
D. To explain how the four food groups are used in meeting nutri-
tional requirements.
Problems and Concerns:"
A. What is meant; by "nutrient?" "Nutrition?'"
B. Whatkare the 'classes of food nutrients?
C. What are the functions of food nutrients?
D. What are the food sources of the essential nutrients?
E. How are the four food groups used in meeting nutritional r
mencs:
93
97
e-

V
References,:
(See "Sources of Instructional Materials" for addresses to use in
obtaining references.)A. Bulletins and Pamphlets
1. "Nutrition: Why Is It Important," Campbell Soup Company,
1973.
2. "Nutrition News and Values," Stokely-Van Camp, Inc., (n.d.).
3. "Are. Vegetable's Doing Their 'Things You?"''Stokely-Van
Cathp, Inc."7771.d.). /
4. "Daily Food Guide" (1F-50), Virenia Polytechnic Instituteand State University, (n.d.).
5. /fly...9u and Your Food" (MF-ENEP-1), Virginia Polytechnic In-
stitute and State University, 1970.
6. "Food Needs of Everybody" (publication 166), Virginia Poly-technic Institute and State Unive;Aity, 19'73.
7. 'Meal Planning Guide,VoPet Incorporated; 1969.
8. "Nutrition and Wprking EffiCiency," Food and:AgricultureOrganizaii n of the United Nations, 1962.
9. "Are Veg ables Doing Their Thing For You?" 'Stokely -Van
Camp, Inc,
BooksLeudal H. Kotschevar and Margaret McWilliams. Understanding
Food-. New York: 'John Wiley and Sons, Inc. 1969.
2. Corinne H. Robinson. Fundamentals of Normal Nutrition.
London: Collier-Macmillan LiRited, 1968.3. 'Marion L. Conan and June Atwood.' Foods in Homemaking.
Peoria, Illinois: Chas. A. Bennett Co., Inc., 1972.
4. Alan Berg. The Nutrition Factor. Washington,'D. C -.:
The Brookings Institute, 1973,
Visual Aids and Other Equipment: a4
A. -Films"Balance Your Diet for Health and Appearance,"ravailable for
for rental from Paul L. Brand end'Son,:234 W. Broad Street,
Falls Church, VA 22046-'"Snacks Count Too," available for rental from University Film
Rental Library, University of Illinois, Champaign, ILL.
61820. ,1
"Balanced Way," available from BureAu of Teaching Materials,State Department% of Education, Richmond VA 232'16.
"Nutritional Needs of Our Bodies," available fromBureau ofTeaching Materials, State Department 'of-Education,
Richmond, VA 23216: \
10
Special Event& and Activities:
A. 'Develop a display of empty food containers by arranging in the
four food grgups. Use a placar&or-other label to identify the
groups.
B. Review the labels on food containers to determine the ingredients,
including nutrients in the food.
98 94
Tit
Application and Evaluation:
A. Have each student design aplan for providing the needed nutrients.
The plan should be developed with menus for breakfast,, lunch, and
dinner.'
B. Haq\each student keepja record of the food consumed for a peri6d
of one week. DetermiVe if the food is meeting the nutritionalneeds, as specified in the "four food groups."
Content Summary:
What is meant by "nutrient?" "Nutrition?"
A nutrientis h food constitutnt, or group of foods of the same gene-
ral composition, that nourishes and promotes life. Nutrients provide for
the following life functions:1. Promote growth.2. Build and repair body tissue.
3. Regulate body processes.
4. Produce heat and energy. 1
5. Under specific conditions, develop the fetus.
Nutrition, in simple terms, refers to the food an individual eats and
how it is used by the body, It is closely associated with good health,including how an individual looks and feels and mentally and physically
performs. Good nutrition involves eating foods which provide the necessary
nutrients for the conduct of life processes. , 6\
What are the classes of food nutrients?
There are six classes of food nutrients: protein, carbohydrates,
What are the functions of food nutrients?
fats, minerals, vitamins, and water.,
Each class of nutrients "perfornis specific functions as related to
11.1e.-nesearesulimiarized.as follows:
Proteins
Carbohydrates
Fats
.1
Build and renew bOdy_Assue.Promote growth of muscles, connective
ligaments, etc.Provide energy.Regulate body processes.Promote health.Comprise cell ttructure.
Furnish energy.Furnish heat.Build body fat.
tissue,
Furnish energy and heat.Build body fat.(Note: Fats perform 'almost tht same functionsas carbohydrates and are capable of providing
23/4 times asAntich energy and heat-as carbohydrates..
9995

Minerals
Calcidn
Phosphrus
Iron-
Iodine
CopperMagnesium.
PotassiuM
Sodium
Zinc
-Vitamins
Vitamin A
Vitamin DVitamin 'K
Vitamin E
Vitamin Sl*(Thiamine)
Vitamin, B2*(R iboflavin)
Vitamin B12*
Niacin*
More than a dozen minerals are found in thebody. The function's of some of the mostimportant minerals are litted below.Buifda'bones:and teeth, essential in bloodclotting, and need for healing wounds andbroken bones. This is one of the most in,portant minerals.Builds bodes, ,teeth, and regulates bodyprocesses. ',
Buildsred blood cells,, body cells, and hemo-globin', which carries oxygen eo all parts,ofthe body.
Prevents goiter and regulates use of energyin-the body,.
Necetsary.for utilization of iron.Builds bones, helps transmit rwrve impulsesand aids in muscle contraction.
. Aids synthesis of protein, requited for.healthynerves and muscles, and needed for enzyme re-actions and fluid balance.Helps maintain fluid balance,ibalances acidsin body, and aids in *absorption of nutrients.Essential for normal .growth,and helps healwounds.
A number of vitamins are important in regula-ting body fupctioni'and keeping it healthy.An adequate supply off vitamins is obtainedwhen a balanced diet is fol] owed. Severalof the most important vitamins are listed anddiscussed below.Weeded for growth and itaintenance of healthyskin, helps resist infection, and aids goodvision.
, Needed for healthy teeth and bones.Promotes normal blood clotting.Protects red blood cells and helps retarddestruction of vitamin A.Helps bogy use. carbohydrates and maintainnervous system.Aids'body in using protein, fats, and Carbo-hydrates and keeps skin healthy, especially:.around mouth, nose, and eyes.Aids in Oroduction'of red blood cells in bone
'marrow, functioning of nervous tissue, and .
building the body.Needed for healthy nervous*system, skin, andnormal digestion and aids in use of oxygen bybody.
Vitamin C Needed for health of teeth, gums, and blood(Ascorbic Acid) vessels and in resisting infection.
'4)
*These are a part of 'he Vitamin B complex, which includes more thana dozen vitamins, some of which are better known than others.
96
100
4

;.
Water
-41
I.
Necessary for all chemical reactions in the
. body. AIt aids in digestion of food, trans-vorts nutrients, regulates body temperature,
rand is essential in'tlie elimination of 'body
wastes,
'W/hat are the food sourcesof the essential nutrients?, -
No single food item contains all of the needed nutrients. 'However,-,
some food items dy contain larger amounts of the mor.esesentialptrients
,A knowledge OT alch food items have the essentihiknutrients wil be help
ful to,an individual in determin4g which to consume. Common so cgs of
certain nutrients are presented below. .1
. ,. ..
Nutrients
4 /
Proteins
Carbyhygrates
Fats
MineralsCalckum
Iron
Iodine
Copper ,
Magnesium
Potassium
Sodium
Zinc
Sources
Lean meat, poultry, fish, sea, food, eggs,
milk, and cheese are impOrtant-sources.. Other souices'include beans, peas, breads,
. and cereals, and puts, including peanuts and \;
peanut butter.
Bread, rice-, cereal, spaghetti, macaroni, :noodles, dried fruit, grits,'sugar, molasies,
and honey.are important sources..
Butter, vegetablevoils, lard, nuts, marga-rine, meat, cheese, and egg yolks are sources
of fat.4
Milk is an excellent source of calcium. Other
sources include leafy greens, cheese, ice-cream, broccoli, oysters, shrimp; salmon, clams,
and cabbage.Lean peat, including liver, kidneys, and heart;
oysters;kegg yolk; green vegetables; driedfruit; and whole-grain or enriched bread and
cereals are.godd:sources of%irOn.Seafood and foods grown near the seacoast are
sources. The best source is iodized salt.Meats (particularly liver), shellfi$4,c nuts, t
raisins, cocoa,'cereal, and chocolate -hre
sources of copper.Cereal, nuts, and meat are sources of magne-
sium. (A dietary deficiency of this'mineral
is unlikely.)Meat, fish, cereal, fruit and fruit juice,and vegetables are sources of potassium.(Well-balanced diets usually supply ample po-
tassium.)Salt, meat, fish, poultry, milk, and eggs Are
sources of this mineral.
Green leafy vegetables, fruit, whole-grain foods,and lean meat are good sources of zinc.
97

V
-4r4 Nutrients - Sources. . ,
Vitamins.7
- 'Vitamin A Liver, kidney, yolk, 'dark ,green ,leafy'
t ..)l''.
vegetables, ye-low-colored vegetables,tomatoes, fruit , butter, whole milk,cheese,
<. and fish Jiver oils are sources of vitamin A.itemin D , Fortified milk,' egg yolk,liverandfish
.
. are sources of vitamin'D..Vitamin ,IC
,Green leafy vegetabler(sPinach, kale.Nnd
1,- cabbage) , cauliflower, and pork liver.
Vitamin E. Green .leafy vegetables, nuts, salad oils, .
o, ' shortening, and margarine are sources of. ,-
, vitamin E. r . . ,...4 -Vitamin B A variety of, foods is required to meet,re-Complex quirementssp the vitamin $ complex. Some of
the fooirs-aN twat, poultry, fish, milk,
. cheese, green leafy vegetables, dry beans andpeas, peanuts, egg yolk, bread and cereal.
I Vitamin C Citrus fruit and juices, cantaloupe,' tomatoes,.,.
(Ascorbic Acid) broccoli, raw green vegetables, potatpes, and, strawberries. .
.0 ,.
Wow are the "four food groups" used in meeting nutritional requirements?.7 , - 4 t. 1
The "four food groups"'is'a simple guide to pro_er-human nutrition.It is a means of trpnslating technical knowledge% 6f
.
nuttire into a planfor everyday eating involving four ,groups Of.foods: EacK gro t_nontains
-1'. ' a variety of foods frbm which i.o.choose. The fdur groups are: (1) vege-tables and fruits group, (2) meat group, (3) milk sroup, and (4) breadand cereals group. It is 4mportant rhaf one eat'a variety of foods fromeach'gropp every day. Eactifgpoup is briefly discussed. '
'I-
Vegetables and Fruits Group. FoOds in this group supply .,a numbei of
vitamins and minerals.. Each person should eat four of more servings fromthis group every day: (A serving is cup of vegetable or fruit' or aportion as ordinarily served, stich as a medium-size banana.) At leastone serving each should consist of the following:
Citrus fruits, fruit juices, or vegetables which are high in vitaminC. (Examples include oranges,'grepefruit, lemons, times, ',
strawberries, cantaloupe, tomatoes,*and green and red pepper.),Dark greep and bright yellow, fruits.br vegetablts. (Examples.include
apricots, carrots, okra, squash, mustard greens, turnip greens,spinach, collards, chard,'sweet potables, snap beans, and
ri, A ,7
Potatdes and other fruits and vegetables. (Examples include apples,bananas, beets, cauliflower, celery *cnions,,corn, dates, egg,plant, peaches, pears, plums, prunes, rhubarb, rutabagacherries, and berries.), $4'
Meat Group. Foods, in. the meat group Supply protein, iron, vitamins,and other nutrients. Persons should eat 6ro or more servings froM thisgroup each day. A serving is two to thfee ounces of lean, cooked meat,
'98
102.

II
' ,/ / -. t .q'. -
. . ', . , ....
fish and poultry; without bone. Exampiesel meats iriclude beef, veal,v
lambilpprk, poultry, seafoo,d, fish, and shellfish., It is possible to ...1,.
substitute dried beans, R6fS,.eggs;'cheese, peanuts, peanut butter,'and huts for a portion c ehe meat requirement. For)example, One meat
serviNg,may.besubst.ituted with' two eggs or one cup of dripd beans,pipeat, or four tablespoOns of peanut butter. Luncheon meats' and other
1:bcessedvMeat products1
may also be used inolhis grou.,, 'p.,,
Milk Group. Foods in the -milk group supply calcium,'phosphorug,a
' trotein, and 'certain vitamins. These foods,are also'good sources of
.vitamins It and D, provided the milk product has beeri fortified. ReqUire-
-ments oVersons for foods in this group vary and may be met with fluid '
whole-''lk, skin milk,.evlaporated milk, dry milk, ice cream, cheese,
and er milk pnoductt. .The recommended'daily amounts in terms of8: Ounce cups of whdiemi,lkare-:;
__..
...
children Uncle+ age 9 . 2 to.3 cops .
children 9 - 12 3 or more cup's
' teenage persons., 4 or More cups: 'adults
.
4 2 on more cups ..c.
i . ; ..4 Sft ' I.
. . ft 1
$ ' Bread..,and Cereals Group. Foods in this group, when-enriched: 're-
storedstored or whole grain, furnish:vitamins,.minerals, ,carbohydrates, and'Olen. amounts of prbtein. Individuals should eat four or more servings
,from this'group every day. A serving is one ,;slice,of bread, one ounce
of ready-to-eat. cereal, and 1/2 to 3/4 cups of cooked cereal, cornmeal,m cawni, rice, grits, noodles, or spaghetti.. .
. ,
..
..
-
.f
*f
I
14 '4
ample Lesson Plan: Planning for Meeting Food Needs
Enterprise: Family Living
Unit: Meeting Food Needs
NProblem Area: Planning for Meeting Food'Needs
Situation (local),:
Teachei Objectives:
Upon'completfon of this'lesson plan, the students should,be Able to:
1. Name .the majoe sources of food and indicate the advantages anddiIantages
2. Est, the quantity of food required for their families.of each.
3. Discuss the fundamentals of planning a garden.
roduction:
.
, '1/4
The introduction will place stress,o e importance of planning in
order to ma?cimize the benefits from food preservation. The produce thatis preserved must be obtained ln sortie way and it is to the families bene-
fit to do this aseeonoAcallx as possible. In addition, the product to
1* preserved must be o good quality"in order to insure a good food when
served to the family.4. 99
-ma
A'

4.4 4
.
4
Planning also involves some estimation of the quantity that will be
.required. Review the per capita annual- consumption of vIrious foods in
the United States, as follows: .
. .: ...q
..
Annual Per, Capita Consumption ofq'oods ino
'the United States c /
. . .
. , ...
.
7 .
.0
Pounds
. :Beef, veal, pork, lamb,*and muteon 1921, .
1. Chicken,and turkey ' 50 %.
Fresh.fruits". - 81.
_Processed fruit and juices '.. 51
Fresh-vegetables . . 97 .
Canned or 'frozen vegetables -, 60 ''' '''
Dairy products (whole,milk equivalent) 1,574
.
Potatoes and sweet potatoes'.1 '126.
Source: "Background ou U. S. Agriculture," Leaflet Haber 491. Washing-.
toA: U. S, Department of Agricu , 4972.
It is well to note that the determination.of the annual per capita consump-tion of food is based on averages. Individuals may vary consideiably'froma mathematical average, depending on income, cost and availability of food,personal preferences, and'other reasons-.
.
, Stress that througlf proper planning a person with a garderican pro.; 'dube a considerable quantity of food. However, the supply is_seasonal andthrough preservation the foods may be made available in Other seasons.In addition,. 'the costs-of labor, garden seed, fertilizer, and other items,'dye tncrea4ed resulting in more need for good planning of the garden.Perions'who -6ave'lfbited garden space find planning useful in maximizingproduction from the space available. This is accomplished by wise suc-cessionlcropping and rotation.
Group Objectives (develop with group or individually, depending on the. nature of -'the instruction):
5
A suggested, lead question:is: "What is involved In planning foi thefood _needs of a family?" The-following objectives4c'an be developed throughdiscussion of this question:
A. To select the best source of. foods. XB. To eatimate the quantity of food required by a family .s'
C. To planan app iopriate garden layout add schedule of crops. >
Problems and Concerns:
A. What are the sources of produce for,proCessing? -
B. What are the'advantages and,disadvantages of the sources ofproduce?
C. What quantity of food is required for an individual? A family?D. What should be considered in planning a.gard'en? .
CIR 100
I

r`
References:
0. ;
A. Bulletins and Pamphlets"Basic,Vegetable Gardening Guide," Northrup, King and Company,,
1973.
"Vegetable Gardening," Virginia Polytechni c Institute and State
University, 1955. 6
B. 'Books ,
G. W. Ware and J. P. McCollum. Producing Vegetable Crops.apville, Illinois:' The Interstate Pripters and Publishers,
., Inc., 1968. .
Vegetable Gardening. Menlo Park, California: Lane.Book Company,.,
and. Activities:dial Eventst/
1974.
,Sp
>......
$
. . ....
. -A. Have students compile a list of all She'foods consumed by their
family. Next, place a .check, (V) by Ehose whichare grown in the
% ,': family garden. Also, plade an X by those whiCh could be zrown inthe garden. (This procedure may show the need kor. better.pApningin use of the garden if the number Of X's is greater than.thenumber of checks (.6.) /.
// 4.
B. If possible, arrange, to ?risit one or more gardens. Discus.s the
arrangement.of vegetable crops and the adequacy of the garden in, - -meeting family-food needs. '
. 't r
Appli ?cation and Evaluation::
A. Have each.student sketch the.garden area currently being used.(Dimepsions should be included,) Indicate the location of the
different vegetablecrops. Study the sketch to determine if the
available space is being used to greatest advantage.. Investigaterelocating certain vegetables tO other areas, of the garden.
B. Have students estimate the amount of food required for theirTamilies for a year. Determine the amount which c'an be produced
in the garden.ir
Content, Summary:
What are the souicesof produce for processing? Whet.are,and disadvantages of each? 4, #
,
Produce for home or cannery preservation may be purchased or grownin a home garden. In the past, many families have relied on a home gardento 'supply the vegetables which are preserved: Vegetables' may'be purChasedfrom roadside stands, centraL markets, the grower qn the larms, Nld super
markets. The economic advantage of food preservation is lessened.if vege-tables are purchased for a greater cost an the cost of raising in the
home garden. It is important to car full analyze the advantages and dis-
advantages of all sources.
the advantages
101 105
4

. -
Advgntages and Disadvantages of`Different Sotirces of Vegetables
for Preservation
Source .
Home Garden
Road Side Stands
2.`
ipenteal Markets
Advantages
1. 'Good control over 1.
.quality of vege-tables to be pro-cessed. t2
2. May be more eco'nomical than'othe sources: e, 3.
3. Gardening pro-vides thei exer-
cise which some.people need:
4.. Can grow the va-rieties desiredforreservation.
Disadvanta es
le Good quality vege- 1.
tables can of en(be oltainet if 10-s 2.tally grown vege-tables are sold..
2. May be more eco- 3.
nomical than su=.,
. permarkets.
1 During season,there may be awide selection.
2.. May ge more eco-.
nomical than.su-,.permarkets.
3.. May be of goodif local-
ly g pwn.-re
Jam (Buying on thefarm)
.
2.
4,
1.
it
Quality may be asgood as home gar-den. 0.
hay be more eco-nomical than roadSide stands, centtralmarkets,.andsupermarkets, 3.
ecially if "yo
' pick your own.!1'.
Must have adequategarden space.avail-able.Must have time orlabor tO4raise a.
crops: -
Must have neededtools and equip-ment.
May be more expen-sive than home grown. ,
Control- over qual-
ity is ,less than
with home garded.Control over varietyavailablolta lessthan with home gar-den. 4 .
1
May be more expen-sive than home gar-den
2. Control over quali-ty_is less than withhome garden.
3: Control over varie-tieesevallable isless than with homegarden.
4. Supply may not bestable.
1. May be moreexpen-'' sive than home gar-
den.
2. Control over varie-ties available isless than with homegarden.Supply may be high-
ly seasonal.'''
102 106
O
7

3.
4.
41
Supermarkets 1.
'May beidVailablein larger quanti-ties than withhome garden.,With some ferric-
ers,
to make re-pest ahead of'time.
Tend to havesupply yeararound.
1.
2.
3.
4.
May be the most ex-pensive source.Quality may belacking.No control overvarieties availas-
ble.
Not usually avail
41.
able in large, quantities.
What quantity of food is required for an individual? A family?
The amount of food required for an ily estimated. Such estimates should takeneeds, age, personal preferences, and kin
divildual and family can be dasi-
into consideration nutritionalof food to be available.
Family Food Needs hnd Goalsfor Meeting These Needs*
Each Person Needs theFollowing MinimumAmounts for Good
NutritionOne Day '
'Milk
ButterEggs
Meat
PotatoesTomatoes, oranges, grape-fruit, or'raw cabbage'.
Vegetables, especiallygreen and yellow coloredvegetablesFruit
.mss:
.3-4 cups
1 ounce1 (at least; 3-4
a week)
1 serving
142 servings1-2 servings
2 or more servings
1 or more
One Year
90 gallons .26 pounds20-25 dozen
100-125 pounds oflean meat, poUltry,and fish5 bushels311-4 baskets of
tomatoes
21/2 bushels fresh
fruit or 49 quartscanned.
*Bread and sugar are not listed.103

What should be considered in planning a garden?
. Planning a garden involves giving attention td a number of factors,such as pesonal preferences of family members for certain vegetables,amount of space available, and season in which vegetables are to begrown.' In planning, it is a good idea to prepare a sketch of the spaceavailable., This plan should give consideration to the fallowing factors:
1. Arrangement followed in theigarden:a. Corn and other tall crops should be located so*as not to
shade low-growing crops.b. Perennials, such as asparagus, rhubarb, and strawberries
should be located so as.not to1be damaged in plowing and
harvesting other vegetables..
c. Crops requiring longer times to maturity should be grouped
together.
d. Crops maturing early should be grouped together.
2. Direction of rows:a. A rectangular-shaped garden is to be preferred over a square-
shaped garden.b. Rows should be run lengthwise on level ground.
c. Rows should be..run across the slppe on land which is not
level.
3. Row spacing:a: When hand-operated tools are used, rows may be as close as
12 inches apart for small-growing crops and 24 inches for
larger-growing crops.b. When power-operated equipment is used, rows may need to be
wider, depending on the type of equipment used.
4. Cropping methods: C)a. Succession,or 9mpanion.cropping makes for more efficient
use of land. In succession cropping, two or three different
crops may be. planted in the same spate. For example, atmaturity, early-maturing crops are removed and another crop
planted. With companion cropping two or more crops are
grown on the same area at the sametime. Yor.example, let-
tuce, may be grown in the-row with cabbage or beans in the
row with born.b. Single cv2pping is inefficient when space is limitsd because
it invol'es planting the garden only once, usually in the
spring.
5. Sfze:
a. The size of a garden depends on the number in a family, thenutritional needs of the family, method of cropping, and the
availability of labor and equipment.
b. IE is a rule of thumb to allow 3,000 to 4,000 square feet
of space for each person in family, if space permits.
104 1 OR
6. Drawing the plana. Plans should include" kind of vegetable, variety, amount of
space for each vegetable, planting.date,.and where each _vegetable is to be located in a garden.
b. If possible, plans should be drawn to scale and kept in a,convenient location'for use.
Sample Lesson Plan: Preserving Food
Enterprise: Family Living
Unit: Meeting Food Needs
Problem Area: Preserving Food
Situation (local): ,
Teacher Objectives:
Upon completion of this lesson plan, the students should be able to:
1. Name various methods used in preserving food.
2. Select the appropriate method for preserving various food pro-ducts.
3. Properly preserve various food products.
Note: Much of the basic information for this lesson plan, is presented
in Parts I and II of this document.
Introduction:
The introduction will place stress on the*"why" of food preservation,
which is primarily to revent food spoilage. Spoilage is often manifested
by changes in the char cter of foods. These include changes in odor, fla-
vor, and texture. Most spoilage is caused by yeasts, molds, and bacteria= -
all micro-organisms. ("Nig.tD4organism" may be written as "microorganism"
and refers to organisms which can normally be seen only with the aid of a
microscope.) zo. *Nk
Food preservation involves "treating" food products in some manner
to reduce the number of micro-organisms or prevent the growth oft such
organisms. This treatment may involve a combinatim of procedures, suchas heating food to a point where the micro-organisms are desyroyed and
sealing the food in a hermetic (airtight) container.
Stress that in preserving food it is important to follow the proper
procedures. The food must be safe for consumption when it is used. Food
poisoning may result from eating decayed food or food which had not been
properly preserved. (The teacher may wish to have students relate exam-
ples they know of food poisoning.) One of the most severe food poisonings
is botulism. This is a condition which develops when certain bacteriagrow in food without air and form a powerful toxin. (It has been said
that a spoonful of this toxin might kill a million persons.)
105
109
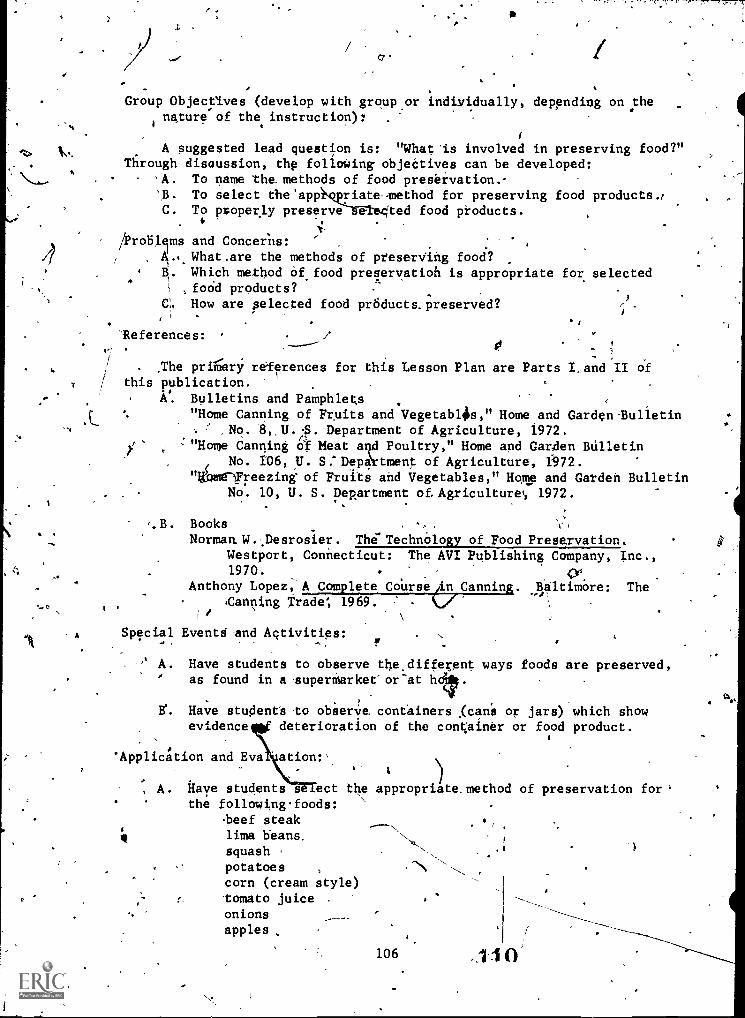
4
Group Objectives (develop with group or individually, depending on thenature of the instruction): .
i
1...A suggested lead question is: "What 'is involved in preserving food?"
Through disoussion, thy following objectives can be developed:'A. To name the. methods of food preservation.-
, 'A. To select the `app riatemethod for preserving food products.;C. To properly preserve e ted food products. ,
4,
/Problems and Concer6: .
/
. /... What.are the methods of preserVihg food?B. Which method of food preservatioh is appropriate for selected
,food products?CL How are selected food products, preserved?
.,
. . ,`References: , / .
,.. .
ary ref
0.
/
/. ,The pri..- m s for this Lesson Plan are Parts Ia
.
references I. II ofeY ' this publication.
.
.
.
A. Bulletins and Pamphlets ,
% "Home Canning of Fruits and Vegetablis," Home and Garden-Bulletin. No. B,.U.:S. Department of Agriculture, 1972.
r ' "Home Canning of Meat aid Poultry," Home and Garden BulletinNo. r06, U. S.-Depkirtment of Agriculture, 1972.Freezing of Fruits and Vegetables," Hose and Garden Bulletin
No. 10, U. S. Department of. Agriculture, 1972.
-
A
*
.B. BooksNorman. W.Desrosier. The'TechnOlogy of Food Preservation.
Westport, Connecticut: The AVI Publishing Company, Inc.,1970. t.Y
Anthony Lopez; A Complete Course in Canning. BaltimOre: Thetanning Trade; 1969.
/
Special Events and Activities:
A. Have students to observe the different ways foods are preserved,as found in a auperiarket' or-at h
V. Have students to obserVe containers ,(cans or jars) which showevidence deterioration of the container or food product.
'ApplicAtion and Eva ation:s
A. Have students se ect the appropriate method of preservation for'the followingfoods:
-beef steak */
lima beans.
squashpotatoescorn (cream style)tomato juice .
onionsapples
106 .1 1 0

B. Have Students-Ito_can food iiroducts.
Content Summary:,
What are the methods of predrving\food?
The following methods are used in preserving food: (The first two
are most commonly used.)1. canning-
2. freezing
3. fermenting4. dehydrating (diying)5. radiating6. preserving with sugar-. I
7: salting and smoki g
Some food prod;ic,,S-may be stored without special preservation. The
. environment in which/ these are stored must be suitabla if:they are to be
stored very, long./Examples of farads which are stored include onions and
'p.otatoes..
Which method of food preservation is appropriate for,selected food products?
The table below presents a summary of the recommended methods of pre-.
serving certain fruits and vegetables.
Product
Vegetables:
- AsparaBeans, lima-Beans, snap'Beets 'BrodcoliCabbageCarrotsCorn, sweetKaleOnionsPeasPotatoes, IrishPotatoes, sweetPumpkinRhubarbSpinach
, SquashjromappelToMato juice
Cannin
.
Method of Preserving
xxx
Preezfn Storin
(Continued on next page)
107
XXX
xxxXXX-
XXIX
XXXXXXXXxxx
xx
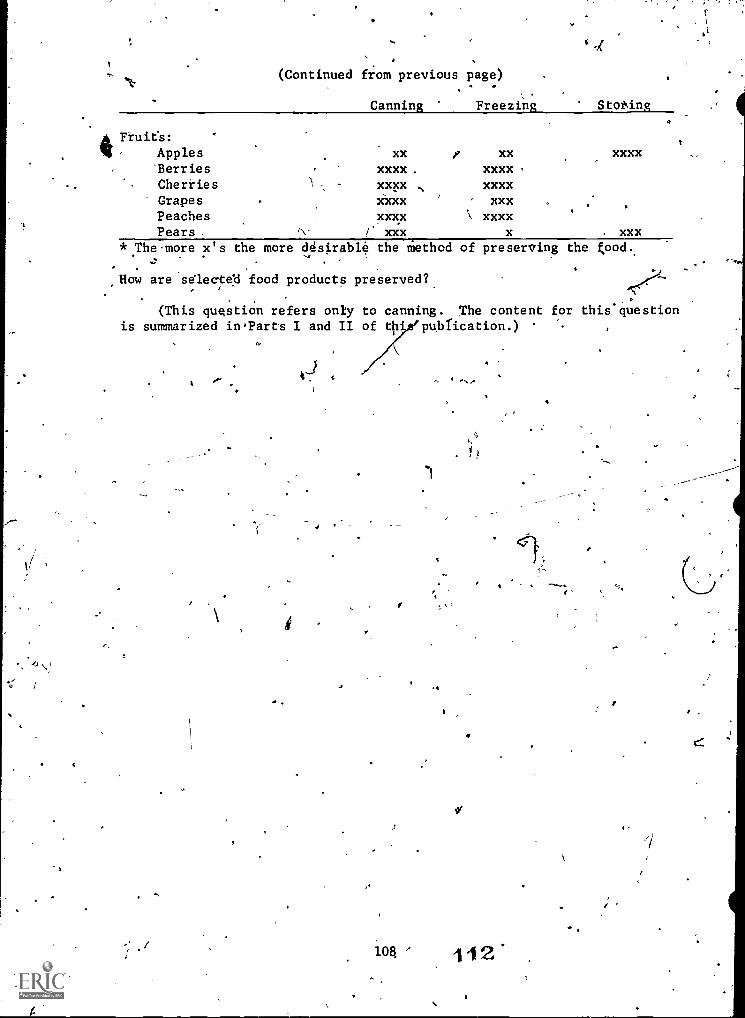
44
(Continued from previous page)
41
Canning Freezing Stoning
Fruits:Apples xx , xx xxxx'Berries xxxx . xxxx ,
Cherries \ . - xxxx , xxxxGrapes xxxx xxxPeaches xxxx xxxxPears . -... r xxx x xxx
*The.more x's the more desirable the Method of preserving the good.
How are selecte:d food products preserved?
.. .
'
(This question refers only to canning. The content for this questionis summarized in,Parts I and II of this publication.) ,
.
I
108, 112 .
.",...
V

;-4"
Appendix
'Sample Sources of Instructional Materialson
Food Preservation
(Tpe) AVI Publishing Company,Westport, Connecticut 06§19
0.0V
Ball CorporationMuncie, Indiana 47302
Burdau of Teaching MaterialsState Department of EducationRichmond -iVirginia 23216
Campbell Soup CompanyHome Economics Department ,kCampbell.PlaceCamden, New Jersey 08101
(The) Caniling Trade, Inc.2619,Mauland AvenueBaltimore, Maryland 21218
Chas. A. Bennett Co., Inc.809 West DetweilerPepria, Illinois 61614
Food and Agriculture Organizationof the United Nations
Unipub, Inc.650 4.st Avenue
Box 433New York, New York 10016
Kerr Glass Mfg. CorporationConsumer Products Division
Boi 97Sa.nd Springs, Oklahoma 74063
Northrup', King and Company1500 Jackson Street,.N. E.Minneapolis, Minnesota 55413
.
Pet IncorporatedHome EconomicsPet Plaza400 South Fourth StreetSaint Louis, Missouri 63166
109
x
x
x
x.
x
113
x
f
StoRely-Van Camp, Inc.Home Economics Department941 North Meridian StreetIndianapolis, Indiana 46206
U. S. Department of AgricultureOffice of(InformatiomWaehington:t. C. 2025A
Virginia Polytedfinic Institute andState
Cooperative ,Extension SvviceDistribution'CenterBlacksburg, Virginia' 24061
A
110
0
1
1.14
x
- .t

'Bibliography`Jo
The Bibliography contains excellent siprces of additional information for
persons involVed with school-community canneries.)
Are Vegetables Doing Their "Thing".for You? 'Indianapolis: Stokely-Van
tamp, I0c., Home Economics. Dep4itment, n. d.
Ball-Blue-Book. Muncieo rndiana: Ball Corporation,_ 1974.
Ball Freezer Book. Muncie,. Indiana:. Ball Corporation, 1974.
i. ..
..
Basic Vegetable Gardening Guide. Minneapolis: Northrup, King and ConTny,
1973.'I
Bert., Alap The Nutrition Factor. Washington: The Brookings Institute,
19731.
1,
,.
Borgstropi, Georg. Prineiplesof Food Science, Volume-I and II. New
York: The Macmillan Company., 1968./
! .,k
Carroll, Lula Mae. Canning Fruits and Vegetables in School-Community Food
Preserve ion Laboratories. Baton Rouge: State Department of Education
OC.Louisi na, 1952.
Desrosier, Norman W. The Technology of Foo3 Preservation.
COhnecticut: The AVI Publishing Company, Inc., 1970.%
Dunn, Charlotte M.. Safe Home Canning of Fruits. Madison:
of Wisconsin, Cooperative. Extension-Programs, 1974.
Westport,
University
.
Dunn, Charlotte M. 'Safe Home Canning of Vegetables. 'Madison: University,
of Wisconsin, CooperatkvezExtension Programs, 1974.
Food Needs, -of Everybody, Publication 166. Blacksburg, Virginia Poly-
wechnic Institute and State University, Extension Division,- 1973.
4
Home Cannin: of Fruits and Vegetables, Home and Garddn Bulletin No. 8.
Washington: U. S. Department of Agriculture, 1972.
Home Canning of Meat and Poultry, Home and Garden Bulletin No. 106.
Washington: U. S. Department of Agriculture, 1972.
Home Freezin: of Fruits a d tables,-Home and Garden Bulletin No. 10.
Washington: U. S. Depar ment of Agriculture, 1971.
Home Freezing of Poultry, Home and Garden Bulletin No. 70. Washington:
U. S. Department'of Agriculture, 1970.
Kerr Home fanninarreezin232cos. Sand Springs, Oklahoma: Kerr
Glass Manufacturing Corporati , n. d.
Kotschevar, Leudal. H. and Margaret McWilliams, Understanding Food.
New York: John Wiley and Sons, Inc., 1969.
3
44111

Lopez, Anthony. A_CoRiplete Course in Canning. Baltimore: The CanningTrade, 1969.
0Nutrition: Why Is It Important.? Camden, New Jersey: Campbell 'oup
Company, 1973.
Presto Cooker-Canner: Instructions Reci es and Time Tables; EauClaire, Wisconsin: National Presto Industries, Inc., 1974.
Processes for Low-Acid Foods iii, Metal Containers, Washington: NationalCanners Association,\1966. .
,
Robinson, Corinne H. funda\mentals Of Nprmal Nutrition. New York: 1 1
The Macmillan Company, 1968..
. -/
.
Slaughtering, CuttingL and Processing Pork on the Farm, Farmer's BuL-letin No. 2138. Washigton: U. S. Department of. Agriculture, \1973. II
.
..,
. .
Some Aspects of Food Preservation. Muncie, Indiana:. Ball Corporation,n. cr. ' .
N\4
I
(The) Top DoubleSeam for Round Cans. New York: American Can Company,1957. 1 "
Top Double Seaming,Manual., New York: C?ntinental 'Can,Company, /5666
il
Vegetable Gardening. Menlo Park, Californ : Lane Books; 1974. (' i
,
Wolff Isabel.'Home,Cannin Fruit and-Ve etbles, Extension Folder100. St. PaUl: University fcMinnesota, Extension Service, 1974.
"IA
ti
rp