! ! Connect Your Wireless Devices Successfully connected to a wireless router or AP. Blinking The...
4
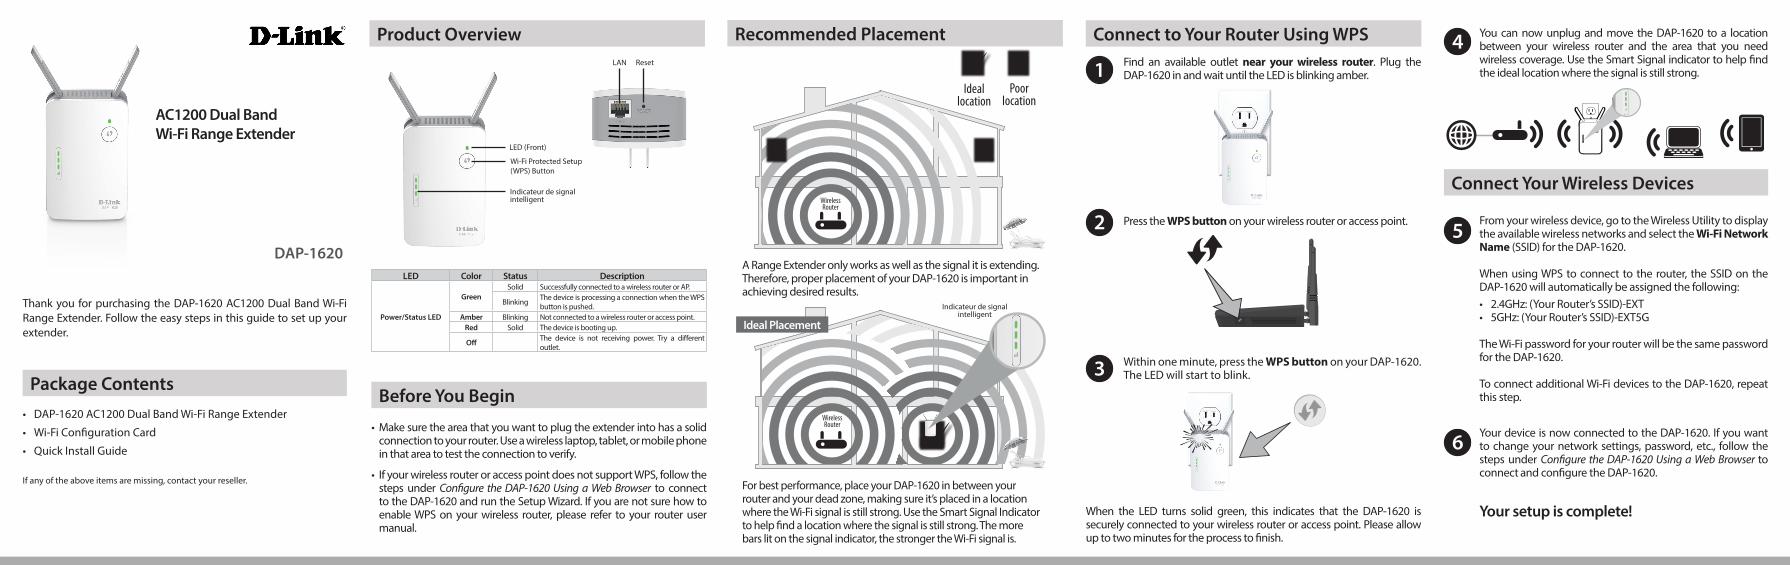
DAP-1620 AC1200 Dual Band Wi-Fi Range Extender If any of the above items are missing, contact your reseller. Package Contents • DAP-1620 AC1200 Dual Band Wi-Fi Range Extender • Wi-Fi Configuration Card • Quick Install Guide Product Overview Recommended Placement LED Color Status Description Power/Status LED Green Solid Successfully connected to a wireless router or AP. Blinking The device is processing a connection when the WPS button is pushed. Amber Blinking Not connected to a wireless router or access point. Red Solid The device is booting up. Off The device is not receiving power. Try a different outlet. Connect to Your Router Using WPS Thank you for purchasing the DAP-1620 AC1200 Dual Band Wi-Fi Range Extender. Follow the easy steps in this guide to set up your extender. 1 Find an available outlet near your wireless router. Plug the DAP-1620 in and wait until the LED is blinking amber. 2 Press the WPS button on your wireless router or access point. Within one minute, press the WPS button on your DAP-1620. The LED will start to blink. 3 4 When the LED turns solid green, this indicates that the DAP-1620 is securely connected to your wireless router or access point. Please allow up to two minutes for the process to finish. You can now unplug and move the DAP-1620 to a location between your wireless router and the area that you need wireless coverage. Use the Smart Signal indicator to help find the ideal location where the signal is still strong. 5 From your wireless device, go to the Wireless Utility to display the available wireless networks and select the Wi-Fi Network Name (SSID) for the DAP-1620. When using WPS to connect to the router, the SSID on the DAP-1620 will automatically be assigned the following: • 2.4GHz: (Your Router’s SSID)-EXT • 5GHz: (Your Router’s SSID)-EXT5G The Wi-Fi password for your router will be the same password for the DAP-1620. To connect additional Wi-Fi devices to the DAP-1620, repeat this step. 6 Your device is now connected to the DAP-1620. If you want to change your network settings, password, etc., follow the steps under Configure the DAP-1620 Using a Web Browser to connect and configure the DAP-1620. Your setup is complete! Before You Begin • Make sure the area that you want to plug the extender into has a solid connection to your router. Use a wireless laptop, tablet, or mobile phone in that area to test the connection to verify. • If your wireless router or access point does not support WPS, follow the steps under Configure the DAP-1620 Using a Web Browser to connect to the DAP-1620 and run the Setup Wizard. If you are not sure how to enable WPS on your wireless router, please refer to your router user manual. Connect Your Wireless Devices Poor location Ideal location ! ! ! A Range Extender only works as well as the signal it is extending. Therefore, proper placement of your DAP-1620 is important in achieving desired results. For best performance, place your DAP-1620 in between your router and your dead zone, making sure it’s placed in a location where the Wi-Fi signal is still strong. Use the Smart Signal Indicator to help find a location where the signal is still strong. The more bars lit on the signal indicator, the stronger the Wi-Fi signal is. Ideal Placement Wireless Router Wireless Router LED (Front) Wi-Fi Protected Setup (WPS) Button Reset LAN Indicateur de signal intelligent Indicateur de signal intelligent
Transcript of ! ! Connect Your Wireless Devices Successfully connected to a wireless router or AP. Blinking The...
DAP-1620
AC1200 Dual Band Wi-Fi Range Extender
If any of the above items are missing, contact your reseller.
Package Contents• DAP-1620 AC1200 Dual Band Wi-Fi Range Extender
• Wi-Fi Configuration Card
• Quick Install Guide
Product Overview Recommended Placement
LED Color Status Description
Power/Status LED
GreenSolid Successfully connected to a wireless router or AP.
Blinking The device is processing a connection when the WPS button is pushed.
Amber Blinking Not connected to a wireless router or access point.Red Solid The device is booting up.
Off The device is not receiving power. Try a different outlet.
Connect to Your Router Using WPS
Thank you for purchasing the DAP-1620 AC1200 Dual Band Wi-Fi Range Extender. Follow the easy steps in this guide to set up your extender.
1 Find an available outlet near your wireless router. Plug the DAP-1620 in and wait until the LED is blinking amber.
2 Press the WPS button on your wireless router or access point.
Within one minute, press the WPS button on your DAP-1620. The LED will start to blink.3
4
When the LED turns solid green, this indicates that the DAP-1620 is securely connected to your wireless router or access point. Please allow up to two minutes for the process to finish.
You can now unplug and move the DAP-1620 to a location between your wireless router and the area that you need wireless coverage. Use the Smart Signal indicator to help find the ideal location where the signal is still strong.
5From your wireless device, go to the Wireless Utility to display the available wireless networks and select the Wi-Fi Network Name (SSID) for the DAP-1620.
When using WPS to connect to the router, the SSID on the DAP-1620 will automatically be assigned the following:• 2.4GHz: (Your Router’s SSID)-EXT• 5GHz: (Your Router’s SSID)-EXT5G
The Wi-Fi password for your router will be the same password for the DAP-1620.
To connect additional Wi-Fi devices to the DAP-1620, repeat this step.
6 Your device is now connected to the DAP-1620. If you want to change your network settings, password, etc., follow the steps under Configure the DAP-1620 Using a Web Browser to connect and configure the DAP-1620.
Your setup is complete!
Before You Begin
• Make sure the area that you want to plug the extender into has a solid connection to your router. Use a wireless laptop, tablet, or mobile phone in that area to test the connection to verify.
• If your wireless router or access point does not support WPS, follow the steps under Configure the DAP-1620 Using a Web Browser to connect to the DAP-1620 and run the Setup Wizard. If you are not sure how to enable WPS on your wireless router, please refer to your router user manual.
Connect Your Wireless Devices
Poorlocation
Ideallocation
!
!!
Poorlocation
Ideallocation
!
!!
A Range Extender only works as well as the signal it is extending. Therefore, proper placement of your DAP-1620 is important in achieving desired results.
For best performance, place your DAP-1620 in between your router and your dead zone, making sure it’s placed in a location where the Wi-Fi signal is still strong. Use the Smart Signal Indicator to help find a location where the signal is still strong. The more bars lit on the signal indicator, the stronger the Wi-Fi signal is.
Ideal Placement
WirelessRouter
WirelessRouter
LED (Front)
Wi-Fi Protected Setup (WPS) Button
ResetLAN
Indicateur de signal intelligent
Indicateur de signal intelligent

Copyright ©2015 D-Link Corporation/D-Link Systems, Inc. All rights reserved. D-Link and the D-Link logo are registered trademarks of D-Link Corporation or its subsidiaries in the United States and other countries. iPhone, iPad, and iPod touch are registered trademarks of Apple Inc. Android is a trademark of Google, Inc. Other trademarks are the property of their respective owners. Maximum wireless signal rate derived from IEEE Standard 802.11ac (draft), 802.11n, and 802.11g specifications. Actual data throughput will vary. Network conditions and environmental factors, including volume of network traffic, building materials and construction, and network overhead, lower actual data throughput rate. Environmental factors will adversely affect wireless signal range. Product specifications, size and shape are subject to change without notice, and actual product appearance may differ from that depicted on the packaging. Visit www.dlink.com for more details.
Having trouble installing your new product? D-Link’s website contains the latest user documentation and software updates for D-Link products. U.S. and Canadian customers can contact D-Link Technical Support through our website.
United Stateshttp://support.dlink.com
Canadahttp://support.dlink.ca
Technical Support
Version 1.0(NA) | August 12, 2015 290726001620A10
Open the wireless utility on your wireless device or computer. Select the Wi-Fi Network Name (from the Wi-Fi Configuration Card) and enter the Password.
Open a web browser (e.g., Internet Explorer, Firefox, Safari, or Chrome) and enter http://dlinkap.local./.
2
3 Why can’t I connect to my wireless router or my wireless connection drops?
1. Verify that the DAP-1620 is within range of your wireless router. Try plugging it into a location closer to the router and verify the LED is solid green.
2. Note that when repeating a wireless signal from a router or access point, devices connected to the extender will not get the same speed/throughput as when connected directly to the router.
How do I change the wireless settings on the DAP-1620?1. Open a web browser (e.g., Internet Explorer, Firefox, Safari, or Chrome)
and go to http://dlinkap.local./ (or http://dlinkap on Windows XP).
2. At the login screen, click or press the Log In button (no password by default).
3. Go to Settings > Extender4. Enter Wi-Fi Name(s) and Password(s).
Troubleshooting
Documentation available at http://support.dlink.ca.
5. Click or press Save.
Note: If you have changed the Wi-Fi network name and/or password, the device you are currently using to connect to the DAP-1620 will drop. You will need to open your wireless utility and connect to the DAP-1620 using the new network name and password.
What if I forgot my DAP-1620 password?1. If you forgot your password or want to reset the DAP-1620 back to
the factory default settings, press and hold the reset button using a paper clip and release after 10 seconds.
Warning: This process will erase all your settings. 2. You may repeat the WPS process on the other side of this QIG or log
in and run the Setup Wizard. Follow the steps under Connect to Your Router Using WPS.
Configure the DAP-1620 Using a Web BrowserYou may log into the web-based configuration utility on the DAP-1620 to perform the following tasks:
• Run the Setup Wizard• Upgrade firmware• Change wireless and network settings
Wi-Fi Name(SSID) 2.4Ghz:dlink-xxxxWi-Fi Name(SSID) 5GHz:dlink-xxxx-mediaPassword:gccnu80856
To con�gure your extender, go to:http://dlinkap.local.Or http://192.168.0.50Username: “Admin”Password:” “ (leave the �eld blank)
Once you connect, the login page will appear. By default, the username is Admin and the password field should be left blank.
Note: If this is the first time logging in to the DAP-1620, you will be directed to the Setup Wizard automatically.
4
The home page will display your current status. A green check mark represents a successful connection to your wireless router or Access Point (AP).
5
If it is a red X, you may connect to your wireless router or AP by clicking on the Uplink Router icon.
Visit http://support.dlink.ca to download the user manual for more information. Please refer to the product manual for further information on configuring the DAP-1620 using a web browser.
* The default IP address is 192.168.0.50. Once the DAP-1620 connects to your router, it will get assigned a new IP address based on your router/network’s DHCP settings. You will need to log in to your router and view the DHCP table to see what IP address was assigned to the DAP-1620. The MAC address is printed on the label on the DAP-1620.
1 Plug the DAP-1620 into an available outlet near your router. You may move it to a more suitable location after configuration.
Setting up the DAP-1620 using the QRS Mobile App
The DAP-1620 can be configured using your smartphone. Search for “D-Link QRS Mobile” on the Apple App Store or Google Play, and download the app. Next, connect your smartphone to the DAP-1620 using the SSID and Password information provided on the Wi-Fi Configuration Card and follow the helpful in-app prompts, or refer to the product manual for more information.

DAP-1620
Prolongateur de portée double bande Wi-Fi AC1200
Contactez votre revendeur s'il manque l'un des éléments ci-dessus.
Contenu de la boîte• Prolongateur de portée double bande Wi-Fi AC1200 DAP-1620
• Carte de configuration du Wi-Fi
• Guide d’installation rapide
Présentation du produit Positionnement recommandé
Voyant lumineux Couleur État Description
Voyant d'alimentation DEL/
état
Vert
Reste allumé Connecté avec succès à un routeur ou PA sans fil.
Clignote Le périphérique traite une connexion lorsque le bouton WPS est enfoncé.
Orange Clignote Pas connecté à un routeur ou point d'accès sans fil.
Rouge Reste allumé Le périphérique est en cours de démarrage.
Éteint Le périphérique ne reçoit pas d'alimentation. Essayez une autre prise.
Connexion à votre routeur à l'aide du WPS
Merci d'avoir acheté le prolongateur de portée double bande Wi-Fi AC1200. Suivez les étapes simples de ce guide pour configurer votre prolongateur.
1 Trouvez une prise disponible à proximité de votre routeur sans fil. Branchez le DAP-1620 et attendez que le voyant clignote en orange.
2 Appuyez sur le bouton WPS de votre routeur ou point d’accès sans fil.
Dans la minute qui suit, appuyez sur le bouton WPS de votre DAP-1620. Le voyant commencera à clignoter.3
4
Lorsque le voyant reste allumé en vert, cela indique que le DAP-1620 est bien connecté à votre routeur ou point d'accès sans fil. S’il vous plaît permettre jusqu’à deux minutes pour que le processus se termine
Vous pouvez maintenant débrancher le DAP-1620 et le déplacer vers un emplacement entre votre routeur sans fil et la zone où vous avez besoin d'une couverture sans fil. Utilisez l’indicateur de signal intelligent pour aider à trouver l’endroit idéal où le signal est encore forte.
5À partir de votre périphérique sans fil, allez à votre utilitaire sans fil pour afficher les réseaux sans fil disponibles et
sélectionnez le nom du réseau Wi-Fi (SSID) pour le DAP-1620.
Si vous utilisez le WPS pour la connexion au routeur, le SSID du DAP-1620 sera automatiquement attribué comme suit :• 2,4 GHz : (Le SSID de votre routeur)-EXT• 5 GHz : (Le SSID de votre routeur)-EXT5G
Le DAP-1620 utilisera le même mot de passe Wi-Fi que votre routeur.
Pour connecter d'autres périphériques Wi-Fi au DAP-1620, répétez cette étape.
6 Votre périphérique est maintenant connecté au DAP-1620. Si vous souhaitez modifier les paramètres de votre réseau, le mot de passe, etc., suivez les étapes de la section Configurer le DAP-1620 à l'aide d'un navigateur Web pour connecter et configurer le DAP-1620.
Configuration terminée!
Avant de commencer• Assurez-vous que la zone où vous voulez brancher le prolongateur
possède une connexion stable à votre routeur. Pour vérifier, utilisez un ordinateur portable sans fil, une tablette ou un téléphone mobile dans cette zone pour tester la connexion.
• Si votre routeur ou point d'accès sans fil ne prend pas en charge le WPS, suivez les étapes de la section Configurer le DAP-1620 à l'aide d'un navigateur Web pour vous connecter au DAP-1620 et exécuter l'assistant de configuration. Si vous ne savez pas comment activer WPS sur votre routeur sans fil, veuillez consulter son manuel d’utilisation.
Connecter vos périphériques sans fil
Poorlocation
Ideallocation
!
!!
Poorlocation
Ideallocation
!
!!
Un prolongateur de portée ne fonctionne qu'aussi bien que le signal qu'il prolonge. Par conséquent, il est important de bien positionner votre DAP-1620 pour atteindre les résultats souhaités.
Emplacementidéale
Malsitué
Pour de meilleures performances, positionnez votre DAP-1620 entre votre routeur et votre zone morte, en veillant à ce qu'il soit placé dans un endroit où le signal Wi-Fi est encore puissant. Utilisez l’indicateur de signal intelligent pour aider à trouver un endroit où le signal est encore forte. Le nombre de barres allumées sur l’indicateur de signal, le meilleur le signal sans fil est.
Positionnement idéal
Réseau sans filRouteur
Réseau sans filRouteur
Poorlocation
Ideallocation
!
!!
Voyant lumineux (Avant)
Bouton WPS (Wi-Fi Protected Setup)
Bouton de réinitialisationLAN
Indicateur de signal intelligent

Copyright ©2015 D-Link Corporation/D-Link Systems, Inc. Tous droits réservés. D-Link et le logo D-Link sont des marques déposées de D-Link Corporation ou de ses filiales aux États-Unis et dans d’autres pays. iPhone, iPad et iPod touch sont des marques déposées de Apple Inc. Android est une marque de Google, Inc. Les autres marques déposées appartiennent à leurs propriétaires respectifs. Débit maximum du signal sans fil provenant des spécifications des normes IEEE 802.11ac (en version préliminaire), 802.11n et 802.11g. Le débit de transmission réel des données peut varier. Le surdébit, ainsi que les conditions du réseau et les facteurs environnementaux, dont l’importance du trafic réseau, les matériaux de construction et les constructions, peuvent avoir des conséquences négatives sur le débit de transmission réel des données. Les facteurs environnementaux ont des conséquences négatives sur la portée du signal sans fil. Les caractéristiques du produit, sa taille et sa forme sont soumises à modification sans préavis et l'apparence réelle du produit peut différer de celle illustrée sur la boîte. Consultez le www.dlink.com pour de plus amples détails.
Vous avez des difficultés à installer votre nouveau produit? Le site Web de D-Link comporte la documentation utilisateur à jour et les dernières mises à jour logicielles des produits D-Link. Les clients des États-Unis et du Canada peuvent contacter le support technique de D-Link via notre site Web.
États-Unishttp://support.dlink.com
Canadahttp://support.dlink.ca
Assistance technique
Version 1.0(NA) | 12 août 2015 290726001620A10
Ouvrez l'utilitaire sans fil sur votre périphérique ou ordinateur sans fil. Sélectionnez le Wi-Fi Network Name (Nom du réseau Wi-Fi affiché sur la carte de configuration du Wi-Fi) et saisissez le Password Mot de passe).
Ouvrez un navigateur web (par ex., Internet Explorer, Firefox, Safari ou Chrome) et saisissez http://dlinkap.local./.
2
3 Pourquoi ne puis-je pas me connecter à mon routeur sans fil ou ma connexion sans fil se coupe?
1. Vérifiez que le DAP-1620 se trouve à portée de votre routeur sans fil. Essayez de le brancher dans un endroit plus près du routeur et vérifiez que le voyant reste allumé en vert.
2. Notez que lorsqu'un signal sans fil d'un routeur ou d'un point d'accès est répété, les périphériques connectés au prolongateur n'auront pas la même vitesse/le même débit que s'ils étaient connectés directement au routeur.
Comment modifier les paramètres sans fil du DAP-1620?1. Ouvrez un navigateur web (par ex., Internet Explorer, Firefox, Safari ou Chrome)
et allez sur http://dlinkap.local./. (ou http://dlinkap sous Windows XP).
2. Quand l’écran de connexion apparaît, cliquez ou appuyez sur le bouton Log In (Connexion) (aucun mot de passe par défaut).
3. Allez dans Settings > Extended Wi-Fi Settings (Paramètres > Paramètres du Wi-Fi étendu).
4. Renseignez les champs Wi-Fi Name (Nom Wi-Fi) et Password (Mot de passe).
5. Cliquez ou appuyez sur Save (Enregistrer). Remarque : Si vous avez modifié le nom et/ou le mot de passe du réseau Wi-Fi,
le périphérique que vous utilisez actuellement pour vous connecter au DAP-1620 ne sera plus connecté. Vous devrez ouvrir votre utilitaire sans fil et vous connecter au DAP-1620 en utilisant le nouveau nom de réseau et le nouveau mot de passe.
Résolution des problèmes
La documentation est disponible sur http://support.dlink.ca.
Que faire si j'ai oublié le mot de passe de mon DAP-1620?1. Si vous avez oublié votre mot de passe ou si vous souhaitez
réinitialiser le DAP-1620 sur les paramètres d'usine par défaut, appuyez sur le bouton de réinitialisation à l'aide d'un trombone et relâchez-le après 10 secondes.
Avertissement : Ce processus effacera tous vos paramètres. 2. Vous pouvez répéter le processus WPS au verso de ce guide
d'installation rapide ou vous connecter et exécuter l'Assistant de configuration. Suivez les étapes de la section Connexion à votre routeur à l’aide du WPS.
Configurer le DAP-1620 à l'aide d'un navigateur WebVous pouvez vous connecter à l'utilitaire de configuration Web du DAP-1620 pour effectuer les tâches suivantes :
• Exécuter l'assistant de configuration• Mettre à jour le microprogramme• Modifier les paramètres sans fil et réseau
Wi-Fi Name(SSID) 2.4Ghz:dlink-xxxxWi-Fi Name(SSID) 5GHz:dlink-xxxx-mediaPassword:gccnu80856
To con�gure your extender, go to:http://dlinkap.local.Or http://192.168.0.50Username: “Admin”Password:” “ (leave the �eld blank)
Une fois que vous vous connectez, la page de connexion s'affiche. Par défaut, le nom d’utilisateur est admin et le mot de passe doit être laissé vide.
Remarque : Si vous vous connectez au DAP-1620 pour la première fois, vous serez dirigé automatiquement vers l'assistant de configuration.
4
La page d'accueil affiche l'état actuel de votre connexion. Une coche verte indique une connexion réussie à votre routeur ou point d'accès (PA) sans fil.
5
Si c’est une x rouge, vous pouvez vous connecter à votre routeur ou point d'accès sans fil en cliquant sur l'icône Uplink Router (Routeur de liaison montante).
Visitez http://support.dlink.ca pour télécharger le manuel d'utilisation afin d'obtenir plus d'informations.
* L'adresse IP par défaut est 192.168.0.50. Une fois que le DAP-1620 se connecte à votre routeur, il obtiendra une nouvelle adresse IP basée sur les paramètres DHCP de votre routeur/réseau. Vous devez vous connecter à votre routeur et afficher la table DHCP pour voir quelle adresse IP a été attribuée au DAP-1620. L'adresse MAC est imprimée sur l'étiquette du DAP-1620.
1 Branchez le DAP-1620 dans un prise disponible à proximité de votre routeur. Vous pouvez le déplacer vers un emplacement plus convenable après la configuration.
Le DAP-1620 peut être configuré à l'aide de votre téléphone intelligent. Recherchez « D-Link QRS Mobile » dans l'App Store ou Google Play et téléchargez l'application. Ensuite, connectez votre téléphone intelligent au DAP-1620 en utilisant le SSID et le mot de passe fournis sur la Carte de configuration du Wi-Fi et suivez les invites de l'application ou reportez-vous au manuel du produit pour obtenir plus d'informations.
Installation du DAP-1620 en utilisant l’application QRS mobile