Brewery Series Beer Ingredients Kit - Brewcraft USA RPM... · / Brewery Series Beer Ingredients Kit...
4
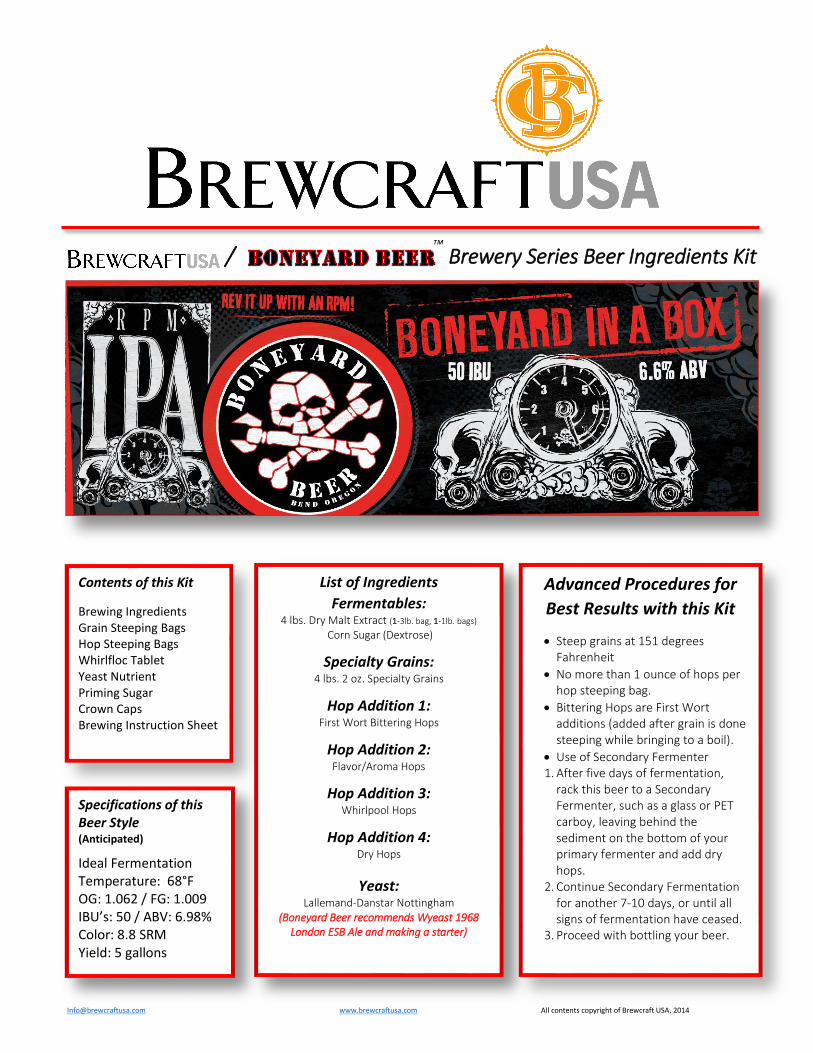
[email protected] www.brewcraftusa.com All contents copyright of Brewcraft USA, 2014 ™ Brewery Series Beer Ingredients Kit / Contents of this Kit Brewing Ingredients Grain Steeping Bags Hop Steeping Bags Whirlfloc Tablet Yeast Nutrient Priming Sugar Crown Caps Brewing Instruction Sheet List of Ingredients Fermentables: 4 lbs. Dry Malt Extract (1-3lb. bag, 1-1lb. bags) Corn Sugar (Dextrose) Specialty Grains: 4 lbs. 2 oz. Specialty Grains Hop Addition 1: First Wort Bittering Hops Hop Addition 2: Flavor/Aroma Hops Hop Addition 3: Whirlpool Hops Hop Addition 4: Dry Hops Yeast: Lallemand-Danstar Nottingham (Boneyard Beer recommends Wyeast 1968 London ESB Ale and making a starter) Advanced Procedures for Best Results with this Kit Steep grains at 151 degrees Fahrenheit No more than 1 ounce of hops per hop steeping bag. Bittering Hops are First Wort additions (added after grain is done steeping while bringing to a boil). Use of Secondary Fermenter 1. After five days of fermentation, rack this beer to a Secondary Fermenter, such as a glass or PET carboy, leaving behind the sediment on the bottom of your primary fermenter and add dry hops. 2. Continue Secondary Fermentation for another 7-10 days, or until all signs of fermentation have ceased. 3. Proceed with bottling your beer. Specifications of this Beer Style (Anticipated) Ideal Fermentation Temperature: 68°F OG: 1.062 / FG: 1.009 IBU’s: 50 / ABV: 6.98% Color: 8.8 SRM Yield: 5 gallons
-
Upload
vuongthuan -
Category
Documents
-
view
221 -
download
0
Transcript of Brewery Series Beer Ingredients Kit - Brewcraft USA RPM... · / Brewery Series Beer Ingredients Kit...
[email protected] www.brewcraftusa.com All contents copyright of Brewcraft USA, 2014
™ Brewery Series Beer Ingredients Kit /
Contents of this Kit
Brewing Ingredients Grain Steeping Bags Hop Steeping Bags Whirlfloc Tablet Yeast Nutrient Priming Sugar Crown Caps Brewing Instruction Sheet
List of Ingredients
Fermentables: 4 lbs. Dry Malt Extract (1-3lb. bag, 1-1lb. bags)
Corn Sugar (Dextrose)
Specialty Grains: 4 lbs. 2 oz. Specialty Grains
Hop Addition 1: First Wort Bittering Hops
Hop Addition 2: Flavor/Aroma Hops
Hop Addition 3: Whirlpool Hops
Hop Addition 4: Dry Hops
Yeast: Lallemand-Danstar Nottingham
(Boneyard Beer recommends Wyeast 1968 London ESB Ale and making a starter)
Advanced Procedures for
Best Results with this Kit
Steep grains at 151 degrees Fahrenheit
No more than 1 ounce of hops per hop steeping bag.
Bittering Hops are First Wort additions (added after grain is done steeping while bringing to a boil).
Use of Secondary Fermenter 1. After five days of fermentation,
rack this beer to a Secondary Fermenter, such as a glass or PET carboy, leaving behind the sediment on the bottom of your primary fermenter and add dry hops.
2. Continue Secondary Fermentation for another 7-10 days, or until all signs of fermentation have ceased.
3. Proceed with bottling your beer.
Specifications of this Beer Style (Anticipated)
Ideal Fermentation Temperature: 68°F OG: 1.062 / FG: 1.009 IBU’s: 50 / ABV: 6.98% Color: 8.8 SRM Yield: 5 gallons
[email protected] www.brewcraftusa.com All contents copyright of Brewcraft USA, 2014
™Brewery Series Beer Kit Brewing a /
Experience Outstanding Beer™ with Brewcraft USA!
These instructions are a basic set of guidelines for making beer from this kit. As the Brewery Series
kits are an advanced kit, we assume that this is not the first beer you have ever brewed. You will be
following the steps and mimicking the processeses of the commercial brewery on a much smaller
scale. We highly suggest you follow these instructions to the letter to get the best results. If you have more experience, feel free to apply your knowledge to the
process of brewing this kit. We advise you to read through these instructions from start to finish before you begin brewing to be sure you understand the
process.
Equipment You Will Need When You Brew
20 qt. Stock pot No-rinse sanitizer*
Fermenter* (6-gallon plastic pail fermenter and a lid with a hole for rubber stopper/airlock apparatus) with a mark to indicate 5 gallons Distilled or filtered water, about 3 gallons
Grommet* installed in fermenter lid, fits airlock Grain Steeping Bag and Hop Steeping Bags* Airlock* Heat-proof spoon* Hydrometer* and sample jar Thermometer Bottling/Transfer 6-gallon pail* 5 Gallon Carboy (Secondary Fermenter) Strainer
*Such as is provided in a Brewcraft USA Starter Brewery Equipment Kit Getting Started/Set Up Time to complete: 15 minutes
1. Wash and rinse well all your equipment. If you will be using London ESB (1968) liquid yeast from Wyeast Laboratories, Inc™, “smack” the package now
according to the directions on the package.
2. Mix up 1-2 gallons of no-rinse sanitizer solution, following the manufacturer’s instructions, in your fermenter. Put your spoon, thermometer, airlock,
hydrometer and jar into the solution to soak. Steeping Your Grain Time to complete: 1 hour, approximately
3. Run 3 gallons of tap water into your stock pot, place on a large burner on your stove. Place the Specialty Grain that came with your kit into the Grain
Steeping Bag. Place Grain Steeping Bag in the water. Turn the burner on to medium-high.
4. Bring the water and grain slowly up to 151°F. Once it has reached this temperature, turn off the burner and allow the grain to steep for about 20 - 30
minutes with the lid on to hold temperature.
5. After you have steeped the grains for the recommended time, turn burner back on to medium high and slowly increase temperature to 170°F.
6. Once temperature has reached 170°F, remove the grain by lifting the grain bag out and place in a strainer over the pot (allow the water to drip back into the
stock pot – do not squeeze).
7. Slowly pour 1 gallon of 170°F water over the grain.
8. Add Hop Addition 1 (First Wort Hops).
Boiling Your Wort Time to complete: 75 minutes, approximately
9. Bring the contents (now called wort) to a boil, and add the 4 lbs. of Light Dry Malt Extract (1 – 3lb bag and 1 – 1lb bag). Stir until Dry Malt Extract has
thoroughly dissolved. BE CAREFUL, your wort may foam up and boil over at this point. Be prepared to quickly turn off the heat and possibly add a splash of
cold tap water to calm the boil. [If using a timer, start 60 minute countdown now]
10. Boil for 40 minutes then add 13.4 ounces of corn sugar. (20 minutes left)
11. Add the whirlfloc tablet and yeast nutrient. (15 minutes left)
12. Boil for 10 more minutes and then add Hop Addition 2 (Flavor/Aroma Hops). (5 minutes left)
13. Boil for 5 more minutes and then turn off burner. (0 minutes left/Flash Out)
14. Add Hop Addition 3 (Whirlpool Hops) and stir wort with sanitized spoon or paddle creating a whirlpool action. (Note: Your wort is now very close to sterile
and you must try to keep it sterile. Anything that your wort comes in contact with must be previously soaked in your no-rinse sanitizer solution. Clean
hands are essential and food-handlers gloves are also useful from this point forward.)
15. Cover and start cooling your wort. (If using an immersion wort chiller, submerge sanitized immersion wort chiller at this time and start chilling.)
16. While cooling, transfer all equipment from your fermenter to your bottling pail. Put the lid on the fermenter and shake gently to be sure the solution
contacts all surfaces inside. Take off the lid and set it aside without allowing the sanitized inner surface to become contaminated. Pour the solution into
the bottling pail.
Cooling your Wort / Transferring to Your Fermenter Time to complete: 10 minutes
17. Using your sanitized thermometer, check the temperature of your wort. Further chilling of your wort may be necessary by placing the fermenter in a sink
with ice water depending on the temperature of your top off water.
18. Add wort to fermenter and top off with sanitary water until you reach a volume of 5 gallons. (Wort should be 60°F to 70°F.)
19. Carefully take a sample of the wort using your sanitized hydrometer jar. Allow this to cool to room temperature, and then check the specific gravity, aka
original gravity (OG) of your wort with the hydrometer. Write this number down (between 1.030 and 1.100; target is 1.062). Discard the sample wort, do
not return to the fermenter.
20. Once your wort is below 70°F, add the yeast by tearing open the package and sprinkling it across the surface. It is important that you have high enough
yeast cell count to finish fermenting in the directions below. If a starter is not an option for you then you should double pitch. Snap the lid tightly on the
[email protected] www.brewcraftusa.com All contents copyright of Brewcraft USA, 2014
fermenter. Fill the airlock ½ full with sanitizer solution and insert in the grommet. Put the fermenter in a dark, temperature-stable environment, such as
your basement or a closet.
Monitoring Fermentation
21. During the first 24 to 48 hours of primary fermentation, your wort is in the “lag phase” and it will appear nothing is happening. Don’t worry! Soon your
yeast will start turning sugars into alcohol and Co2, plus other flavor and aroma compounds like esters, phenols and sulfur-based aromatics. Keep the lid
on tight and resist the temptation to open and check it frequently.
22. The next phase your wort will go into is “high krausen” which is peak fermentation characterized by rapid release of Co2 and much foaming on the surface
of the wort. This will last for about three days. Peak fermentation is followed by much slower release of Co2 and a noticeable change to the appearance
of your beer, it will begin to turn clear and the foam on the top will be gone. This should take place on day 4 to day 5.
23. On the fifth day, rack your beer (now called beer because of the fermented sugars which created alcohol) into a secondary fermenter and add Hop
Addition 4 (Dry Hops).
Your Finished Beer
24. Secondary fermentation should be finished on day 9 (if you pitched enough yeast) and your beer should be fully fermented. Higher gravity beers (1.065-
1.100 OG) will require longer secondary fermentation than lighter beers (1.032-1.064 OG). Bubbling in the airlock will slow down to 0-1 bubble per 5
minutes. Carefully check the final gravity with the sanitized hydrometer. Terminal Gravity target is 1.009. The difference between the original gravity (OG)
and the final gravity (FG) will tell you the approximate alcoholic strength of your beer. Your beer will not get any stronger now; no matter how long you
“age” it, fermentation is done.
The alcoholic strength of your beer will be about 1% alcohol per .0075 of gravity drop. For example, a beer with OG=1.060 (-) FG=1.010 (=) gravity drop of
.05 / .0075 = 6.7 % ABV.
Fill in your data here: OG ______ (-) FG ______ (/) .0075 = ______% (approx.) alcohol by volume.
Carbonating and Packaging Your Beer
Your beer is flat (un-carbonated) and the yeast has used up all the fermentable sugars now. To make your beer ready to drink, you will need to carbonate and
package it by one of several methods. One method is to prime your beer with corn sugar and bottle it. Another is to transfer your beer to a keg and force-
carbonate. Your local home brew shop can help you decide which of these processes is right for you. For your convenience, we’ve included a packet of priming
sugar, adequate to carbonate the beer you’ve made from this kit and a separate set of instructions, “Bottling your Brewcraft USA Beer”.
Advancing Your Knowledge and Skills – Brewing Better Beer
Making great beer can be as simple as you have just experienced, or as complex as you want to make it. We strongly recommend you purchase one of the many
good books on home brewing in order to advance your hobby. You will learn many small tips and more complex procedures that will help you take your beer to
even higher levels of greatness. You can also choose to keep brewing great beer, simply, from Brewcraft USA Brewery Series, Premium and Ultimate Beer
Ingredient Kits!
Cheers, Happy Brewing and Drinking!
[email protected] www.brewcraftusa.com All contents copyright of Brewcraft USA, 2014
Bottling your Brewery Series Beer Kit Experience Outstanding Beer™ with Brewcraft USA! These instructions are a basic set of guidelines for bottling your fully fermented Brewcraft Brewery
Series, Premium or Ultimate Beer. Bottle your beer about 14-21 days after brewing or after final gravity is reached and there is no further sign of
fermentation. You will be adding sugar to the beer in the form of Priming Sugar, and the small amount of yeast still remaining in the beer will re-ferment in
the bottle, creating just the right amount of CO2 (carbonation).
Fermenter* with 5 gallons of fermented beer
Bottling/Transfer 6-gallon pail*
No-rinse sanitizer *
Racking Cane and Siphon Assembly*
Bottle Filler*
Bottle Brush*
Hand Capper*
Disposable food-handler’s gloves (optional)
Plastic or glass bowl
1-2 qt. sauce pan
*Such as is provided in a Brewcraft Starter Brewery Equipment Kit
Clean and Sanitize Equipment, Bottles, and Caps
Boil your Priming Sugar
Transfer (Rack) Beer to Bottling Pail
Fill and Cap your Bottles
Rinse and Store your Bottles at Room Temp until ____/____/_______ Chill and Drink!
Getting Started/Set Up: Time to complete: 45-60 minutes
1. Wash and rinse well all your equipment and your bottles and caps. Use the bottle brush to clean the bottles.
2. Mix up 1-2 gallons of no-rinse sanitizer solution in your bottling / transfer 6-gallon pail following the manufacturer’s instructions. Put your Racking Cane
and Siphon Assembly, bottle filler and caps into the solution to soak.
3. Sanitize your bottles: dip each bottle into the sanitizer solution, filling the bottle part-way. Invert the bottle and pour the solution back into the pail. Line
up your sanitized bottles on your counter or work table. This is a no-rinse sanitizer, so it is not necessary to drip-dry or rinse away the solution with water.
Contact time to sanitize is about 1 minute.
Transferring Your Beer: Also known as “racking” your beer. Time to complete: Approximately 30 minutes.
4. Pour approx. 1 qt. of your sanitizer solution into a bowl; discard remaining. Place the caps into the bowl with the sanitizer.
5. Pour the Priming Sugar from your beer kit into the saucepan, add 2 cups of water and boil for 5 minutes. Allow to cool for a few minutes and pour into the
sanitized Bottling/Transfer 6-gallon pail.
6. Place your fermenter with beer in it on a kitchen counter and place the sanitized pail on the floor directly beneath it. Use the Racking Cane/Siphon
Assembly to transfer the beer from the fermenter to the pail without splashing. Take care NOT TO SIPHON THE YEAST SLURRY/SEDIMENT FROM THE
BOTTOM OF THE FERMENTER. There is plenty of yeast in the beer (even if it looks clear) to carbonate your beer in the bottles.
7. Remove the Siphon Assembly from the fermenter when all the beer is transferred, and place both ends in the beer in the lower pail. Set the fermenter
with the remaining yeast sediment aside; discard the yeast sediment and clean your fermenter later. Lift the pail with the beer onto the counter where the
fermenter was previously.
Filling and Capping your Bottles: You may want to recruit a helper for this part Time to complete: Approximately 45 minutes.
8. Attach the Bottle Filler to the tube/outlet end of the Siphon Assembly. The Bottle Filler is designed so that no beer will flow until you touch it to the
bottom inside of the bottle. Prime the siphon.
9. Begin filling bottles by inserting the Bottle Filler all the way to the bottom. As each bottle is filled to the top, lift out the Bottle Filler and start filling the next
bottle. This is where a helper will be very useful! As you fill your bottles, your helper- wearing food handler’s gloves, if desired- can place the caps on the
bottles, and crimp down the caps with the Hand Capper. Continue until all of your beer is bottled.
Finishing Up
10. Clean up your equipment and dry for storage. Rinse your bottles and replace them in the boxes they came in.
11. Put your bottled beer in a warm (68-70degF), dark place for about 2 weeks. This will allow the yeast to metabolize the sugar and create CO2 to carbonate
your beer. Keep away from UV light to preserve the quality and flavor of your beer.
12. After 2 weeks, move your beer to a cool or cold storage area for longer term storage; or chill for drinking. It is now ready to drink, but may continue to
improve over time. Mild and medium strength beers and any hoppy beers are best if drunk while fresh- from 3 to 12 weeks after bottling. Stronger or very
dark beers are sometimes at their best after 12-20 weeks or even longer. Lagers are best if not bottled until 4 weeks after brewing, and allowing to rest for
another 4-6 weeks in the bottle.
Equipment You Will Need on the Day You Bottle:
Process Checklist: Use this checklist to track and record all your bottling steps
Cheers, Happy Brewing and Drinking!