© 2003 Xilinx, Inc. All Rights Reserved Advanced Features.
34
© 2003 Xilinx, Inc. All Rights Reserved Advanced Features
-
Upload
maria-horn -
Category
Documents
-
view
223 -
download
0
Transcript of © 2003 Xilinx, Inc. All Rights Reserved Advanced Features.

© 2003 Xilinx, Inc. All Rights Reserved
Advanced Features

Advanced Features - 8 - 2 © 2003 Xilinx, Inc. All Rights Reserved
After completing this module, you will be able to:
Objectives
• Understand the structure, and the design flow associated with the PicoBlaze Microcontroller
• To know how to re-use IP• Be able to create Parametric Designs• Design using Multiple FPGAs• Switch between Multiple System Generator versions

Advanced Features - 8 - 3 © 2003 Xilinx, Inc. All Rights Reserved
Outline
• Multiple FPGAs• Multiple System Generator Versions • PicoBlaze Microcontroller• User IP Library• Parametric Design Techniques

Advanced Features - 8 - 4 © 2003 Xilinx, Inc. All Rights Reserved
Multiple FPGAs
• May need to break down a design into smaller low-cost components• Use the Resource estimator• Generate the top level of the design
– No Xilinx components and/or System Generator tokens should be present in the top level. Create the subsystems. (Remember the FPGA name is derived from the file name and the name of the subsystem)
• For each subsystem, design as normal– Each subsystem will include GatewayIn, GatewayOut, and the System
Generator token, which will be the master • For each subsystem generation as normal
– Select the System Generator token, select the relevant family, and process as normal

Advanced Features - 8 - 5 © 2003 Xilinx, Inc. All Rights Reserved
Multiple FPGAs
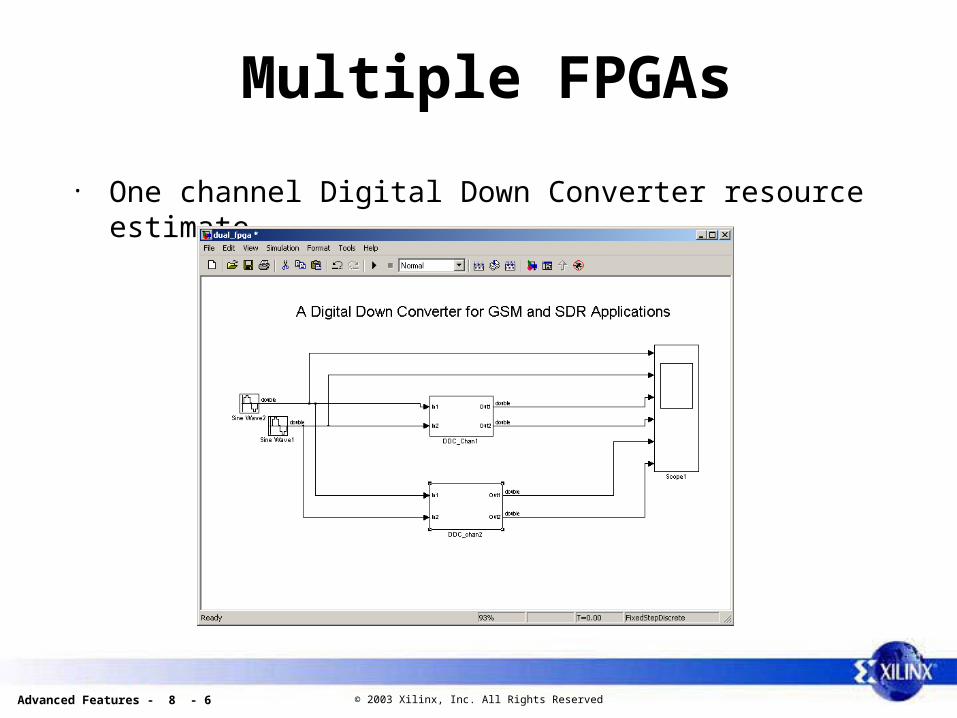
• Example of two channel Digital Down Converter
Advanced Features - 8 - 6 © 2003 Xilinx, Inc. All Rights Reserved
Multiple FPGAs
• One channel Digital Down Converter resource estimate

Advanced Features - 8 - 7 © 2003 Xilinx, Inc. All Rights Reserved
Multiple FPGAs
• One channel Digital Down Converter resource estimate

Advanced Features - 8 - 8 © 2003 Xilinx, Inc. All Rights Reserved
Outline
• Multiple FPGAs • Multiple System Generator Versions • PicoBlaze Microcontroller• User IP Library• Parametric Design Techniques

Advanced Features - 8 - 9 © 2003 Xilinx, Inc. All Rights Reserved
Multiple System Generators
• Having multiple versions of System Generator installed within MATLAB environment and being able to easily switch between the versions are useful
– Allows old projects to be supported and archived– Allows new projects to be created with the new version– Now have the ability to compare results between new versus old versions
of System Generator. Ensuring consistency of results– If issues with the new version come up, don’t have to find and reinstall
older versions of system Generator
Advanced Features - 8 - 10 © 2003 Xilinx, Inc. All Rights Reserved
Multiple System Generators
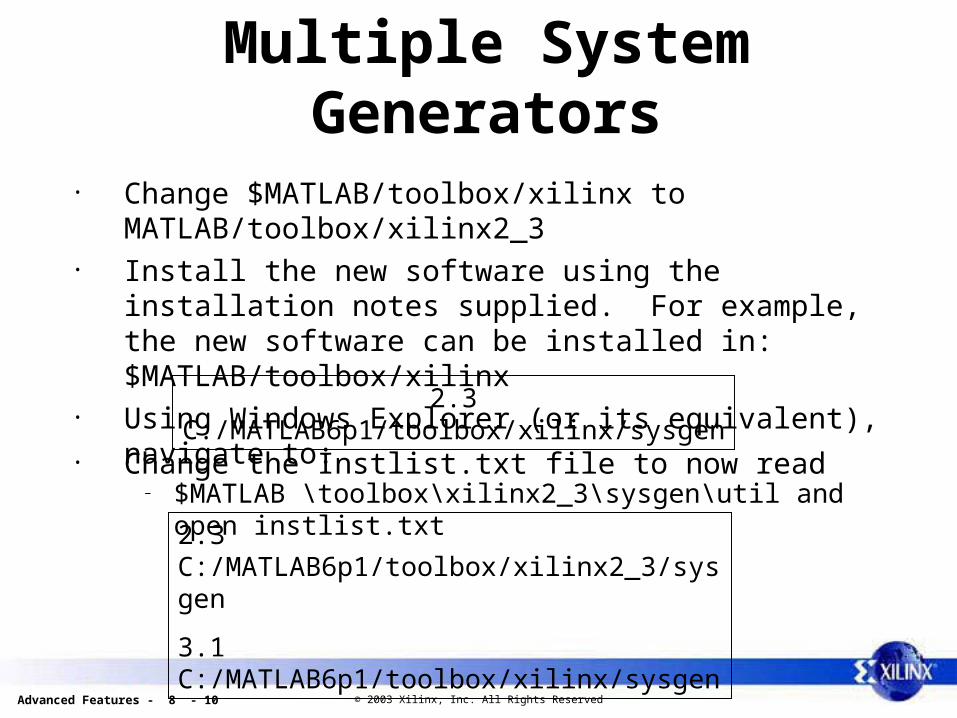
• Change $MATLAB/toolbox/xilinx to MATLAB/toolbox/xilinx2_3 • Install the new software using the installation notes supplied. For
example, the new software can be installed in: $MATLAB/toolbox/xilinx• Using Windows Explorer (or its equivalent), navigate to:
– $MATLAB \toolbox\xilinx2_3\sysgen\util and open instlist.txt
2.3 C:/MATLAB6p1/toolbox/xilinx/sysgen
• Change the Instlist.txt file to now read
2.3 C:/MATLAB6p1/toolbox/xilinx2_3/sysgen
3.1 C:/MATLAB6p1/toolbox/xilinx/sysgen

Advanced Features - 8 - 11 © 2003 Xilinx, Inc. All Rights Reserved
Multiple System Generators
• Navigate to $MATLAB/toolbox/xilinx and open the instlist.txt • Redo the instlist.txt file as per previous slide• Go to the MATLAB command line and use the xlversion command to
determine the present System Generator being used and what versions are available
>>xlversion• This returns the following
Available System Generator installations: Version 3.1 in C:/MATLAB6p1/toolbox/xilinx/sysgen Version 2.3 in C:/MATLAB6p1/toolbox/xilinx2_3/sysgen Current version of System Generator is 2.3."

Advanced Features - 8 - 12 © 2003 Xilinx, Inc. All Rights Reserved
Multiple System Generators
• To use version 3.1 >>xlversion 3.1
• This returns the following ans = 0 • You will get a message to restart MATLAB• Type
>>xlversion 3.1• This will return
ans = 1

Advanced Features - 8 - 13 © 2003 Xilinx, Inc. All Rights Reserved
Outline
• Multiple FPGAs • Multiple System Generator Versions • PicoBlaze Microcontroller• User IP Library• Parametric Design Techniques

Advanced Features - 8 - 14 © 2003 Xilinx, Inc. All Rights Reserved
What is PicoBlaze for FPGAs?
• 8-bit Microcontroller Reference Design– Supports Virtex/Virtex-E, Spartan™-II/E, Virtex-II/Pro devices– Very small size – only 84 Virtex-II slices, 33% of XC2V40– Up to 66 MIPS in Virtex™-II – Everything in FPGA - no external components required– Highly integrated for implementing non-time critical state machine– Predictable fast interrupt response
Advanced Features - 8 - 15 © 2003 Xilinx, Inc. All Rights Reserved
PicoBlaze Application Examples
• Front panel switches and displays for Set Top Box• Dynamic Loop Bandwidth Multiplexer for frame to frame analysis • Link layer of IEEE 1394 Interface• Microcontroller for Compact Flash Programming engine • DECT Radio/Repeater • PCI board programming controller• Communications controller• Preprocessing for network processor• Motor controller• Programmable power supply controller• Part of Media Access Controller• Controller in broadcast video equipmentand many, many more…………………………

Advanced Features - 8 - 16 © 2003 Xilinx, Inc. All Rights Reserved
PicoBlaze Feature Set
• 32 General Purpose 8-Bit Registers • Arithmetic Logic Unit (ALU)
– Performed with operands from any of the registers – Operations include logical, arithmetic, shift and rotate operations
• Flags (Program Flow Control)– ZERO and CARRY flags
• Input/Output – 256 input and 256 output ports (8 bits)– Shift data in and out of the unit
• Interrupt– Single interrupt that can be augmented by logic
• Predictable execution rate– Two clock cycles/instruction

Advanced Features - 8 - 17 © 2003 Xilinx, Inc. All Rights Reserved
PicoBlaze Architecture
Interrupt Control
8OUT_PORT
Program Flow
Control
ZERO & CARRY
Flags
ALU
Interrupt Flag Store
Program Counter
Program Counter
Stack
8
8
8
8
8PORT_IDPort
Address Control
READ_STROBE
WRITE_STROBE
INTERRUPT
10 10ADDRESS
10Operational Control & Instruction Decoding
RESET
CLK
18INSTRUCTION
8
8
8
8IN_PORT
CONSTANT DATA
16 to 32
8-bit Registers
Program ROM/RAM
1024 words
10
ADDRESS

Advanced Features - 8 - 18 © 2003 Xilinx, Inc. All Rights Reserved
Complete PicoBlaze Instruction Set
The following is a complete instruction set representing all op-codes‘X’ and ‘Y’ refer to the definition of the storage registers ‘s’ in the range 0 to 1F‘kk’ represents a constant value in the range 00 to FF‘aa’ represents an address in the range 00 to FF‘pp’ represents a port address in the range 00 to FF
Program Control Group
JUMP aaJUMP Z,aaJUMP NZ,aaJUMP C,aaJUMP NC,aa
CALL aaCALL Z,aaCALL NZ,aaCALL C,aaCALL NC,aa
RETURNRETURN ZRETURN NZRETURN CRETURN NC
Note that call and return supports up to a stack depth of 15.
Logical Group
LOAD sX,kkAND sX,kkOR sX,kkXOR sX,kk
LOAD sX,sYAND sX,sYOR sX,sYXOR sX,sY
Arithmetic Group
ADD sX,kkADDCY sX,kkSUB sX,kkSUBCY sX,kk
ADD sX,sYADDCY sX,sYSUB sX,sYSUBCY sX,sY
Shift and Rotate Group
SR0 sXSR1 sXSRX sXSRA sXRR sX
SL0 sXSL1 sXSLX sXSLA sXRL sX
Input/Output Group
INPUT sX,ppINPUT sX,(sY)
OUTPUT sX,ppOUTPUT sX,(sY)
Interrupt Group
RETURNI ENABLERETURNI DISABLE
ENABLE INTERRUPTDISABLE INTERRUPT

Advanced Features - 8 - 19 © 2003 Xilinx, Inc. All Rights Reserved
PicoBlaze Design Flow
Create a program file
<filename>.PSM
Run the compilerperl('xlpbsmble.pl','-p',’<filename>.psm')
Creates a array m filefill_<filename>_program_store.m
Creates a directory<filename>_psm_results

Advanced Features - 8 - 20 © 2003 Xilinx, Inc. All Rights Reserved
PicoBlaze Results DirectoryOutput Files
• Output files– COE : The initialization contents file for Core Generator Block memory– DAT : Assembler processing files – FMT : Formatted PSM File– PSM : PicoBlaze assembler source file– LOG : Assembler report file– HEX : Hex-decimal ROM Definition file– DEC : Decimal ROM Definition file

Advanced Features - 8 - 21 © 2003 Xilinx, Inc. All Rights Reserved
PicoBlaze Block Diagram
INSTRUCTION[17:0]
ADDRESS[9:0]
CLK
IN_PORT[7:0]
INTERRUPT
RESET
INSTRUCTION[17:0]ADDRESS[9:0]
OUT_PORT[7:0]PORT_ID[7:0]
READ_STROBE
WRITE_STROBE
CLK
PicoBlaze Module
Block Memory
Interface to Logic
Virtex-II FPGA
Interface to Logic

Advanced Features - 8 - 22 © 2003 Xilinx, Inc. All Rights Reserved
Lab 9
Control the pulse width of an output signal using PicoBlaze™ microcontroller• Become familiar with the design flow for PicoBlaze microcontroller
– Create assembler code– Compile the assembler code– Test the code within simulink– Control the pulse width of a output by changing internal register value– Control the output pulse high and lows via accessing external registers
allowing the ability to change the widths

Advanced Features - 8 - 23 © 2003 Xilinx, Inc. All Rights Reserved
Outline
• Multiple FPGAs• Multiple System Generator versions • PicoBlaze Microcontroller• User IP Library• Parametric Design Techniques

Advanced Features - 8 - 24 © 2003 Xilinx, Inc. All Rights Reserved
Why User Library?
• In the real world, designs are more than a few blocks. Have to design complex systems so need to be able to reuse IP blocks
– Can re-use HDL IP by using HDL Co-sim – Would like to re-use IP we have designed in System Generator
• Use the IP across different projects where the requirements could be quite different. Hence the need for flexibility

Advanced Features - 8 - 25 © 2003 Xilinx, Inc. All Rights Reserved
Creating User Library
• Create own custom-made library to contain own IP and include it within the Blockset library
• This means any changes done in the library block will reflect to all references in the same way
• To be used with a Mask subsystem• Steps involved in creating user library:
– Create the design– Select “New” and “Library” in the File Menu– Create the design– Copy the IP into the new library and save. Then the blocks from the library
can be copied into new designs

Advanced Features - 8 - 26 © 2003 Xilinx, Inc. All Rights Reserved
Creating User Library

Advanced Features - 8 - 27 © 2003 Xilinx, Inc. All Rights Reserved
Creating User Library (cont)
Adding Libraries to the Library Browser• Create a new directory<my_library> for user library in a directory either
under $MATLAB/toolbox directory, or user specified directory path• Copy the library file to this new directory• Create an slblocks.m file
– The file defines the Simulink library block representation

Advanced Features - 8 - 28 © 2003 Xilinx, Inc. All Rights Reserved
slblocks.m File
• Use existing slblocks.m as a template. Type which('slblocks.m', '-all') to get examples of the files
• slblocks.m is a function that will be called when the user double-clicks on the icon
– blkStruct.OpenFcn = 'transpose_filters';%get the library mdl file• Define the library list for the Simulink Library browser. Return the name
of the library model and the name for it• Browser(1).Library = 'transpose_library';• Browser(1).Name = 'User Transpose Filters';• Browser(1).IsFlat = 0;% Is this library "flat" (i.e. no subsystems)?• blkStruct.Browser = Browser;

Advanced Features - 8 - 29 © 2003 Xilinx, Inc. All Rights Reserved
Outline
• Multiple FPGAs• Multiple System Generator versions • PicoBlaze Microcontroller• User IP Library• Parametric Design Techniques

Advanced Features - 8 - 30 © 2003 Xilinx, Inc. All Rights Reserved
Why Parametric Designs?
• Using a library block is fine but may need more flexibility on the IP within it
– For example, using the transpose filter building block what happens if we need a 20 tap or a 60 tap filter, or a 5 tap filter
– How can we reduce design time and still have a common IP Block?
• Need the equivalent of the for:loop• In order to answer this question review three useful
commands– get_param– set_param– find_system
Transpose FIRBuilding Block

Advanced Features - 8 - 31 © 2003 Xilinx, Inc. All Rights Reserved
Getting Parameters
GET_PARAM('OBJ','PARAMETER') where 'OBJ' is a system or block path name, returns the value of the specified
parameter
SET_PARAM('OBJ','PARAMETER1',VALUE1,'PARAMETER2',VALUE2,...), where 'OBJ' is a system or block path name, sets the specified parameters to the
specified values
Systems=FIND_SYSTEM('PARAMETER_NAME1',VALUE1,'PARAMETER_NAME2',VALUE2,...)
searches all open systems and returns a cell array containing the full path names in hierarchical order of all systems, subsystems, and blocks, whose specified parameters have the specified values

Advanced Features - 8 - 32 © 2003 Xilinx, Inc. All Rights Reserved
Adding Blocks
ADD_BLOCK('SRC','DEST','PARAMETER1',VALUE1,...) – copies the block with full path name 'SRC' to a new block with full path name 'DEST'
and the named parameters have specified values– Examples
• add_block('xbsBasic_r3/Counter', 'addblock/Counter', 'position', [50, 50, 100, 100]);– Add a counter from the basic sub-blockset to the design window
DELETE_BLOCK does the opposite

Advanced Features - 8 - 33 © 2003 Xilinx, Inc. All Rights Reserved
Adding lines
ADD_LINE('SYS','OPORT','IPORT') – adds a straight line to a system from the specified block output port 'OPORT' to the
specified block input port 'IPORT'– Examples
• add_line('model_name','SRC/1',’DEST/1')– adds a line to the mymodel system connecting the output of the SRC block to the
first input of the DEST block.• add_line('model_name','SRC/1',’DEST/1','autorouting','on')
– adds a line to the model_name system connecting the output of the SRC block to the first input of the DEST block and routes the line around any intervening blocks
DELETE_LINE is the opposite command

Advanced Features - 8 - 34 © 2003 Xilinx, Inc. All Rights Reserved
Lab 10
• Generate a user library to be displayed in the Simulink library• Create a parametric Comb Filter